The 1999 S10 4.3 Obd2 system can be efficiently troubleshooted using CAR-DIAGNOSTIC-TOOL.EDU.VN’s comprehensive diagnostic tools, detailed repair guides, and expert technical support, allowing for precise identification and resolution of issues. This article will delve into the most effective troubleshooting methods, offering solutions for error code analysis, repair procedures, and remote assistance, as well as training to enhance your skills. For superior vehicle maintenance, explore CAR-DIAGNOSTIC-TOOL.EDU.VN for sophisticated tools, extensive repair instructions, expert remote help, and specialized technician education.
Contents
- 1. Understanding the 1999 S10 4.3 OBD2 System
- 1.1 What is OBD2 and How Does it Work?
- 1.2 Key Components of the 1999 S10 4.3 OBD2 System
- 1.3 Common Issues in the 1999 S10 4.3 OBD2 System
- 2. Essential Tools for Troubleshooting
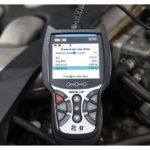
- 2.1 OBD2 Scan Tools: Choosing the Right One
- 2.2 Multimeters and Test Lights
- 2.3 Vacuum Gauges and Fuel Pressure Testers
- 2.4 Diagnostic Software and Apps
- 3. Step-by-Step Guide to Retrieving and Interpreting DTCs
- 3.1 Connecting the Scan Tool to the DLC
- 3.2 Reading and Recording DTCs
- 3.3 Understanding DTC Categories and Structures
- 3.4 Using Online Resources for DTC Definitions
- 4. Diagnosing Common 1999 S10 4.3 OBD2 Codes
- 4.1 P0101 – Mass Air Flow (MAF) Sensor Circuit Range/Performance Problem
- 4.2 P0171 and P0174 – System Too Lean (Bank 1 and Bank 2)
- 4.3 P0300 – Random Misfire Detected
- 4.4 P0420 – Catalyst System Efficiency Below Threshold (Bank 1)
- 4.5 P0440 – Evaporative Emission Control System Malfunction
- 5. Advanced Troubleshooting Techniques
- 5.1 Using Live Data for Real-Time Analysis
- 5.2 Performing Component-Level Testing
- 5.3 Checking Wiring and Connections
- 5.4 Diagnosing Intermittent Problems
- 6. Common Repairs and Maintenance for the 1999 S10 4.3 OBD2 System
- 6.1 Replacing Faulty Sensors
- 6.2 Repairing Vacuum Leaks
- 6.3 Cleaning or Replacing the EGR Valve
- 6.4 Servicing the Ignition System
- 6.5 Maintaining Proper Fuel System Pressure
- 7. Preventive Maintenance Tips for Your 1999 S10 4.3 OBD2 System
- 7.1 Regular Oil Changes
- 7.2 Checking and Replacing Filters
- 7.3 Inspecting and Maintaining Hoses and Belts
- 7.4 Monitoring Fluid Levels
- 7.5 Performing Regular Tune-Ups
- 8. Leveraging CAR-DIAGNOSTIC-TOOL.EDU.VN for Advanced Support
- 8.1 Accessing Detailed Repair Guides and Schematics
- 8.2 Utilizing Remote Diagnostic Support
- 8.3 Participating in Training Programs and Workshops
- 8.4 Engaging with the Online Community Forum
- 9. Case Studies: Successful 1999 S10 4.3 OBD2 Troubleshooting
- 9.1 Case Study 1: Resolving a P0171 Code
- 9.2 Case Study 2: Diagnosing a Misfire Issue (P0300)
- 9.3 Case Study 3: Addressing an Evaporative Emission Control System Malfunction (P0440)
- 10. FAQs About 1999 S10 4.3 OBD2 Troubleshooting
- 10.1 What does the Check Engine Light mean on my 1999 S10 4.3?
- 10.2 How do I reset the Check Engine Light on my 1999 S10 4.3?
- 10.3 What is the best OBD2 scanner for a 1999 S10 4.3?
- 10.4 Where is the OBD2 port located on a 1999 S10 4.3?
- 10.5 Can I diagnose OBD2 problems myself, or do I need a professional?
- 10.6 How often should I scan my 1999 S10 4.3 for OBD2 codes?
- 10.7 What are the most common OBD2 codes for a 1999 S10 4.3?
- 10.8 How can CAR-DIAGNOSTIC-TOOL.EDU.VN help me troubleshoot my 1999 S10 4.3 OBD2 system?
- 10.9 What should I do if I can’t communicate with the PCM?
- 10.10 Are there any recalls for the 1999 S10 4.3 OBD2 system?
1. Understanding the 1999 S10 4.3 OBD2 System
The On-Board Diagnostics II (OBD2) system in your 1999 Chevy S10 4.3L is a critical component for monitoring and maintaining your vehicle’s health. According to the EPA, OBD2 systems were standardized in 1996 to ensure all vehicles meet emissions standards. This system provides a wealth of information, from engine performance to emissions control, helping you diagnose and address potential issues promptly.
1.1 What is OBD2 and How Does it Work?
OBD2 is a standardized system that monitors various vehicle parameters through sensors and electronic control units (ECUs). When a problem is detected, the system stores a Diagnostic Trouble Code (DTC) that can be retrieved using a scan tool. According to a study by the National Institute for Automotive Service Excellence (ASE), understanding OBD2 systems is crucial for accurate diagnostics.
1.2 Key Components of the 1999 S10 4.3 OBD2 System
The key components include:
- Powertrain Control Module (PCM): The main computer that controls engine and transmission functions.
- Oxygen Sensors: Monitor the oxygen levels in the exhaust to ensure optimal air-fuel mixture.
- Mass Airflow (MAF) Sensor: Measures the amount of air entering the engine.
- Throttle Position Sensor (TPS): Detects the throttle valve’s position.
- Diagnostic Link Connector (DLC): The port where you connect a scan tool to retrieve DTCs.
1.3 Common Issues in the 1999 S10 4.3 OBD2 System
Common problems include:
- Faulty Sensors: Oxygen sensors, MAF sensors, and TPS can fail, leading to incorrect readings.
- Vacuum Leaks: Cause the engine to run lean, triggering error codes.
- Ignition System Problems: Misfires due to bad spark plugs, wires, or distributor issues.
- EGR Valve Issues: Problems with the Exhaust Gas Recirculation (EGR) valve can affect emissions and engine performance.
- Catalytic Converter Failure: Can cause emissions issues and trigger a Check Engine Light.
Image of the location of the OBD2 port in a 1999 Chevy S10, under the dashboard
2. Essential Tools for Troubleshooting
Having the right tools is essential for effectively troubleshooting your 1999 S10 4.3 OBD2 system. CAR-DIAGNOSTIC-TOOL.EDU.VN offers a range of tools and resources to help you get the job done right.
2.1 OBD2 Scan Tools: Choosing the Right One
An OBD2 scan tool is your primary diagnostic tool. There are several types available:
- Basic Code Readers: These tools read and clear DTCs.
- Mid-Range Scanners: Offer additional features like live data streaming and freeze frame data.
- Professional-Grade Scanners: Provide advanced capabilities such as bidirectional control and module programming.
Choosing the right scan tool depends on your needs. For basic troubleshooting, a simple code reader may suffice. However, for more in-depth diagnostics, a mid-range or professional-grade scanner is recommended.
2.2 Multimeters and Test Lights
A multimeter is essential for testing electrical circuits and components. You can use it to check voltage, continuity, and resistance. A test light is a simple tool for verifying the presence of voltage in a circuit.
2.3 Vacuum Gauges and Fuel Pressure Testers
A vacuum gauge helps diagnose vacuum leaks, which can cause various engine problems. A fuel pressure tester is used to check the fuel system’s pressure, ensuring the engine receives the correct amount of fuel.
2.4 Diagnostic Software and Apps
Several diagnostic software and apps are available for smartphones and laptops. These tools often provide additional features like enhanced code definitions, repair guides, and access to online databases. Some popular options include Torque Pro, OBD Fusion, and AutoEnginuity.
Image of a mechanic using an OBD2 scanner to diagnose a car issue
3. Step-by-Step Guide to Retrieving and Interpreting DTCs
Retrieving and interpreting Diagnostic Trouble Codes (DTCs) is the first step in diagnosing OBD2 system problems. CAR-DIAGNOSTIC-TOOL.EDU.VN provides detailed guides and support to help you through this process.
3.1 Connecting the Scan Tool to the DLC
- Locate the DLC under the dashboard, usually near the steering column.
- Plug the scan tool into the DLC.
- Turn the ignition key to the “ON” position, but do not start the engine.
- The scan tool should power on and establish a connection with the vehicle’s computer.
3.2 Reading and Recording DTCs
- Use the scan tool’s menu to select the “Read Codes” or “Retrieve Codes” option.
- The scan tool will display any stored DTCs.
- Record each code, along with its description.
- Note the order in which the codes appear, as this can sometimes indicate the root cause of the problem.
3.3 Understanding DTC Categories and Structures
DTCs are typically five-character codes, with each character providing specific information:
- First Character: Indicates the system (P=Powertrain, B=Body, C=Chassis, U=Network).
- Second Character: Indicates whether the code is generic (0) or manufacturer-specific (1).
- Third Character: Indicates the specific subsystem (e.g., 1=Fuel and Air Metering, 2=Fuel and Air Metering – Injector Circuit).
- Fourth and Fifth Characters: Indicate the specific fault within the subsystem.
For example, a code like P0171 indicates a lean condition (Bank 1) in the powertrain system.
3.4 Using Online Resources for DTC Definitions
Several online resources provide detailed definitions and troubleshooting tips for DTCs. Some popular websites include:
- OBD-Codes.com: Offers a comprehensive database of DTC definitions and potential causes.
- AutoCodes.com: Provides detailed information on DTCs, along with repair guides and videos.
- CAR-DIAGNOSTIC-TOOL.EDU.VN: Offers a wealth of resources, including DTC definitions, repair guides, and technical support.
Image of a mechanic holding a paper with DTC codes written on it
4. Diagnosing Common 1999 S10 4.3 OBD2 Codes
Understanding how to diagnose common DTCs is crucial for efficient troubleshooting. CAR-DIAGNOSTIC-TOOL.EDU.VN provides detailed diagnostic procedures for a wide range of codes.
4.1 P0101 – Mass Air Flow (MAF) Sensor Circuit Range/Performance Problem
Symptoms: Poor engine performance, stalling, rough idling, and a Check Engine Light.
Possible Causes:
- Dirty or faulty MAF sensor.
- Vacuum leaks.
- Wiring problems (e.g., damaged wires, loose connections).
Diagnostic Steps:
- Inspect the MAF sensor for dirt or debris. Clean the sensor with a MAF sensor cleaner.
- Check for vacuum leaks using a vacuum gauge or by spraying carburetor cleaner around vacuum lines.
- Test the MAF sensor’s wiring and connections using a multimeter.
- Replace the MAF sensor if necessary.
4.2 P0171 and P0174 – System Too Lean (Bank 1 and Bank 2)
Symptoms: Rough idling, hesitation during acceleration, and a Check Engine Light.
Possible Causes:
- Vacuum leaks.
- Faulty oxygen sensors.
- Clogged fuel filter.
- Weak fuel pump.
- Leaking fuel injectors.
Diagnostic Steps:
- Check for vacuum leaks.
- Test the oxygen sensors using a multimeter or scan tool.
- Check the fuel filter and replace if necessary.
- Test the fuel pump’s pressure and output.
- Inspect the fuel injectors for leaks or clogs.
4.3 P0300 – Random Misfire Detected
Symptoms: Rough idling, engine misfires, and a Check Engine Light.
Possible Causes:
- Faulty spark plugs.
- Damaged spark plug wires.
- Faulty ignition coil.
- Vacuum leaks.
- Low fuel pressure.
Diagnostic Steps:
- Inspect the spark plugs and replace if necessary.
- Check the spark plug wires for damage or wear.
- Test the ignition coil’s output.
- Check for vacuum leaks.
- Test the fuel pressure.
4.4 P0420 – Catalyst System Efficiency Below Threshold (Bank 1)
Symptoms: Reduced fuel economy, poor engine performance, and a Check Engine Light.
Possible Causes:
- Faulty catalytic converter.
- Faulty oxygen sensors.
- Exhaust leaks.
Diagnostic Steps:
- Inspect the catalytic converter for damage or deterioration.
- Test the oxygen sensors before and after the catalytic converter.
- Check for exhaust leaks.
- Replace the catalytic converter if necessary.
4.5 P0440 – Evaporative Emission Control System Malfunction
Symptoms: Fuel odor, reduced fuel economy, and a Check Engine Light.
Possible Causes:
- Faulty gas cap.
- Leaking vacuum lines.
- Faulty purge valve.
- Faulty vent valve.
Diagnostic Steps:
- Inspect the gas cap for damage and ensure it is properly tightened.
- Check the vacuum lines for leaks or damage.
- Test the purge valve and vent valve using a multimeter or scan tool.
- Replace any faulty components.
5. Advanced Troubleshooting Techniques
For more complex issues, advanced troubleshooting techniques may be necessary. CAR-DIAGNOSTIC-TOOL.EDU.VN offers advanced training and resources to help you tackle these challenges.
5.1 Using Live Data for Real-Time Analysis
Live data allows you to monitor sensor readings in real-time. This can be invaluable for diagnosing intermittent problems or identifying subtle variations in sensor performance.
Steps:
- Connect the scan tool to the DLC.
- Select the “Live Data” or “Data Stream” option.
- Choose the sensors you want to monitor (e.g., MAF sensor, oxygen sensors, TPS).
- Observe the sensor readings while the engine is running.
- Look for any অস্বাভাবিক readings or sudden changes that may indicate a problem.
5.2 Performing Component-Level Testing
Component-level testing involves testing individual components to verify their functionality. This can be done using a multimeter, oscilloscope, or specialized testing equipment.
Examples:
- Testing the resistance of a coolant temperature sensor.
- Testing the voltage output of an oxygen sensor.
- Testing the continuity of a wiring harness.
5.3 Checking Wiring and Connections
Wiring problems are a common cause of OBD2 system issues. Inspecting wiring and connections can help you identify damaged wires, loose connections, or corrosion.
Steps:
- Visually inspect the wiring harness for any signs of damage.
- Check the connections for looseness or corrosion.
- Use a multimeter to test the continuity of the wires.
- Repair or replace any damaged wires or connectors.
5.4 Diagnosing Intermittent Problems
Intermittent problems can be challenging to diagnose, as they only occur under certain conditions.
Tips:
- Use a scan tool with data logging capabilities to record sensor readings during a test drive.
- Pay attention to the conditions when the problem occurs (e.g., engine temperature, load, speed).
- Check for loose connections or wiring that may be affected by vibration or temperature changes.
Image of a mechanic inspecting a car’s wiring harness
6. Common Repairs and Maintenance for the 1999 S10 4.3 OBD2 System
Performing regular maintenance and addressing common repairs can help keep your 1999 S10 4.3 OBD2 system in top condition. CAR-DIAGNOSTIC-TOOL.EDU.VN provides detailed repair guides and maintenance schedules.
6.1 Replacing Faulty Sensors
Replacing faulty sensors is a common repair for OBD2 system problems.
Steps:
- Identify the faulty sensor using a scan tool and diagnostic procedures.
- Disconnect the electrical connector from the sensor.
- Remove the sensor from the vehicle.
- Install the new sensor, ensuring it is properly tightened.
- Reconnect the electrical connector.
- Clear the DTCs using a scan tool.
6.2 Repairing Vacuum Leaks
Repairing vacuum leaks can improve engine performance and fuel economy.
Steps:
- Locate the vacuum leak using a vacuum gauge or by spraying carburetor cleaner around vacuum lines.
- Replace any cracked or damaged vacuum lines.
- Tighten any loose connections.
6.3 Cleaning or Replacing the EGR Valve
Cleaning or replacing the EGR valve can address emissions problems and improve engine performance.
Steps:
- Remove the EGR valve from the vehicle.
- Clean the EGR valve with carburetor cleaner.
- Inspect the EGR valve for damage or wear.
- Replace the EGR valve if necessary.
- Reinstall the EGR valve.
6.4 Servicing the Ignition System
Servicing the ignition system can prevent misfires and improve engine performance.
Steps:
- Inspect the spark plugs and replace if necessary.
- Check the spark plug wires for damage or wear.
- Test the ignition coil’s output.
- Replace any faulty components.
6.5 Maintaining Proper Fuel System Pressure
Maintaining proper fuel system pressure ensures the engine receives the correct amount of fuel.
Steps:
- Check the fuel filter and replace if necessary.
- Test the fuel pump’s pressure and output.
- Inspect the fuel injectors for leaks or clogs.
- Replace any faulty components.
Image of a mechanic replacing a spark plug in an engine
7. Preventive Maintenance Tips for Your 1999 S10 4.3 OBD2 System
Preventive maintenance can help you avoid costly repairs and keep your 1999 S10 4.3 OBD2 system running smoothly. CAR-DIAGNOSTIC-TOOL.EDU.VN offers maintenance schedules and tips to help you stay on top of your vehicle’s needs.
7.1 Regular Oil Changes
Regular oil changes are essential for maintaining engine health. Follow the manufacturer’s recommended oil change interval.
7.2 Checking and Replacing Filters
Check and replace the air filter, fuel filter, and cabin air filter according to the manufacturer’s recommendations.
7.3 Inspecting and Maintaining Hoses and Belts
Inspect hoses and belts for cracks, wear, or damage. Replace any worn or damaged components.
7.4 Monitoring Fluid Levels
Regularly check and maintain fluid levels, including coolant, brake fluid, power steering fluid, and transmission fluid.
7.5 Performing Regular Tune-Ups
Perform regular tune-ups, including replacing spark plugs, checking ignition timing, and inspecting the distributor cap and rotor.
8. Leveraging CAR-DIAGNOSTIC-TOOL.EDU.VN for Advanced Support
CAR-DIAGNOSTIC-TOOL.EDU.VN is your go-to resource for advanced support, offering a range of services to help you troubleshoot and repair your 1999 S10 4.3 OBD2 system.
8.1 Accessing Detailed Repair Guides and Schematics
CAR-DIAGNOSTIC-TOOL.EDU.VN provides access to detailed repair guides and schematics, offering step-by-step instructions and visual aids to help you through complex repairs.
8.2 Utilizing Remote Diagnostic Support
CAR-DIAGNOSTIC-TOOL.EDU.VN offers remote diagnostic support, connecting you with experienced technicians who can provide real-time assistance.
8.3 Participating in Training Programs and Workshops
CAR-DIAGNOSTIC-TOOL.EDU.VN offers training programs and workshops to enhance your diagnostic and repair skills.
8.4 Engaging with the Online Community Forum
CAR-DIAGNOSTIC-TOOL.EDU.VN hosts an online community forum where you can connect with other technicians, share tips and advice, and ask questions.
Image of a technician receiving remote diagnostic support on a laptop
9. Case Studies: Successful 1999 S10 4.3 OBD2 Troubleshooting
Real-world examples can provide valuable insights into effective troubleshooting techniques.
9.1 Case Study 1: Resolving a P0171 Code
A 1999 S10 4.3L exhibited a P0171 code (System Too Lean, Bank 1). The technician used a scan tool to read the code and then performed a visual inspection of the vacuum lines. A cracked vacuum line was discovered and replaced. After clearing the code, the vehicle ran smoothly.
9.2 Case Study 2: Diagnosing a Misfire Issue (P0300)
A 1999 S10 4.3L experienced a P0300 code (Random Misfire Detected). The technician inspected the spark plugs and found several were worn. The spark plugs were replaced, and the ignition system was tested. The misfire was resolved, and the engine ran smoothly.
9.3 Case Study 3: Addressing an Evaporative Emission Control System Malfunction (P0440)
A 1999 S10 4.3L exhibited a P0440 code (Evaporative Emission Control System Malfunction). The technician inspected the gas cap and found it was not sealing properly. The gas cap was replaced, and the code was cleared. The evaporative emission system functioned correctly.
10. FAQs About 1999 S10 4.3 OBD2 Troubleshooting
10.1 What does the Check Engine Light mean on my 1999 S10 4.3?
The Check Engine Light indicates that the OBD2 system has detected a problem. Use a scan tool to read the DTCs and diagnose the issue.
10.2 How do I reset the Check Engine Light on my 1999 S10 4.3?
Use a scan tool to clear the DTCs. The Check Engine Light will turn off after the codes are cleared.
10.3 What is the best OBD2 scanner for a 1999 S10 4.3?
The best OBD2 scanner depends on your needs. A basic code reader is sufficient for simple tasks, while a mid-range or professional-grade scanner is recommended for more in-depth diagnostics.
10.4 Where is the OBD2 port located on a 1999 S10 4.3?
The OBD2 port is typically located under the dashboard, near the steering column.
10.5 Can I diagnose OBD2 problems myself, or do I need a professional?
You can diagnose many OBD2 problems yourself with the right tools and resources. However, for complex issues, it’s best to consult a professional technician.
10.6 How often should I scan my 1999 S10 4.3 for OBD2 codes?
Scan your vehicle whenever the Check Engine Light comes on or if you notice any performance issues.
10.7 What are the most common OBD2 codes for a 1999 S10 4.3?
Common codes include P0101 (MAF sensor), P0171/P0174 (lean condition), P0300 (misfire), P0420 (catalyst system), and P0440 (evaporative emission system).
10.8 How can CAR-DIAGNOSTIC-TOOL.EDU.VN help me troubleshoot my 1999 S10 4.3 OBD2 system?
CAR-DIAGNOSTIC-TOOL.EDU.VN offers detailed repair guides, remote diagnostic support, training programs, and an online community forum to help you troubleshoot and repair your vehicle.
10.9 What should I do if I can’t communicate with the PCM?
Check the wiring and connections to the PCM. Also, verify the PCM’s power and ground circuits.
10.10 Are there any recalls for the 1999 S10 4.3 OBD2 system?
Check the National Highway Traffic Safety Administration (NHTSA) website for any recalls related to your vehicle.
Troubleshooting your 1999 S10 4.3 OBD2 system doesn’t have to be a daunting task. With the right tools, knowledge, and support, you can effectively diagnose and resolve a wide range of issues. CAR-DIAGNOSTIC-TOOL.EDU.VN is committed to providing you with the resources and expertise you need to keep your vehicle running smoothly. Don’t let diagnostic challenges slow you down—contact us today via Whatsapp at +1 (641) 206-8880 or visit our office at 1100 Congress Ave, Austin, TX 78701, United States. Our team is ready to assist you with expert advice, detailed repair guides, and remote support to ensure your 1999 S10 4.3 OBD2 system is always in top condition. Whether you need immediate assistance or are looking to enhance your skills through our comprehensive training programs, CAR-DIAGNOSTIC-TOOL.EDU.VN is your trusted partner in automotive diagnostics.