Connecting your OBD2 ELM327 adapter is straightforward, and CAR-DIAGNOSTIC-TOOL.EDU.VN offers comprehensive guides and expert tips to make the process even easier for diagnosing and resolving car issues. We enhance your skills in automotive diagnostics, repair procedures, and remote support by providing advanced technician training.
Contents
- 1. What Is An OBD2 ELM327 Adapter And Why Use It?
- 1.1 What Are The Primary Benefits Of Using An OBD2 ELM327 Adapter?
- 1.2 What Types Of Vehicles Are Compatible With OBD2 ELM327 Adapters?
- 2. Preparing For The Connection Process
- 2.1 What Tools And Software Do I Need?
- 2.2 How To Locate The OBD2 Port In Your Vehicle?
- 2.3 What Are The Common OBD2 Protocols?
- 2.4 How To Determine The Correct IP Address And Port Number For Your Adapter?
- 3. Step-By-Step Guide To Connecting Your OBD2 ELM327 Adapter
- 3.1 How To Physically Connect The Adapter To Your Vehicle?
- 3.2 How To Connect The Adapter Via Wi-Fi?
- 3.3 How To Configure The OBD2 Software To Recognize The Adapter?
- 3.4 What To Do If The Software Fails To Recognize The Adapter?
- 4. Common Issues And Troubleshooting
- 4.1 What Are The Common Connection Problems And Their Solutions?
- 4.2 What If The Adapter Connects But Reads Incorrect Data?
- 4.3 How To Reset Diagnostic Trouble Codes (DTCs)?
- 5. Advanced Tips And Techniques
- 5.1 How To Use Data Logging For In-Depth Analysis?
- 5.2 What Are Custom PIDs And How To Use Them?
1. What Is An OBD2 ELM327 Adapter And Why Use It?
An OBD2 ELM327 adapter is a vital tool used to interface with a vehicle’s On-Board Diagnostics (OBD) system, allowing you to read diagnostic trouble codes (DTCs) and access real-time data to diagnose and fix automotive issues; CAR-DIAGNOSTIC-TOOL.EDU.VN’s resources can help you master the use of this tool.
The OBD2 ELM327 adapter provides access to a wealth of diagnostic information from your vehicle. It transforms complex vehicle data into a format easily understood on a smartphone, tablet, or computer, offering insights into your vehicle’s health and performance. According to a study by the National Institute for Automotive Service Excellence (ASE), using OBD2 scanners can reduce diagnostic time by up to 50%, increasing efficiency and accuracy in auto repairs.
1.1 What Are The Primary Benefits Of Using An OBD2 ELM327 Adapter?
Using an OBD2 ELM327 adapter offers numerous benefits, including quick diagnostics, cost savings, and enhanced vehicle understanding; CAR-DIAGNOSTIC-TOOL.EDU.VN supports these benefits with detailed guidance and expert support.
Here’s a detailed look at the key advantages:
- Early Problem Detection: The adapter allows you to identify potential issues early, preventing minor problems from escalating into major repairs. Regular use can help maintain your vehicle’s optimal condition.
- DIY Diagnostics: With an OBD2 adapter, you can perform diagnostics at home, saving money on professional mechanic fees. This is particularly useful for understanding the nature of a problem before seeking professional help.
- Real-Time Data Monitoring: The adapter provides real-time data on various vehicle parameters, such as engine temperature, speed, and fuel efficiency. This data helps you monitor your vehicle’s performance and make informed driving decisions.
- Enhanced Vehicle Knowledge: Using an OBD2 adapter increases your understanding of how your vehicle operates. This knowledge empowers you to discuss issues more effectively with mechanics and make informed decisions about repairs.
- Cost Savings: By diagnosing and addressing issues early, you can avoid costly repairs down the line. Additionally, performing your own diagnostics saves on labor costs associated with professional services.
1.2 What Types Of Vehicles Are Compatible With OBD2 ELM327 Adapters?
Most vehicles manufactured after 1996 are OBD2 compliant, making them compatible with OBD2 ELM327 adapters; CAR-DIAGNOSTIC-TOOL.EDU.VN offers compatibility guides to help you confirm whether your vehicle is supported.
Here’s a breakdown to help you determine if your vehicle is compatible:
- United States: All cars and light trucks sold in the U.S. since 1996 are required to be OBD2 compliant.
- Europe: Most gasoline vehicles sold in Europe since 2001 and diesel vehicles since 2004 are OBD2 compliant.
- Other Regions: Compatibility varies by region, but generally, vehicles produced after the early to mid-2000s are likely to be OBD2 compliant.
Checking for OBD2 Compliance:
- Check Your Vehicle’s Manual: The easiest way to confirm compatibility is to consult your vehicle’s owner’s manual. It should state whether the vehicle is OBD2 compliant.
- Locate the OBD2 Port: The OBD2 port is typically located under the dashboard on the driver’s side. If you find a 16-pin connector, your vehicle is likely OBD2 compliant.
- Online Compatibility Checkers: Many websites offer OBD2 compatibility checkers where you can enter your vehicle’s make, model, and year to verify.
2. Preparing For The Connection Process
Before connecting your OBD2 ELM327 adapter, ensure you have the necessary tools and information ready for a smooth and successful connection; CAR-DIAGNOSTIC-TOOL.EDU.VN provides detailed checklists and preparation tips to help you get started.
2.1 What Tools And Software Do I Need?
To connect your OBD2 ELM327 adapter, you’ll need the adapter itself, a compatible device (smartphone, tablet, or laptop), and suitable OBD2 software; CAR-DIAGNOSTIC-TOOL.EDU.VN recommends specific software based on compatibility and features.
Here’s a detailed list of the essentials:
- OBD2 ELM327 Adapter: This is the core tool that plugs into your vehicle’s OBD2 port. Ensure it supports the communication protocol of your vehicle.
- Compatible Device:
- Smartphone or Tablet: Most users prefer using a smartphone or tablet for convenience. Ensure your device runs a compatible operating system (iOS, Android).
- Laptop: A laptop running Windows can also be used, providing a larger screen for data analysis.
- OBD2 Software/App:
- Car Scanner: A popular choice for its user-friendly interface and comprehensive features.
- Torque Pro (Android): Known for its extensive customization options and real-time data monitoring.
- OBD Fusion (iOS and Android): Offers advanced diagnostics and reporting capabilities.
- FORScan (Windows): Specifically designed for Ford, Lincoln, and Mercury vehicles, providing in-depth diagnostics.
- Vehicle Owner’s Manual: Keep your vehicle’s manual handy for quick reference on OBD2 port location and vehicle-specific information.
- Stable Wi-Fi Connection: For Wi-Fi enabled adapters, ensure you have a stable Wi-Fi connection for initial setup and software downloads.
- Fully Charged Device: Ensure your smartphone, tablet, or laptop is fully charged to avoid interruptions during the diagnostic process.
2.2 How To Locate The OBD2 Port In Your Vehicle?
The OBD2 port is typically located under the dashboard on the driver’s side, though the exact location can vary slightly; CAR-DIAGNOSTIC-TOOL.EDU.VN provides detailed guides with images to help you find it quickly.
Here are the common locations:
- Under the Dashboard: This is the most common location. Look for the port near the steering column or to the left of the driver’s knee.
- Inside the Glove Box: In some vehicles, the OBD2 port may be located inside the glove box.
- Near the Center Console: Some models have the port located near the center console, often hidden by a small cover.
- Behind a Panel: Occasionally, the port may be behind a small, removable panel.
Tips for Finding the OBD2 Port:
- Consult Your Vehicle’s Manual: The owner’s manual usually provides the exact location of the OBD2 port.
- Use a Flashlight: If the port is in a dimly lit area, use a flashlight to help locate it.
- Look for the 16-Pin Connector: The OBD2 port is a 16-pin connector, so look for a port with this configuration.
2.3 What Are The Common OBD2 Protocols?
Common OBD2 protocols include ISO 9141-2, KWP2000, SAE J1850 PWM, SAE J1850 VPW, and CAN; CAR-DIAGNOSTIC-TOOL.EDU.VN provides detailed explanations of each protocol to ensure compatibility with your vehicle.
Here’s a breakdown of these protocols:
- ISO 9141-2:
- Description: An older protocol used primarily in European and Asian vehicles.
- Characteristics: Features a serial communication interface and is characterized by its two-line communication system, K-line and L-line.
- Vehicles: Used in many European and Asian vehicles manufactured before 2003.
- KWP2000 (ISO 14230):
- Description: A more advanced protocol that replaced ISO 9141-2 in many vehicles.
- Characteristics: Supports faster data transfer rates and more comprehensive diagnostic capabilities.
- Vehicles: Commonly found in European and Asian vehicles from the early 2000s.
- SAE J1850 PWM (Pulse Width Modulation):
- Description: Used primarily by Ford vehicles.
- Characteristics: Employs a variable pulse width to transmit data.
- Vehicles: Found in Ford vehicles manufactured in the late 1990s and early 2000s.
- SAE J1850 VPW (Variable Pulse Width):
- Description: Used primarily by General Motors (GM) vehicles.
- Characteristics: Similar to PWM but uses a different voltage level.
- Vehicles: Found in GM vehicles manufactured in the late 1990s and early 2000s.
- CAN (Controller Area Network):
- Description: The most modern and widely used protocol.
- Characteristics: Offers high-speed communication and advanced diagnostic capabilities.
- Vehicles: Mandated for all vehicles sold in the US from 2008 onwards and widely used in vehicles worldwide.
2.4 How To Determine The Correct IP Address And Port Number For Your Adapter?
The default IP address for most OBD2 ELM327 adapters is 192.168.0.10, and the port number is typically 35000; CAR-DIAGNOSTIC-TOOL.EDU.VN advises checking the adapter’s documentation for accurate settings.
Steps to Determine the Correct IP Address and Port Number:
- Consult the Adapter’s Documentation:
- The most reliable source for this information is the documentation that comes with your OBD2 ELM327 adapter. Look for sections on setup, troubleshooting, or technical specifications.
- Check the Manufacturer’s Website:
- If you no longer have the documentation, visit the manufacturer’s website. Many manufacturers provide detailed product information, including IP address and port number settings, in their support or FAQ sections.
- Use a Network Scanning Tool:
- If the documentation and website don’t provide the necessary information, you can use a network scanning tool to identify the adapter’s IP address. Tools like Angry IP Scanner (free and open source) can scan your Wi-Fi network and list connected devices along with their IP addresses.
3. Step-By-Step Guide To Connecting Your OBD2 ELM327 Adapter
Connecting your OBD2 ELM327 adapter involves several key steps, including physical connection, setting up your device, and configuring the software; CAR-DIAGNOSTIC-TOOL.EDU.VN provides a comprehensive guide to ensure a smooth process.
3.1 How To Physically Connect The Adapter To Your Vehicle?
Physically connecting the adapter involves plugging it into the OBD2 port and ensuring it is securely fitted; CAR-DIAGNOSTIC-TOOL.EDU.VN provides tips for proper installation and troubleshooting connection issues.
Step-by-Step Instructions:
- Locate the OBD2 Port: Refer to your vehicle’s manual or the guidelines mentioned earlier to find the OBD2 port.
- Prepare the Adapter: Ensure the adapter is ready for connection. If it has an on/off switch, make sure it is in the off position before plugging it in.
- Plug in the Adapter: Align the adapter with the OBD2 port and gently push it in. You should feel a secure fit.
- Turn on the Ignition: Turn your vehicle’s ignition to the “ON” position without starting the engine. This provides power to the OBD2 system.
- Power On the Adapter: If your adapter has a power button, switch it on. You should see indicator lights on the adapter, signaling that it is receiving power.
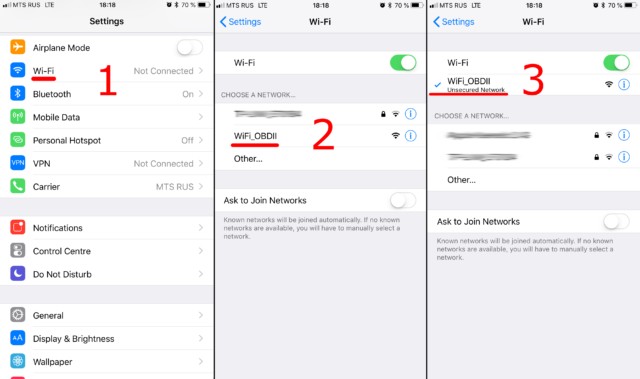
3.2 How To Connect The Adapter Via Wi-Fi?
Connecting via Wi-Fi involves accessing your device’s Wi-Fi settings, selecting the adapter’s network, and entering the correct password if required; CAR-DIAGNOSTIC-TOOL.EDU.VN provides detailed instructions for both iOS and Android devices.
Step-by-Step Guide:
- Turn on the Adapter: Plug the OBD2 ELM327 adapter into your vehicle’s OBD2 port and turn on the ignition. If the adapter has a power button, press it.
- Access Wi-Fi Settings on Your Device:
- iOS: Open the Settings app, then tap on Wi-Fi.
- Android: Open the Settings app, then go to Network & Internet and tap on Wi-Fi.
- Scan for Available Networks: Your device will scan for available Wi-Fi networks.
- Select the Adapter’s Network: Look for a network name that corresponds to your OBD2 adapter. Common names include “OBDII,” “OBD2,” “WIFI_OBDII,” or something similar to your adapter’s brand (e.g., “VLINK” for VGate adapters).
- Connect to the Network: Tap on the adapter’s network name to connect.
- Enter Password (If Required): Most adapters do not require a password, but if prompted, refer to the adapter’s documentation for the default password. Common passwords include “1234,” “0000,” or “password.”
3.3 How To Configure The OBD2 Software To Recognize The Adapter?
Configuring the software involves selecting the correct connection type (Wi-Fi), entering the IP address and port number, and testing the connection; CAR-DIAGNOSTIC-TOOL.EDU.VN provides screenshots and step-by-step instructions for popular OBD2 apps.
General Steps for Configuring OBD2 Software:
- Open the OBD2 App: Launch your chosen OBD2 app on your device.
- Access Settings or Configuration: Look for a settings or configuration menu within the app. This is often represented by a gear icon or a menu button.
- Select Connection Type: Choose “Wi-Fi” as the connection type.
- Enter IP Address and Port Number: Enter the IP address and port number for your adapter. The default IP address is often 192.168.0.10, and the default port number is 35000. Refer to your adapter’s documentation for the correct settings if these defaults do not work.
- Test the Connection: Many apps have a “Test Connection” or “Connect” button. Tap this to verify that the app can communicate with the adapter.
- Save Settings: Save the configuration settings within the app.
 Connecting to Wi-Fi through an iOS device for OBD2 diagnostics
3.4 What To Do If The Software Fails To Recognize The Adapter?
If the software fails to recognize the adapter, check the Wi-Fi connection, verify the IP address and port number, and ensure the adapter is properly powered; CAR-DIAGNOSTIC-TOOL.EDU.VN offers troubleshooting tips and expert support to resolve connection issues.
Troubleshooting Steps:
- Verify Wi-Fi Connection: Ensure your device is connected to the adapter’s Wi-Fi network.
- Check Adapter Power: Make sure the adapter is properly plugged into the OBD2 port and has power. Look for indicator lights on the adapter.
- Confirm IP Address and Port Number: Double-check the IP address and port number in the OBD2 app settings. Ensure they match the settings specified in the adapter’s documentation.
- Restart the Adapter and App: Try turning off the adapter (if it has a power switch), closing the OBD2 app, and then restarting both.
- Check for Interference: Sometimes, other devices can interfere with the Wi-Fi signal. Try moving away from potential sources of interference, such as microwaves or other electronic devices.
- Update the App: Ensure you are using the latest version of the OBD2 app. Updates often include bug fixes and improved compatibility.
- Test on Another Device: If possible, try connecting the adapter to another smartphone, tablet, or laptop to rule out issues with your primary device.
- Check Adapter Compatibility: Verify that the adapter is compatible with your vehicle and the OBD2 app. Some adapters may not support all vehicles or apps.
- Consult the Adapter’s Documentation: Refer to the adapter’s documentation for specific troubleshooting steps.
- Contact Support: If you have tried all the above steps and the adapter still fails to connect, contact the adapter manufacturer’s support team for assistance.
4. Common Issues And Troubleshooting
Even with careful setup, you might encounter issues while connecting your OBD2 ELM327 adapter; CAR-DIAGNOSTIC-TOOL.EDU.VN provides solutions to common problems to keep you on track.
4.1 What Are The Common Connection Problems And Their Solutions?
Common connection problems include incorrect Wi-Fi settings, incorrect IP address or port number, and adapter incompatibility; CAR-DIAGNOSTIC-TOOL.EDU.VN provides detailed troubleshooting steps for each issue.
1. Incorrect Wi-Fi Settings:
- Problem: The device is not connected to the adapter’s Wi-Fi network, or the Wi-Fi connection is unstable.
- Solutions:
- Verify Wi-Fi Connection: Ensure your device is connected to the correct Wi-Fi network broadcast by the OBD2 adapter.
- Forget and Reconnect: On your device, forget the Wi-Fi network and reconnect to it.
- Check Wi-Fi Signal Strength: Ensure the Wi-Fi signal strength is adequate. Move closer to the adapter if necessary.
- Tools: Wi-Fi Analyzer apps (available for Android and iOS) can help you assess Wi-Fi signal strength.
2. Incorrect IP Address or Port Number:
- Problem: The OBD2 app is configured with the wrong IP address or port number for the adapter.
- Solutions:
- Verify Settings: Double-check the IP address and port number in the OBD2 app settings.
- Consult Documentation: Refer to the adapter’s documentation or the manufacturer’s website for the correct settings.
- Default Settings: Try the default settings (IP address: 192.168.0.10, port number: 35000) if you are unsure.
- Example: According to ELM327 adapter manuals, the default IP address is typically 192.168.0.10, and the port number is 35000.
3. Adapter Incompatibility:
- Problem: The adapter is not compatible with the vehicle or the OBD2 app.
- Solutions:
- Check Compatibility Lists: Consult the adapter’s documentation or the manufacturer’s website for a list of compatible vehicles and OBD2 apps.
- Update Firmware: Check if there are firmware updates available for the adapter.
- Try a Different Adapter: If possible, try a different OBD2 adapter to rule out compatibility issues.
- Research: A study by the Society of Automotive Engineers (SAE) highlights the importance of using compatible diagnostic tools to ensure accurate data and prevent communication errors.
4. Adapter Not Powered On:
- Problem: The adapter is not receiving power from the vehicle’s OBD2 port.
- Solutions:
- Check Connection: Ensure the adapter is securely plugged into the OBD2 port.
- Inspect OBD2 Port: Check the OBD2 port for any damage or debris that may be preventing a good connection.
- Verify Ignition: Make sure the vehicle’s ignition is turned to the “ON” position (without starting the engine) to provide power to the OBD2 system.
- Adapter Power Button: If the adapter has a power button, ensure it is switched on.
- Practical Tip: Use a voltmeter to check if the OBD2 port is providing power (12V).
5. Software Issues:
- Problem: The OBD2 app is outdated, has bugs, or is not properly configured.
- Solutions:
- Update App: Ensure you are using the latest version of the OBD2 app.
- Restart App: Close and restart the app to refresh its settings and processes.
- Reinstall App: If the issue persists, try uninstalling and reinstalling the app.
- Check App Permissions: Ensure the app has the necessary permissions (e.g., Wi-Fi access) on your device.
- Testing: Beta test programs often release updates that fix bugs and improve app stability.
6. Interference from Other Devices:
- Problem: Other electronic devices are interfering with the Wi-Fi signal.
- Solutions:
- Move Away from Interference Sources: Move away from potential sources of interference, such as microwaves, Bluetooth devices, and other electronic equipment.
- Use a Different Wi-Fi Channel: Some routers allow you to change the Wi-Fi channel. Experiment with different channels to find one that is less congested.
- Background: A study by the IEEE on wireless communication notes that interference can significantly degrade Wi-Fi performance.
7. Adapter Firmware Issues:
- Problem: The adapter’s firmware is outdated or corrupted.
- Solutions:
- Check for Updates: Check the adapter manufacturer’s website for firmware updates.
- Follow Update Instructions: Follow the manufacturer’s instructions carefully to update the firmware.
- Contact Support: If the update process fails or the adapter becomes unresponsive, contact the manufacturer’s support team for assistance.
- Safety: Always follow the manufacturer’s instructions when updating firmware to avoid bricking the device.
4.2 What If The Adapter Connects But Reads Incorrect Data?
If the adapter connects but reads incorrect data, verify the vehicle profile settings, check for firmware updates, and ensure the adapter is compatible with your vehicle’s OBD2 protocol; CAR-DIAGNOSTIC-TOOL.EDU.VN provides detailed guidance on data accuracy and validation.
Detailed Solutions:
-
Verify Vehicle Profile Settings:
- Problem: The OBD2 app may be using incorrect settings for your vehicle, leading to misinterpretation of data.
- Solutions:
- Check Vehicle Profile: Ensure that the vehicle profile in your OBD2 app is correctly set up with the correct make, model, year, and engine type.
- Manual Configuration: Manually configure the vehicle profile if automatic detection is not accurate.
- Reference: According to the National Institute for Automotive Service Excellence (ASE), accurate vehicle profile settings are crucial for correct data interpretation.
-
Check for Firmware Updates:
- Problem: Outdated or buggy firmware on the OBD2 adapter can lead to incorrect data readings.
- Solutions:
- Visit Manufacturer’s Website: Check the adapter manufacturer’s website for firmware updates.
- Follow Update Instructions: Carefully follow the instructions provided by the manufacturer to update the firmware.
- Tip: Regularly updating firmware ensures that the adapter has the latest bug fixes and improvements.
-
Ensure Adapter Compatibility with OBD2 Protocol:
- Problem: The adapter may not fully support the OBD2 protocol used by your vehicle.
- Solutions:
- Check Protocol Support: Verify that the adapter supports the OBD2 protocol (e.g., CAN, ISO 9141-2, KWP2000, SAE J1850 PWM, SAE J1850 VPW) used by your vehicle.
- Vehicle Manual: Consult your vehicle’s manual for information on the OBD2 protocol it uses.
- Use Compatible Adapter: If the adapter is not fully compatible, consider using an adapter that specifically supports your vehicle’s protocol.
- Study: The Society of Automotive Engineers (SAE) provides detailed standards for OBD2 protocols, ensuring compatibility and accurate data transmission.
-
Check Sensor Data Accuracy:
- Problem: The sensors in your vehicle may be faulty, leading to incorrect data being transmitted to the OBD2 system.
- Solutions:
- Compare with Known Values: Compare the sensor data with known good values for your vehicle.
- Use a Multimeter: Use a multimeter to check the sensor outputs directly.
- Replace Faulty Sensors: If a sensor is found to be faulty, replace it with a new one.
- Recommendation: Regular sensor checks can help identify and address issues before they lead to more significant problems.
-
Inspect Wiring and Connections:
- Problem: Damaged or loose wiring can cause incorrect data readings.
- Solutions:
- Visual Inspection: Visually inspect the wiring and connections to the sensors and the OBD2 port for any signs of damage or corrosion.
- Secure Connections: Ensure that all connections are secure and properly seated.
- Repair or Replace Wiring: Repair or replace any damaged wiring.
- Best Practice: Properly maintained wiring ensures reliable data transmission and accurate diagnostics.
-
Rule Out Software Glitches:
- Problem: The OBD2 app may have glitches or bugs that cause it to misinterpret data.
- Solutions:
- Restart App: Close and restart the OBD2 app.
- Update App: Ensure you are using the latest version of the app.
- Reinstall App: If the issue persists, try uninstalling and reinstalling the app.
- Use a Different App: Test with a different OBD2 app to see if the problem is specific to the app you are using.
- Testing: Beta testing programs often release updates that fix bugs and improve app stability.
-
Check for Electrical Interference:
- Problem: Electrical interference can disrupt the data signals, leading to incorrect readings.
- Solutions:
- Shielded Cables: Use shielded cables for sensors and connections to minimize interference.
- Route Cables Properly: Ensure that cables are routed away from potential sources of interference, such as high-voltage wires.
- Grounding: Ensure that all components are properly grounded to minimize electrical noise.
- Background: A study by the IEEE on electromagnetic compatibility highlights the importance of minimizing electrical interference in automotive systems.
-
Verify ECU Calibration:
- Problem: The Engine Control Unit (ECU) may have incorrect calibration settings, leading to inaccurate data.
- Solutions:
- Check Calibration: Verify that the ECU calibration is correct for your vehicle.
- Reflash ECU: If necessary, reflash the ECU with the correct calibration using appropriate software and tools.
- Caution: Reflashing the ECU should be done by a qualified technician, as incorrect procedures can damage the ECU.
-
Monitor Data in Real-Time:
- Problem: Intermittent issues may be difficult to diagnose without real-time monitoring.
- Solutions:
- Use Real-Time Monitoring: Use the real-time data monitoring feature in your OBD2 app to observe the sensor readings while the vehicle is running.
- Record Data: Record the data for later analysis to identify patterns or anomalies.
- Tip: Real-time monitoring can help pinpoint the exact conditions under which the incorrect data readings occur.
-
Consult a Professional:
- Problem: If you are unable to resolve the issue on your own, it may be necessary to consult a professional mechanic.
- Solutions:
- Seek Expert Help: Take your vehicle to a qualified mechanic who has experience with OBD2 diagnostics.
- Provide Information: Provide the mechanic with detailed information about the issue, including the steps you have already taken to troubleshoot it.
- Value: Professional mechanics have advanced tools and expertise to diagnose and repair complex automotive issues.
4.3 How To Reset Diagnostic Trouble Codes (DTCs)?
Resetting DTCs involves using the OBD2 software to clear the codes after addressing the underlying issues; CAR-DIAGNOSTIC-TOOL.EDU.VN provides step-by-step instructions and precautions for resetting codes safely.
Step-by-Step Guide:
-
Connect the OBD2 Adapter:
- Plug the OBD2 ELM327 adapter into your vehicle’s OBD2 port.
- Turn the ignition to the “ON” position without starting the engine.
- Ensure the adapter is properly connected and communicating with your device (smartphone, tablet, or laptop).
- Note: Confirm that the adapter is powered on and connected to your device via Wi-Fi.
-
Open the OBD2 App:
- Launch the OBD2 app on your device.
- Ensure that the app is connected to the OBD2 adapter.
- Tip: Verify the connection by checking for real-time data from the vehicle’s sensors.
-
Read Diagnostic Trouble Codes (DTCs):
- Navigate to the section of the app that reads diagnostic codes.
- Allow the app to scan for and display any stored DTCs.
- Note: Record the codes and their descriptions for your reference. This information can be useful for future troubleshooting.
-
Address the Underlying Issues:
- Before resetting the DTCs, identify and fix the problems that triggered the codes.
- Examples:
- If the code indicates a faulty oxygen sensor, replace the sensor.
- If the code indicates a loose gas cap, tighten or replace the gas cap.
- Warning: Resetting DTCs without fixing the underlying issues will only cause the codes to reappear.
-
Clear the DTCs:
- In the OBD2 app, find the option to clear or reset the diagnostic codes. This is often labeled as “Clear Codes,” “Reset DTCs,” or similar.
- Select the option to clear the codes.
- Note: The app may ask you to confirm the action. Follow the prompts to proceed.
-
Verify the Reset:
- After clearing the codes, allow the app to rescan for DTCs to ensure that the codes have been successfully cleared.
- Check: Verify that no new codes appear immediately after the reset.
-
Test Drive the Vehicle:
- Take the vehicle for a test drive under various driving conditions.
- Monitor the vehicle’s performance and check for any warning lights or unusual behavior.
- Tip: Drive the vehicle in conditions similar to those that triggered the original code.
-
Recheck for DTCs:
- After the test drive, use the OBD2 app to rescan for DTCs.
- Confirm: Ensure that the original codes have not reappeared.
- Troubleshoot: If the codes reappear, further diagnosis and repair may be necessary.
-
Document the Process:
- Keep a record of the DTCs, the repairs performed, and the dates of the reset and subsequent checks.
- Importance: This documentation can be valuable for tracking the vehicle’s maintenance history and identifying recurring issues.
-
Safety and Precautions:
- Battery Voltage: Ensure that the vehicle’s battery voltage is stable before clearing the codes. Low voltage can sometimes cause issues during the reset process.
- Engine Off: Always clear the codes with the engine off but the ignition in the “ON” position.
- Readiness Monitors: Be aware that clearing the codes will also reset the vehicle’s readiness monitors. It may take some time and driving for these monitors to reset, which can affect emissions testing.
- Professional Advice: If you are unsure about any part of the process, consult a qualified mechanic.
5. Advanced Tips And Techniques
Enhance your skills with advanced tips and techniques for using the OBD2 ELM327 adapter, including data logging and custom PIDs; CAR-DIAGNOSTIC-TOOL.EDU.VN provides training on advanced diagnostic procedures.
5.1 How To Use Data Logging For In-Depth Analysis?
Data logging involves recording real-time data from your vehicle over a period, allowing you to analyze performance trends and diagnose intermittent issues; CAR-DIAGNOSTIC-TOOL.EDU.VN offers detailed guides on setting up and interpreting data logs.
Step-by-Step Guide:
-
Choose a Compatible OBD2 App:
- Select an OBD2 app that supports data logging. Popular choices include Torque Pro (Android), OBD Fusion (iOS and Android), and Car Scanner.
- Ensure the app is compatible with your OBD2 ELM327 adapter.
- Recommendation: Check user reviews and ratings to ensure the app is reliable and provides the features you need.
-
Connect to Your Vehicle:
- Plug the OBD2 ELM327 adapter into your vehicle’s OBD2 port.
- Turn the ignition to the “ON” position without starting the engine.
- Connect your device (smartphone, tablet, or laptop) to the adapter via Wi-Fi.
- Note: Verify the connection by checking for real-time data from the vehicle’s sensors.
-
Configure Data Logging Settings:
- Open the OBD2 app and navigate to the data logging settings.
- Select the parameters you want to log.
- Examples: Engine RPM, vehicle speed, engine load, coolant temperature, fuel trim, oxygen sensor voltage.
- Set the logging frequency (sample rate).
- Tip: A higher frequency provides more detailed data but also creates larger log files. A rate of 1-5 samples per second is usually sufficient.
- Choose a location to save the log files.
- Note: Ensure that your device has enough storage space for the log files.
-
Start Data Logging:
- Start the data logging session in the OBD2 app.
- Drive the vehicle under the conditions you want to analyze.
- Examples: Normal driving, highway driving, acceleration, deceleration.
- Monitor the data logging process to ensure that the app is recording data correctly.
-
Stop Data Logging:
- Stop the data logging session in the OBD2 app when you have collected enough data.
- Save the log file.
-
Analyze the Log Data:
- Transfer the log file to a computer for analysis.
- Open the log file in a spreadsheet program (e.g., Microsoft Excel, Google Sheets) or a dedicated data analysis tool.
- Spreadsheet Programs:
- Import Data: Import the log file into the spreadsheet program.
- Create Charts: Create charts and graphs to visualize the data.
- Analyze Trends: Look for trends, patterns, and anomalies in the data.
- Dedicated Data Analysis Tools:
- Use Specialized Software: Use specialized data analysis software designed for automotive diagnostics.
- Advanced Features: These tools often provide advanced features such as data filtering, smoothing, and statistical analysis.
-
Interpret the Results:
- Use the data analysis to diagnose issues or evaluate performance.
- Examples:
- Engine Performance: Analyze engine RPM, load, and fuel trim data to evaluate engine performance.
- Fuel Efficiency: Analyze fuel consumption data to identify ways to improve fuel efficiency.
- Sensor Issues: Identify sensor issues by looking for erratic or out-of-range sensor readings.
- Tip: Compare the data with known good values for your vehicle to identify deviations.
5.2 What Are Custom PIDs And How To Use Them?
Custom PIDs allow you to access vehicle-specific data not available through standard OBD