Are you looking to build your own OBD2 diagnostic tool for your LT1 engine? At CAR-DIAGNOSTIC-TOOL.EDU.VN, we provide the expertise and resources you need, offering detailed guides, high-quality components, and expert support to empower you in creating a custom diagnostic setup. Explore our range of training programs and remote assistance options to further enhance your skills and ensure you’re equipped for any diagnostic challenge.
Contents
- 1. What is a DIY OBD2 Port for an LT1 Engine?
- 2. Why Build a DIY OBD2 Port for an LT1?
- 3. What are the Essential Parts for a DIY OBD2 Port LT1?
- 4. How Do I Assemble the Fuse Block for My DIY OBD2 Port LT1?
- 5. What are the Wiring Steps for a DIY OBD2 Diagnostic Port LT1?
- 6. How Do I Wire the Check Engine Light (MIL) for My DIY OBD2 Port?
- 7. What are the Common Issues When Building a DIY OBD2 Port LT1?
- 8. How Can CAR-DIAGNOSTIC-TOOL.EDU.VN Help Me Build My DIY OBD2 Port LT1?
- 9. What Diagnostic Tools are Compatible with My DIY OBD2 Port LT1?
- 10. How Do I Troubleshoot Common OBD2 Error Codes with My DIY Port?
- 11. What are the Benefits of Using a Premade Fuse Block for My LT1?
- 12. How Does the 1995 LT1 OBD2 Port Differ from Other Models?
- 13. What are the Safety Precautions for Building a DIY OBD2 Port?
- 14. How Do I Ensure My DIY OBD2 Port is Compliant with OBD2 Standards?
- 15. What are the Alternatives to Building a DIY OBD2 Port LT1?
- 16. How Can I Use My DIY OBD2 Port for Real-Time Data Monitoring?
- 17. What is the Role of the PCM in the OBD2 System?
- 18. How Can I Stay Updated on the Latest OBD2 Technologies and Standards?
- 19. How Do I Test the Continuity of Wires in My DIY OBD2 Port?
- 20. What are the Key Differences Between OBD1 and OBD2 Systems?
- 21. How Can I Build a Custom Diagnostic Tool Using Arduino and My DIY OBD2 Port?
- 22. What are the Legal and Ethical Considerations When Using a DIY OBD2 Port?
- 23. How Do I Properly Ground My DIY OBD2 Port to Prevent Electrical Noise?
- 24. What are the Best Practices for Storing and Protecting My DIY OBD2 Port?
- 25. How Can I Integrate My DIY OBD2 Port with a Head-Up Display (HUD)?
- 26. How Do I Clear Diagnostic Trouble Codes (DTCs) Using My DIY OBD2 Port?
- 27. What Are the Best Resources for Learning More About OBD2 Diagnostics?
- 28. How Can I Use My DIY OBD2 Port to Improve My Vehicle’s Performance?
- 29. What Are the Latest Innovations in OBD2 Technology?
- 30. How Can I Get Certified in Automotive Diagnostics?
- 31. What Are the Key Considerations When Selecting Wires and Connectors for My DIY OBD2 Port?
- 32. How Can I Use My DIY OBD2 Port for Emission Testing?
- 33. What Are the Best Practices for Documenting My DIY OBD2 Port Project?
- 34. How Can I Use My DIY OBD2 Port to Diagnose Transmission Problems?
- 35. What Are the Common Mistakes to Avoid When Building a DIY OBD2 Port?
- 36. How Can I Use My DIY OBD2 Port to Monitor Fuel Efficiency?
- 37. What Are the Tools and Equipment Recommended for Building a DIY OBD2 Port?
- 38. How Can I Use My DIY OBD2 Port to Diagnose ABS (Anti-Lock Braking System) Problems?
1. What is a DIY OBD2 Port for an LT1 Engine?
A DIY OBD2 (On-Board Diagnostics II) port for an LT1 engine involves creating your own diagnostic interface to read engine data and troubleshoot issues. This is a cost-effective solution for automotive enthusiasts and technicians who prefer a hands-on approach to vehicle diagnostics. According to a study by the University of California, Berkeley, DIY automotive solutions can save up to 40% in diagnostic costs.
- Components: The process involves assembling components such as an OBD2 port connector, terminals, a fuse block, and relays.
- Functionality: The goal is to create a functional port that allows you to connect diagnostic tools and retrieve vital engine information.
2. Why Build a DIY OBD2 Port for an LT1?
Building a DIY OBD2 port offers several advantages, making it a worthwhile project for those inclined to understand and maintain their vehicles. A survey conducted by the American Automobile Association (AAA) found that vehicle owners who perform regular maintenance are less likely to experience major breakdowns.
- Cost Savings: Constructing your own port can be significantly cheaper than purchasing a pre-made diagnostic tool.
- Customization: You have the freedom to tailor the setup to your specific needs, adding features or modifications as desired.
- Educational Value: The process provides a deeper understanding of vehicle diagnostics and electrical systems.
3. What are the Essential Parts for a DIY OBD2 Port LT1?
To embark on this project, you’ll need specific parts to ensure compatibility and functionality with your LT1 engine. Securing the correct components is paramount.
| Part | Vendor | Part # | Quantity Needed |
|---|---|---|---|
| OBD2 Port Plastic Connector, 16 Pin | www.mouser.com | 829-12110250 | 1 |
| Terminals – for OBD2 port | www.mouser.com | 829-12129373 | 4 |
| Terminal Lock – secures terminals | www.mouser.com | 829-12160437 | 2 |
| Lamp (for check engine light) | www.allelectronics.com | check lamps/indicators, inventory changes | As Needed |
| Fuse Block Housing kit (terminals included) | www.rockauto.com | 85668 | 1 |
| Relay Socket | www.allelectronics.com | SRLY-2 | 2 |
| Relay 30 Amp | www.allelectronics.com | RLY-351 | 2 |
| Relay Terminal 14-18 AWG | www.mouser.com | 571-42238-2 | 8 |
- OBD2 Port Connector: A 16-pin connector is essential for interfacing with the vehicle’s diagnostic system.
- Terminals: These connect the wires to the OBD2 port, ensuring a secure electrical connection.
- Fuse Block and Relays: These protect the circuit and control the power flow to various components.
4. How Do I Assemble the Fuse Block for My DIY OBD2 Port LT1?
Assembling the fuse block is a crucial step in building your DIY OBD2 port. Proper assembly ensures that the electrical components are protected and function correctly. According to research from the National Institute for Automotive Service Excellence (ASE), a well-constructed fuse block is essential for preventing electrical failures.
- Prepare the Relay Sockets: Remove the short wires from the relay sockets and replace them with terminals suitable for the current needs of the fuse block.
- Connect Terminals: Crimp and solder heavy gauge wires to the terminals, ensuring a secure connection.
- Install Terminals: Install the terminals into the relay output leg and the bussed fuse terminals into the block.
- Connect Power: Connect the red wire from the relay input terminal to the positive 12V+ battery source.
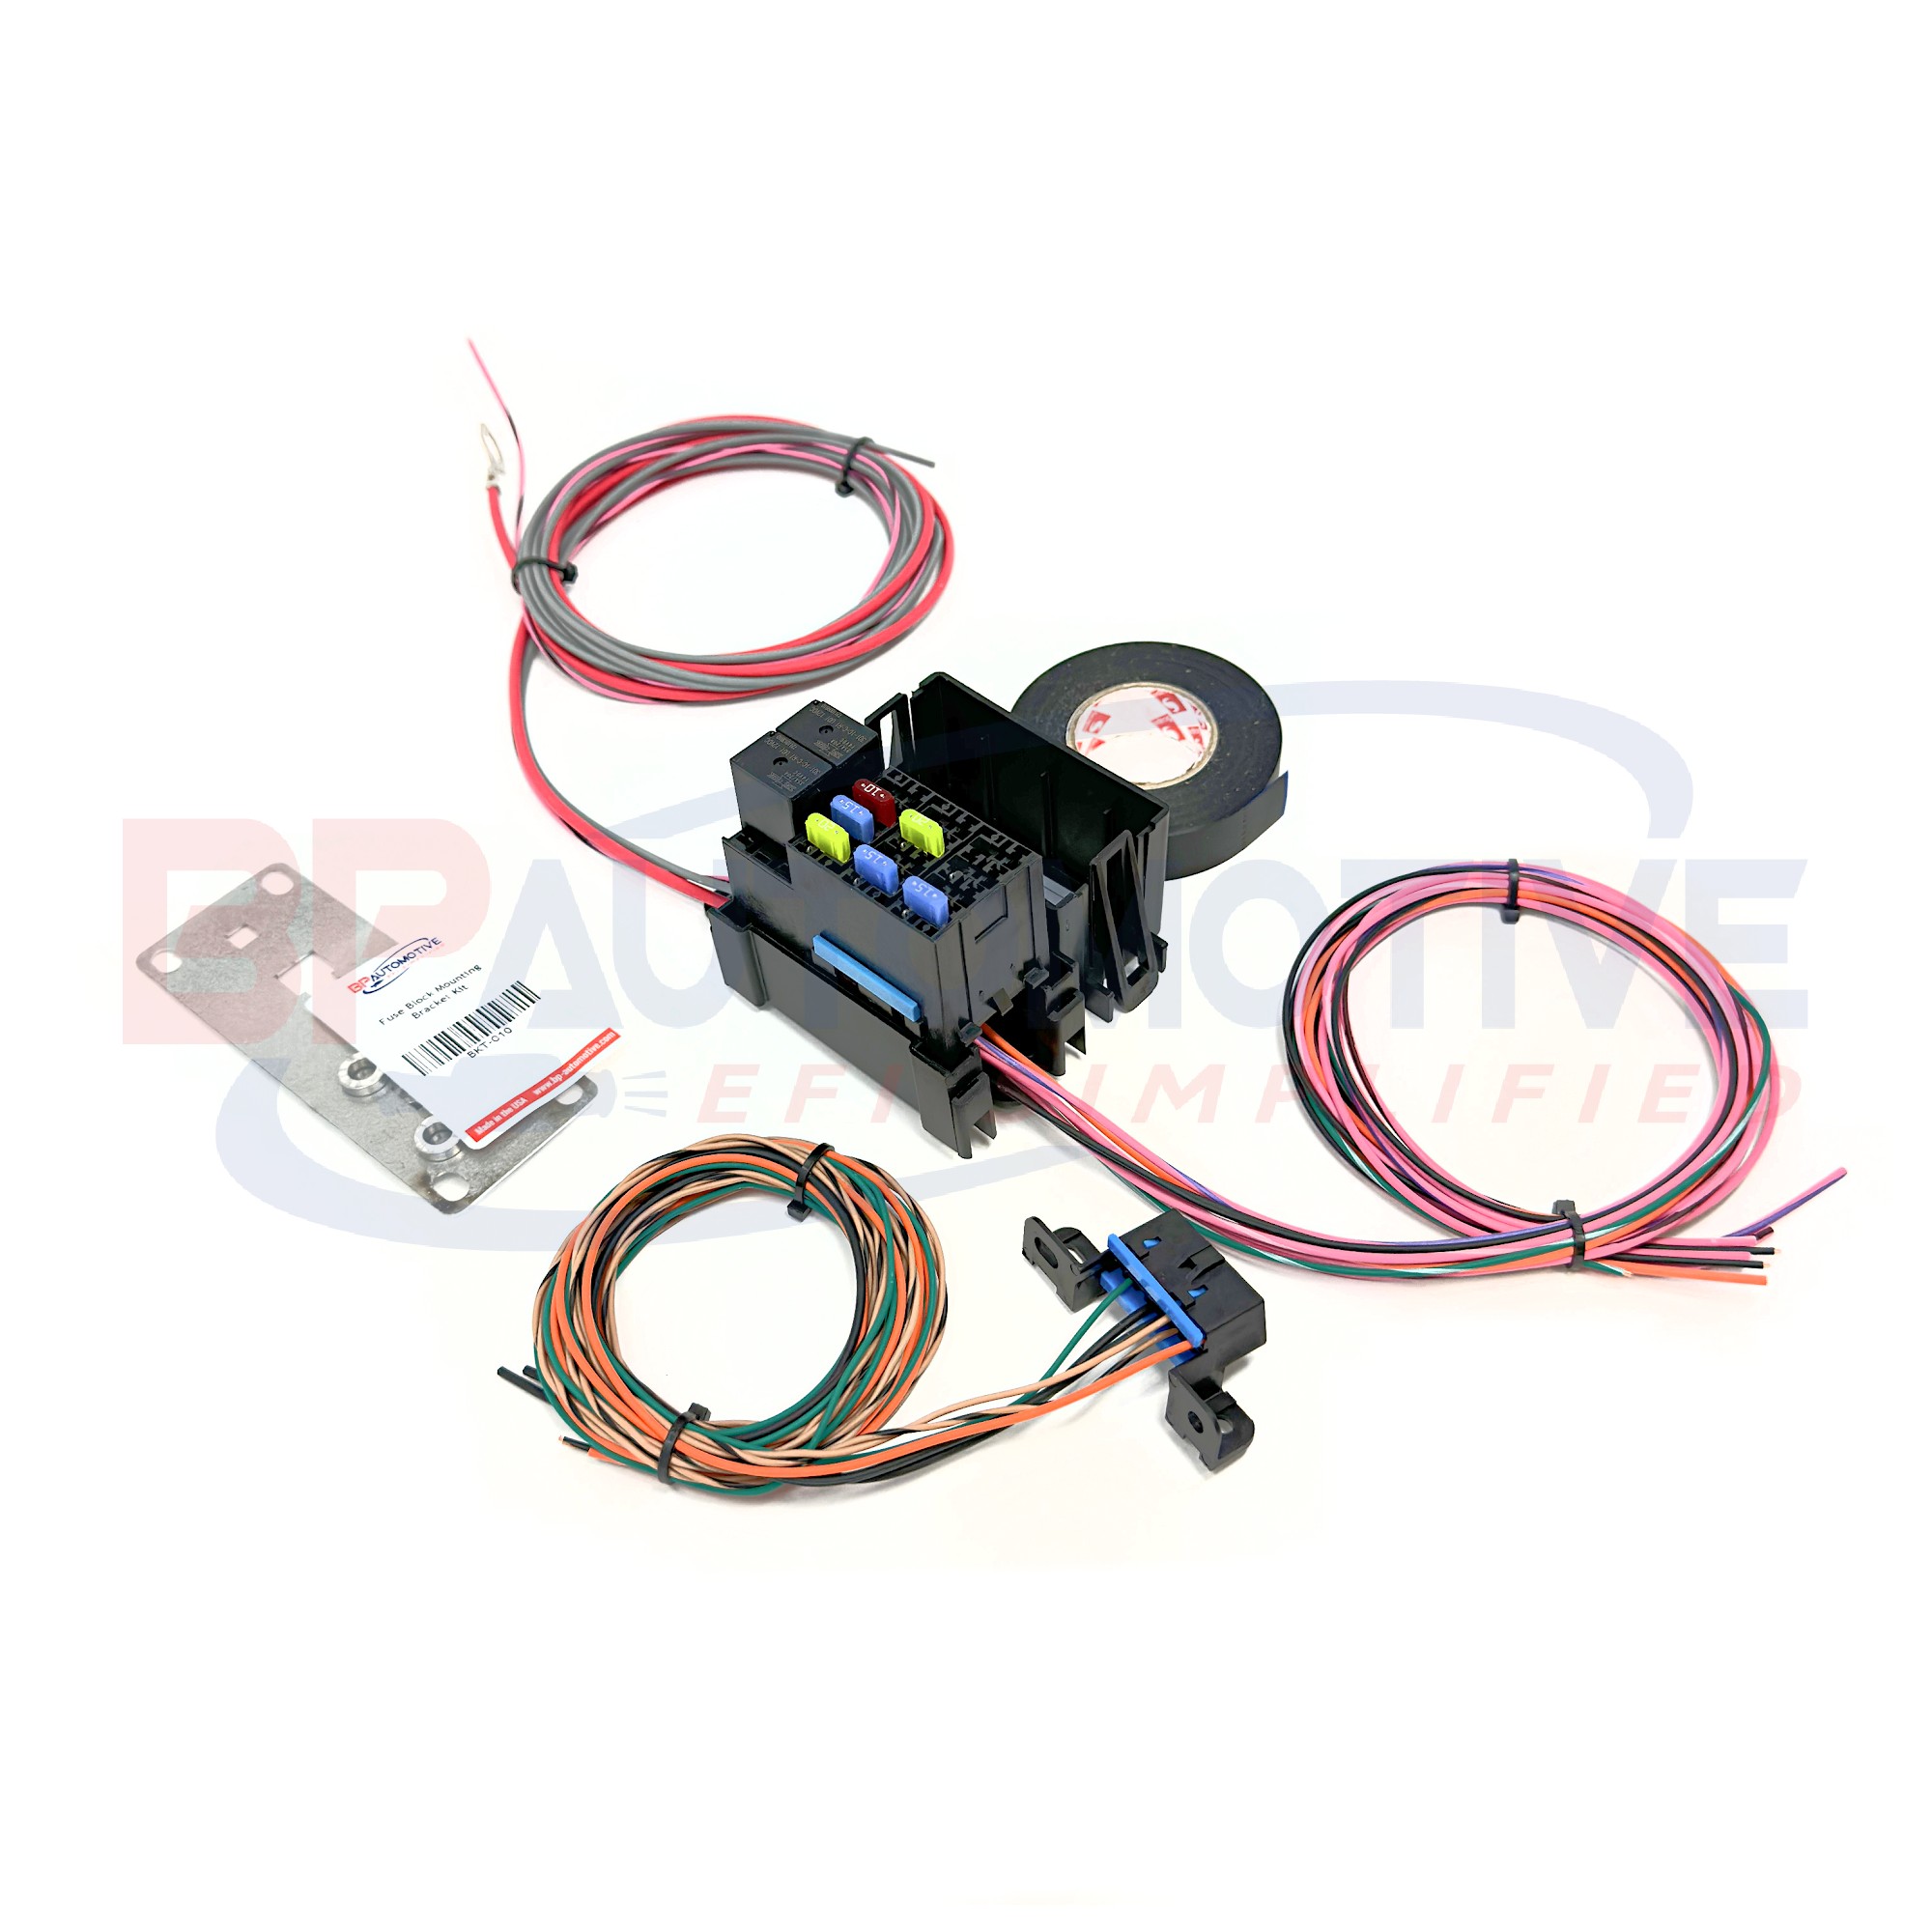 Fuse Block Assembly
5. What are the Wiring Steps for a DIY OBD2 Diagnostic Port LT1?
Proper wiring is critical for the OBD2 port to function correctly. Incorrect wiring can lead to inaccurate readings or damage to the vehicle’s electronic control unit (ECU).
- OBD2 Pin Configuration:
- Pin 2: Serial Data (from the PCM).
- Pins 4 & 5: Ground.
- Pin 16: 12V+ Battery Power.
- LT1 Specific Wiring (96-97 Models):
- Pin 6: Diagnostic Request/Field Output Enable.
- Pin 9: UART Serial Data.
- Connect Wires: Connect the appropriate wires to their respective pins, ensuring each connection is secure and properly insulated.
6. How Do I Wire the Check Engine Light (MIL) for My DIY OBD2 Port?
The check engine light is a crucial indicator of potential issues with your engine. Wiring it correctly to your DIY OBD2 port allows you to monitor engine health and diagnose problems effectively.
- Connect the Lamp: Connect the check engine light to the appropriate wire from the PCM (Powertrain Control Module).
- Ground the Circuit: Ensure the lamp circuit has a proper ground connection for it to illuminate correctly when an issue is detected.
- Test the Connection: Verify that the check engine light illuminates when the engine is running and a diagnostic code is triggered.
7. What are the Common Issues When Building a DIY OBD2 Port LT1?
Building a DIY OBD2 port can present several challenges. Being aware of these common issues can help you troubleshoot and complete your project successfully.
- Incorrect Wiring: Double-check all wiring connections to ensure they match the correct pin configuration.
- Loose Terminals: Ensure all terminals are securely crimped and locked into place to prevent intermittent connections.
- Incompatible Components: Verify that all components are compatible with your LT1 engine and OBD2 system.
8. How Can CAR-DIAGNOSTIC-TOOL.EDU.VN Help Me Build My DIY OBD2 Port LT1?
CAR-DIAGNOSTIC-TOOL.EDU.VN offers comprehensive support to help you build your DIY OBD2 port successfully. Our resources include detailed guides, high-quality components, and expert assistance.
- Detailed Guides: Access step-by-step instructions and wiring diagrams tailored for LT1 engines.
- High-Quality Components: Purchase reliable components from trusted vendors, ensuring compatibility and performance.
- Expert Support: Receive expert advice and troubleshooting assistance from experienced technicians. Contact us via WhatsApp at +1 (641) 206-8880 for immediate support.
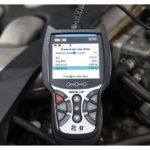
9. What Diagnostic Tools are Compatible with My DIY OBD2 Port LT1?
Once your DIY OBD2 port is complete, you can use a variety of diagnostic tools to read engine data and troubleshoot issues. Ensure the tools you choose are compatible with the OBD2 protocol and your LT1 engine. A report by the Society of Automotive Engineers (SAE) emphasizes the importance of using compatible diagnostic tools for accurate readings.
- OBD2 Scanners: Basic scanners can read and clear diagnostic trouble codes (DTCs).
- Advanced Diagnostic Tools: More sophisticated tools can provide live data, perform component tests, and offer advanced diagnostic capabilities.
- Software Applications: Some software applications, when paired with an OBD2 adapter, can turn your laptop or smartphone into a diagnostic tool.
10. How Do I Troubleshoot Common OBD2 Error Codes with My DIY Port?
Understanding and troubleshooting common OBD2 error codes is essential for maintaining your vehicle. Here are some common codes and how to address them.
- P0100 (Mass Airflow Circuit Malfunction): Check the mass airflow sensor and its wiring for damage or contamination.
- P0300 (Random/Multiple Cylinder Misfire Detected): Inspect spark plugs, ignition coils, and fuel injectors.
- P0420 (Catalyst System Efficiency Below Threshold): Evaluate the catalytic converter for damage or failure.
11. What are the Benefits of Using a Premade Fuse Block for My LT1?
While building a DIY fuse block is possible, using a premade fuse block offers several advantages, including ease of installation and reliability. BP-Automotive offers excellent premade options.
- Convenience: Premade fuse blocks come pre-wired and ready to install, saving you time and effort.
- Reliability: These blocks are typically built to high standards, ensuring reliable performance and protection for your electrical system.
- Diagnostic Port Included: Many premade kits include a diagnostic port, simplifying the process of connecting diagnostic tools.
12. How Does the 1995 LT1 OBD2 Port Differ from Other Models?
The 1995 LT1 used an OBD2 port but was not fully OBD2 compliant. Understanding these differences is crucial for proper diagnostics.
- Serial Data on Pin 9: Unlike OBD2 compliant vehicles, the 1995 LT1 uses pin 9 for serial data transmission.
- No Serial Data on Pin 2: Pin 2, which is typically used for serial data in OBD2 systems, is not used in the 1995 LT1.
- Specific Diagnostic Procedures: Diagnostic procedures for the 1995 LT1 may differ from those used for OBD2 compliant vehicles.
13. What are the Safety Precautions for Building a DIY OBD2 Port?
Safety should always be a top priority when working with electrical systems. Follow these precautions to protect yourself and your vehicle.
- Disconnect the Battery: Always disconnect the negative battery terminal before working on the electrical system.
- Use Proper Tools: Use insulated tools to prevent electrical shock.
- Follow Wiring Diagrams: Adhere strictly to wiring diagrams to avoid short circuits and damage to components.
14. How Do I Ensure My DIY OBD2 Port is Compliant with OBD2 Standards?
Ensuring your DIY OBD2 port complies with OBD2 standards is crucial for accurate diagnostics and compatibility with various tools.
- Verify Pin Configuration: Double-check that the pin configuration matches the OBD2 standard for your specific vehicle model.
- Use Quality Components: Use high-quality components that meet or exceed OEM specifications.
- Test the Port: Use an OBD2 scanner to verify that the port is functioning correctly and providing accurate data.
15. What are the Alternatives to Building a DIY OBD2 Port LT1?
If building a DIY OBD2 port seems too daunting, several alternatives offer similar functionality with less effort.
- Premade OBD2 Adapters: These adapters plug into your vehicle’s OBD2 port and communicate with your smartphone or laptop via Bluetooth or Wi-Fi.
- Professional Diagnostic Services: Consider taking your vehicle to a professional mechanic for diagnostic services.
- OBD2 Scan Tools: Purchase a standalone OBD2 scan tool that offers comprehensive diagnostic capabilities.
16. How Can I Use My DIY OBD2 Port for Real-Time Data Monitoring?
Real-time data monitoring is a valuable feature of OBD2 systems, allowing you to observe engine parameters as they change.
- Connect to a Diagnostic Tool: Connect your DIY OBD2 port to a compatible diagnostic tool or software application.
- Select Parameters: Choose the parameters you want to monitor, such as engine RPM, coolant temperature, and fuel trim.
- Observe Data: View the real-time data on your diagnostic tool or software application, and monitor for any anomalies.
17. What is the Role of the PCM in the OBD2 System?
The Powertrain Control Module (PCM) is the brain of the OBD2 system, responsible for monitoring and controlling various engine functions.
- Data Collection: The PCM collects data from various sensors throughout the engine and drivetrain.
- Diagnostic Code Generation: When the PCM detects an issue, it generates a diagnostic trouble code (DTC) and stores it in memory.
- Communication: The PCM communicates with diagnostic tools via the OBD2 port, allowing technicians to access stored data and perform diagnostic tests.
18. How Can I Stay Updated on the Latest OBD2 Technologies and Standards?
Staying informed about the latest OBD2 technologies and standards is crucial for accurate diagnostics and effective repairs.
- Industry Publications: Subscribe to automotive industry publications and websites to stay updated on the latest news and developments.
- Training Courses: Attend training courses and workshops to learn about new technologies and diagnostic techniques.
- Online Forums: Participate in online forums and communities to share knowledge and learn from other technicians and enthusiasts.
19. How Do I Test the Continuity of Wires in My DIY OBD2 Port?
Testing the continuity of wires is essential to ensure that the electrical connections in your DIY OBD2 port are intact and functioning correctly.
- Use a Multimeter: Set your multimeter to the continuity testing mode.
- Connect the Probes: Place one probe on each end of the wire you want to test.
- Check for Continuity: If the multimeter beeps or displays a low resistance value, the wire has continuity. If there is no beep or a high resistance value, the wire is broken or disconnected.
20. What are the Key Differences Between OBD1 and OBD2 Systems?
Understanding the differences between OBD1 and OBD2 systems is essential for working on older and newer vehicles.
- Standardization: OBD2 is a standardized system, while OBD1 varied by manufacturer.
- Diagnostic Codes: OBD2 uses standardized diagnostic trouble codes (DTCs), while OBD1 codes were manufacturer-specific.
- Data Parameters: OBD2 provides access to a wider range of data parameters compared to OBD1.
21. How Can I Build a Custom Diagnostic Tool Using Arduino and My DIY OBD2 Port?
For advanced users, building a custom diagnostic tool using Arduino and your DIY OBD2 port can provide unparalleled control and customization.
- Arduino Board: Use an Arduino board to interface with the OBD2 port and process data.
- OBD2 Library: Use an OBD2 library to communicate with the vehicle’s ECU.
- Custom Code: Write custom code to read and display the data you want to monitor.
22. What are the Legal and Ethical Considerations When Using a DIY OBD2 Port?
Using a DIY OBD2 port comes with certain legal and ethical considerations that you should be aware of.
- Warranty Issues: Modifying your vehicle’s electrical system may void the warranty.
- Data Privacy: Be aware of data privacy issues when accessing and storing vehicle data.
- Compliance with Regulations: Ensure your diagnostic activities comply with local regulations.
23. How Do I Properly Ground My DIY OBD2 Port to Prevent Electrical Noise?
Proper grounding is crucial for preventing electrical noise and ensuring accurate diagnostic readings.
- Use a Grounding Wire: Connect a grounding wire from the OBD2 port to a clean, unpainted metal surface on the vehicle’s chassis.
- Check Ground Connection: Ensure the ground connection is secure and free from corrosion.
- Minimize Ground Loops: Avoid creating ground loops by using a single ground point for all electrical components.
24. What are the Best Practices for Storing and Protecting My DIY OBD2 Port?
Proper storage and protection will prolong the life of your DIY OBD2 port and ensure it remains in good working condition.
- Store in a Dry Place: Store the port in a dry, clean place to prevent corrosion and damage.
- Protect from Dust: Cover the port to protect it from dust and debris.
- Handle with Care: Handle the port with care to avoid damaging the connectors and wires.
25. How Can I Integrate My DIY OBD2 Port with a Head-Up Display (HUD)?
Integrating your DIY OBD2 port with a head-up display (HUD) can provide real-time data right in your line of sight, improving safety and convenience.
- HUD Compatibility: Ensure your HUD is compatible with OBD2 data.
- Connect the Port: Connect the DIY OBD2 port to the HUD.
- Configure the Display: Configure the HUD to display the data parameters you want to monitor.
26. How Do I Clear Diagnostic Trouble Codes (DTCs) Using My DIY OBD2 Port?
Clearing diagnostic trouble codes (DTCs) is a common task when troubleshooting vehicle issues.
- Connect to a Diagnostic Tool: Connect your DIY OBD2 port to a compatible diagnostic tool.
- Access DTCs: Access the diagnostic trouble codes (DTCs) stored in the vehicle’s ECU.
- Clear the Codes: Follow the instructions on your diagnostic tool to clear the DTCs.
27. What Are the Best Resources for Learning More About OBD2 Diagnostics?
Numerous resources are available to help you expand your knowledge of OBD2 diagnostics.
- Online Courses: Take online courses on websites like Coursera or Udemy.
- Technical Manuals: Refer to technical manuals and repair guides for detailed information.
- Automotive Forums: Participate in automotive forums and communities to learn from other technicians and enthusiasts.
28. How Can I Use My DIY OBD2 Port to Improve My Vehicle’s Performance?
By monitoring and analyzing data from your DIY OBD2 port, you can identify areas for improvement and optimize your vehicle’s performance.
- Monitor Engine Parameters: Monitor engine parameters such as RPM, load, and fuel trim.
- Identify Issues: Identify any issues that may be affecting performance, such as misfires or sensor malfunctions.
- Make Adjustments: Make adjustments to your driving habits or vehicle components to improve performance.
29. What Are the Latest Innovations in OBD2 Technology?
The field of OBD2 technology is constantly evolving, with new innovations emerging regularly.
- Wireless OBD2 Adapters: Wireless OBD2 adapters allow you to connect to your vehicle’s diagnostic system using your smartphone or tablet.
- Cloud-Based Diagnostics: Cloud-based diagnostic systems provide remote access to vehicle data and diagnostic capabilities.
- Artificial Intelligence (AI): AI is being used to analyze OBD2 data and provide predictive maintenance recommendations.
30. How Can I Get Certified in Automotive Diagnostics?
Getting certified in automotive diagnostics can enhance your skills and credibility as a technician.
- ASE Certification: The National Institute for Automotive Service Excellence (ASE) offers certification programs for automotive technicians.
- Manufacturer Training: Many manufacturers offer training programs for their vehicles’ diagnostic systems.
- Technical Schools: Attend a technical school to earn a degree or certificate in automotive technology.
31. What Are the Key Considerations When Selecting Wires and Connectors for My DIY OBD2 Port?
Choosing the right wires and connectors is essential for ensuring the reliability and performance of your DIY OBD2 port.
- Wire Gauge: Select the appropriate wire gauge for the current requirements of each circuit.
- Connector Type: Use high-quality connectors that are compatible with the OBD2 port and other components.
- Material: Choose wires and connectors made from durable, corrosion-resistant materials.
32. How Can I Use My DIY OBD2 Port for Emission Testing?
In some areas, you can use your DIY OBD2 port to perform pre-emission testing to ensure your vehicle will pass the official test.
- Connect to an Emission Testing Tool: Connect your DIY OBD2 port to a compatible emission testing tool.
- Run the Test: Follow the instructions on the tool to run the emission test.
- Analyze the Results: Analyze the results to identify any issues that may cause your vehicle to fail the official emission test.
33. What Are the Best Practices for Documenting My DIY OBD2 Port Project?
Documenting your DIY OBD2 port project is essential for future reference and troubleshooting.
- Keep a Journal: Keep a journal of your progress, including any challenges you encounter and solutions you find.
- Take Photos: Take photos of each step of the project to help you remember how everything goes together.
- Create a Wiring Diagram: Create a detailed wiring diagram to document the connections in your DIY OBD2 port.
34. How Can I Use My DIY OBD2 Port to Diagnose Transmission Problems?
Your DIY OBD2 port can also be used to diagnose transmission problems by monitoring transmission-related data parameters.
- Monitor Transmission Parameters: Monitor transmission parameters such as fluid temperature, gear selection, and slip rate.
- Check for Transmission Codes: Check for transmission-specific diagnostic trouble codes (DTCs).
- Perform Transmission Tests: Use your diagnostic tool to perform transmission tests, such as solenoid tests and pressure tests.
35. What Are the Common Mistakes to Avoid When Building a DIY OBD2 Port?
Avoiding common mistakes can save you time, money, and frustration when building your DIY OBD2 port.
- Rushing the Process: Take your time and pay attention to detail to avoid mistakes.
- Using Low-Quality Components: Use high-quality components to ensure the reliability and performance of your DIY OBD2 port.
- Ignoring Wiring Diagrams: Follow wiring diagrams carefully to avoid incorrect connections.
36. How Can I Use My DIY OBD2 Port to Monitor Fuel Efficiency?
Monitoring fuel efficiency is a great way to save money on gas and reduce your environmental impact.
- Monitor Fuel-Related Parameters: Monitor fuel-related parameters such as fuel trim, oxygen sensor readings, and mass airflow.
- Calculate Fuel Efficiency: Use your diagnostic tool to calculate your vehicle’s fuel efficiency.
- Identify Areas for Improvement: Identify areas where you can improve your fuel efficiency, such as reducing idling time or improving driving habits.
37. What Are the Tools and Equipment Recommended for Building a DIY OBD2 Port?
Having the right tools and equipment can make the process of building your DIY OBD2 port much easier and more efficient.
- Wire Strippers: Use wire strippers to remove insulation from wires without damaging the conductors.
- Crimping Tool: Use a crimping tool to securely crimp terminals onto wires.
- Soldering Iron: Use a soldering iron to solder connections for added reliability.
- Multimeter: Use a multimeter to test continuity, voltage, and resistance.
38. How Can I Use My DIY OBD2 Port to Diagnose ABS (Anti-Lock Braking System) Problems?
Your DIY OBD2 port can also be used to diagnose ABS (Anti-Lock Braking System) problems by monitoring ABS-related data parameters.
- Monitor ABS Parameters: Monitor ABS parameters such as wheel speed sensor readings, brake pressure, and ABS module status.
- Check for ABS Codes: Check for ABS-specific diagnostic trouble codes (DTCs).
- Perform ABS Tests: Use your diagnostic tool to perform ABS tests, such as wheel speed sensor tests and solenoid tests.
At CAR-DIAGNOSTIC-TOOL.EDU.VN, we understand the challenges technicians and garage owners face. The physical demands, constant need for updated knowledge, and pressure to deliver efficient, accurate service are significant. That’s why we’re dedicated to providing not just tools, but comprehensive solutions.
Ready to take control of your vehicle diagnostics? Contact CAR-DIAGNOSTIC-TOOL.EDU.VN today. Let us help you enhance your skills, streamline your processes, and elevate your service quality. Reach out now via WhatsApp at +1 (641) 206-8880 or visit our website CAR-DIAGNOSTIC-TOOL.EDU.VN for personalized assistance and to explore our training programs. Our office is located at 1100 Congress Ave, Austin, TX 78701, United States.