A Diy Usb To Obd2 Cable is a custom-made interface that allows you to connect your vehicle’s On-Board Diagnostics II (OBD2) system to a computer via USB, granting access to valuable diagnostic data for troubleshooting and performance monitoring; CAR-DIAGNOSTIC-TOOL.EDU.VN provides comprehensive guidance, tools, and support for creating and utilizing these cables effectively. This article will explore the creation process, benefits, and essential considerations, while also highlighting how CAR-DIAGNOSTIC-TOOL.EDU.VN can enhance your automotive diagnostic skills through expert-led remote support and specialized technician training programs.
Contents
- 1. Understanding the DIY USB to OBD2 Cable
- 1.1. What is an OBD2 Cable?
- 1.2. What is a DIY USB to OBD2 Cable?
- 1.3. Why Build Your Own USB to OBD2 Cable?
- 1.4. Is it Legal to Build and Use a DIY USB to OBD2 Cable?
- 2. Essential Components for Your DIY USB to OBD2 Cable
- 2.1. OBD2 Connector
- 2.2. USB Connector
- 2.3. Wires
- 2.4. Electronic Components
- 2.5. Enclosure (Optional)
- 3. Tools You’ll Need to Assemble Your DIY USB to OBD2 Cable
- 3.1. Soldering Iron
- 3.2. Solder
- 3.3. Wire Strippers
- 3.4. Multimeter
- 3.5. Crimping Tool
- 3.6. Heat Shrink Tubing
- 3.7. Helping Hand Tool
- 4. Step-by-Step Guide to Building Your DIY USB to OBD2 Cable
- 4.1. Step 1: Gather Your Materials
- 4.2. Step 2: Prepare the OBD2 Connector
- 4.3. Step 3: Prepare the USB Connector
- 4.4. Step 4: Connect the Wires
- 4.5. Step 5: Test the Cable
- 4.6. Step 6: Enclose the Cable (Optional)
- 5. Understanding OBD2 Pinouts and Wiring Diagrams
- 5.1. What is an OBD2 Pinout?
- 5.2. Common OBD2 Pin Functions
- 5.3. Wiring Diagrams
- 5.4. Where to Find Reliable Pinout Information
- 6. Choosing the Right Diagnostic Software
- 6.1. Free vs. Paid Software
- 6.2. Popular Diagnostic Software Options
- 6.3. Compatibility Considerations
- 6.4. Software Features to Look For
- 7. Common Issues and Troubleshooting Tips
- 7.1. Cable Not Recognized by Computer
- 7.2. No Data Transmission
- 7.3. Error Codes and Faulty Data
- 7.4. Interference and Signal Noise
- 7.5. Seeking Expert Assistance
- 8. The Benefits of Using a DIY USB to OBD2 Cable
- 8.1. Cost-Effectiveness
- 8.2. Customization
- 8.3. Educational Experience
- 8.4. Self-Reliance
- 9. Safety Precautions
- 9.1. Electrical Safety
- 9.2. Vehicle’s Electrical System
- 9.3. Software Usage
- 9.4. Personal Protective Equipment
- 10. CAR-DIAGNOSTIC-TOOL.EDU.VN: Your Partner in Automotive Diagnostics
- 10.1. Remote Support Services
- 10.2. Technician Training Programs
- 10.3. Comprehensive Diagnostic Solutions
- 10.4. Stay Ahead with the Latest Technology
- 10.5. Success Stories and Testimonials
- 11. Advanced Projects and Enhancements
- 11.1. Adding Bluetooth Connectivity
- 11.2. Integrating a Display
- 11.3. Building a Custom Enclosure
- 11.4. Implementing Data Logging
- 12. The Future of DIY Automotive Diagnostics
- 12.1. Growing Popularity of Electric Vehicles
- 12.2. Increased Complexity of Vehicle Systems
- 12.3. Role of Artificial Intelligence
- 12.4. Open-Source Diagnostic Tools
- 13. DIY USB to OBD2 Cable: The Ethical Considerations
- 13.1. Data Privacy
- 13.2. Vehicle Security
- 13.3. Responsible Usage
- 13.4. Compliance with Laws
- 14. Frequently Asked Questions (FAQs)
- 14.1. Can I Use a DIY USB to OBD2 Cable on Any Vehicle?
- 14.2. What are the Risks of Using a DIY USB to OBD2 Cable?
- 14.3. Do I Need Special Software to Use a DIY USB to OBD2 Cable?
- 14.4. How Can CAR-DIAGNOSTIC-TOOL.EDU.VN Help Me with My DIY Project?
- 14.5. What are the Benefits of Technician Training?
- 14.6. How Can I Stay Updated on the Latest Diagnostic Technologies?
- 14.7. What is the Difference Between CAN High and CAN Low?
- 14.8. How Do I Know Which OBD2 Pins to Connect?
- 14.9. What is ECU Programming and Should I Attempt It?
- 14.10. Where Can I Buy the Components for My DIY USB to OBD2 Cable?
- 15. Conclusion: Empowering Your Automotive Diagnostics with CAR-DIAGNOSTIC-TOOL.EDU.VN
1. Understanding the DIY USB to OBD2 Cable
1.1. What is an OBD2 Cable?
An OBD2 cable serves as the crucial link between your vehicle’s diagnostic port and a scanning device, enabling real-time data access to monitor engine performance, identify issues, and clear diagnostic trouble codes (DTCs); this functionality is invaluable for automotive enthusiasts and professional technicians alike. According to a study by the National Institute for Automotive Service Excellence (ASE), accurate diagnostics can reduce repair times by up to 40%.
1.2. What is a DIY USB to OBD2 Cable?
A DIY USB to OBD2 cable is a homemade version of the standard OBD2 interface, connecting your car’s OBD2 port to a computer via USB; this enables you to use diagnostic software on your computer to read and interpret vehicle data. Creating one involves assembling the necessary connectors and wiring, and this can be a cost-effective solution for accessing vehicle diagnostics.
1.3. Why Build Your Own USB to OBD2 Cable?
Building your own USB to OBD2 cable offers several advantages:
- Cost Savings: Purchasing individual components is generally cheaper than buying a pre-made cable.
- Customization: You can tailor the cable to your specific needs, such as length and connector types.
- Educational Value: The construction process enhances your understanding of automotive diagnostics and electronics.
- Availability: In situations where specific cables are hard to find, DIY becomes a practical alternative.
1.4. Is it Legal to Build and Use a DIY USB to OBD2 Cable?
Yes, building and using a DIY USB to OBD2 cable is perfectly legal, as it simply involves creating an interface for accessing vehicle data that is already available; however, it is crucial to use the cable responsibly and ethically, respecting data privacy and avoiding any unauthorized modifications to the vehicle’s software.
2. Essential Components for Your DIY USB to OBD2 Cable
2.1. OBD2 Connector
The OBD2 connector is a standardized 16-pin interface that provides access to your vehicle’s diagnostic system; ensure you acquire a high-quality connector that matches the specifications of your vehicle’s port for reliable data transmission.
2.2. USB Connector
A standard USB connector is needed to interface with your computer; choose a USB connector type that is compatible with your computer (USB-A, USB-C, etc.) and ensure it is durable enough to withstand repeated use.
2.3. Wires
You’ll need several wires to connect the OBD2 and USB connectors; use high-quality, shielded wires to minimize interference and ensure reliable data transmission. Different colors can help you keep track of the connections.
2.4. Electronic Components
Depending on the complexity of your project, you might need additional electronic components such as resistors, capacitors, and microcontrollers. These components help regulate voltage, filter noise, and manage data flow between the vehicle and the computer. For instance, a voltage regulator ensures that the signal from the OBD2 port doesn’t damage the USB interface.
2.5. Enclosure (Optional)
An enclosure protects the electronic components and wiring from damage; while optional, it’s highly recommended for a more professional and durable cable.
3. Tools You’ll Need to Assemble Your DIY USB to OBD2 Cable
3.1. Soldering Iron
A soldering iron is essential for creating secure and reliable connections between wires and connectors. A temperature-controlled soldering iron will allow you to work with precision.
3.2. Solder
Use high-quality solder to ensure strong and durable connections; choose a solder type that is suitable for electronics, such as rosin-core solder.
3.3. Wire Strippers
Wire strippers are used to remove the insulation from wires without damaging the conductor; a good wire stripper will handle a range of wire gauges.
3.4. Multimeter
A multimeter is crucial for testing continuity and voltage; this tool helps you verify that your connections are correct and that the cable is functioning as expected.
3.5. Crimping Tool
A crimping tool is used to securely attach connectors to the wires; this is particularly important for OBD2 and USB connectors.
3.6. Heat Shrink Tubing
Heat shrink tubing provides insulation and protection for your solder joints; it also helps to create a more professional and durable finish.
3.7. Helping Hand Tool
A helping hand tool holds components in place while you solder; this is especially useful for small and intricate connections.
 Essential Tools for DIY USB to OBD2 Cable Construction
4. Step-by-Step Guide to Building Your DIY USB to OBD2 Cable
4.1. Step 1: Gather Your Materials
Collect all the necessary components and tools before you start; this ensures a smooth and efficient construction process.
4.2. Step 2: Prepare the OBD2 Connector
Identify the pins on the OBD2 connector that you need to connect; typically, you’ll need pins for ground, power, and CAN bus communication. Refer to your vehicle’s service manual or online resources for specific pinouts.
4.3. Step 3: Prepare the USB Connector
Prepare the USB connector by stripping the insulation from the wires; identify the wires for power, ground, and data transmission.
4.4. Step 4: Connect the Wires
Solder the wires from the OBD2 connector to the corresponding wires on the USB connector. Ensure that the connections are secure and properly insulated with heat shrink tubing. Double-check the pinout diagrams to avoid any errors.
4.5. Step 5: Test the Cable
Use a multimeter to test the continuity of each connection; verify that there are no shorts or open circuits. Connect the cable to your vehicle and computer to test data transmission; use diagnostic software to read vehicle data.
4.6. Step 6: Enclose the Cable (Optional)
If you’re using an enclosure, carefully place the electronic components and wiring inside; secure the enclosure to protect the cable from damage.
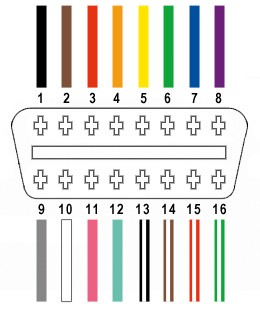
5. Understanding OBD2 Pinouts and Wiring Diagrams
5.1. What is an OBD2 Pinout?
An OBD2 pinout is a diagram that shows the function of each pin on the OBD2 connector; this is essential for correctly wiring your DIY cable.
5.2. Common OBD2 Pin Functions
- Pin 4: Chassis Ground
- Pin 5: Signal Ground
- Pin 6: CAN High (J-2284)
- Pin 7: K-Line (ISO 9141-2)
- Pin 10: CAN Low (J-2284)
- Pin 14: CAN Low (J-2284)
- Pin 15: L-Line (ISO 9141-2)
- Pin 16: Battery Power
5.3. Wiring Diagrams
Refer to wiring diagrams to ensure you connect the correct wires between the OBD2 and USB connectors; these diagrams provide a visual representation of the connections.
5.4. Where to Find Reliable Pinout Information
You can find reliable OBD2 pinout information in your vehicle’s service manual, online forums, and automotive diagnostic websites. Always verify the information with multiple sources to ensure accuracy.
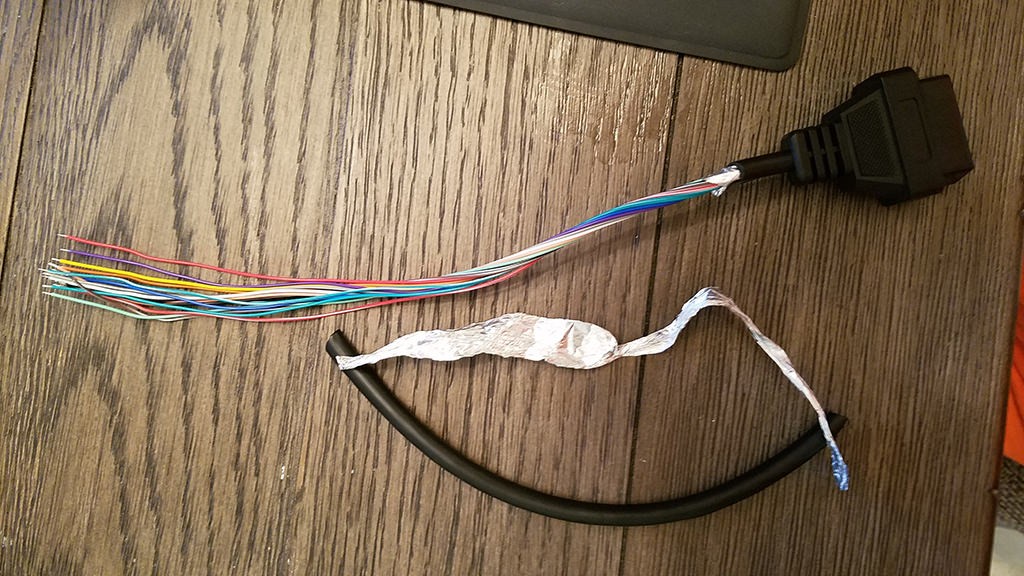 Stripped sheath and shielding for OBD2 cable wiring
6. Choosing the Right Diagnostic Software
6.1. Free vs. Paid Software
There are many OBD2 diagnostic software options available, both free and paid; free software typically offers basic functionality, while paid software provides advanced features such as live data streaming, advanced diagnostics, and ECU programming.
6.2. Popular Diagnostic Software Options
- FORScan: Excellent for Ford, Lincoln, and Mercury vehicles.
- OBD Auto Doctor: Supports a wide range of vehicles and offers a user-friendly interface.
- Torque Pro: Popular Android app for real-time data monitoring.
- ScanTool.net: Offers both software and hardware solutions for OBD2 diagnostics.
- EasyOBDII: Provides comprehensive diagnostic features for various vehicle makes.
6.3. Compatibility Considerations
Ensure that the diagnostic software you choose is compatible with your vehicle’s make and model; some software is designed for specific manufacturers or vehicle types.
6.4. Software Features to Look For
- DTC Reading and Clearing: Ability to read and clear diagnostic trouble codes.
- Live Data Streaming: Real-time monitoring of vehicle parameters.
- Freeze Frame Data: Capturing data when a DTC is triggered.
- Advanced Diagnostics: Support for advanced diagnostic procedures.
- ECU Programming: Ability to reprogram the vehicle’s ECU (requires specialized knowledge and equipment).
7. Common Issues and Troubleshooting Tips
7.1. Cable Not Recognized by Computer
If your computer does not recognize the cable, check the USB connection; ensure that the drivers are properly installed; try using a different USB port or computer to rule out hardware issues.
7.2. No Data Transmission
If there is no data transmission, verify the OBD2 pinout; check the continuity of the connections; ensure that the diagnostic software is properly configured; confirm that the vehicle’s ignition is turned on.
7.3. Error Codes and Faulty Data
If you are receiving error codes or faulty data, double-check the wiring; ensure that the connections are secure and properly insulated; try using different diagnostic software to rule out software issues.
7.4. Interference and Signal Noise
To minimize interference and signal noise, use shielded wires; ensure that the cable is properly grounded; keep the cable away from sources of electromagnetic interference.
7.5. Seeking Expert Assistance
If you encounter persistent issues, consider seeking expert assistance from CAR-DIAGNOSTIC-TOOL.EDU.VN; our remote support services can provide valuable guidance and troubleshooting tips to resolve complex issues.
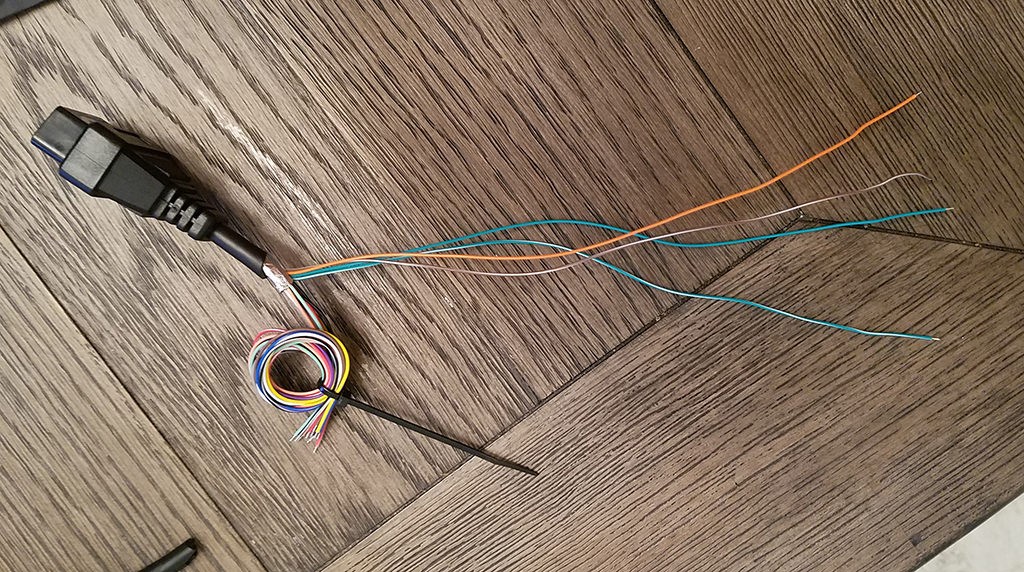 Separated 4 wires being used for OBD2 cable
8. The Benefits of Using a DIY USB to OBD2 Cable
8.1. Cost-Effectiveness
Building your own USB to OBD2 cable is generally more cost-effective than purchasing a pre-made cable; this is especially true if you already have some of the necessary components and tools.
8.2. Customization
You can customize the cable to your specific needs, such as length and connector types; this allows you to create a cable that is perfectly suited to your vehicle and diagnostic setup.
8.3. Educational Experience
The construction process enhances your understanding of automotive diagnostics and electronics; this hands-on experience can be invaluable for both enthusiasts and professional technicians. According to a study by the U.S. Department of Education, hands-on learning increases knowledge retention by up to 75%.
8.4. Self-Reliance
Having the ability to build your own diagnostic tools increases your self-reliance; you are not dependent on commercial products and can quickly create a cable when needed.
9. Safety Precautions
9.1. Electrical Safety
When working with electronics, always take electrical safety precautions; disconnect the vehicle’s battery before working on the electrical system; use insulated tools; avoid working in wet conditions.
9.2. Vehicle’s Electrical System
Be careful when working with your vehicle’s electrical system; incorrect wiring can damage the ECU or other components; always double-check the wiring diagrams and pinout information.
9.3. Software Usage
Use diagnostic software responsibly; avoid making unauthorized modifications to the vehicle’s software; be aware of the potential risks involved in ECU programming.
9.4. Personal Protective Equipment
Wear personal protective equipment (PPE) such as safety glasses and gloves when working with tools and chemicals.
10. CAR-DIAGNOSTIC-TOOL.EDU.VN: Your Partner in Automotive Diagnostics
10.1. Remote Support Services
CAR-DIAGNOSTIC-TOOL.EDU.VN offers expert remote support services to assist you with your automotive diagnostic needs; our experienced technicians can provide guidance and troubleshooting tips to help you resolve complex issues.
10.2. Technician Training Programs
We offer specialized technician training programs to enhance your diagnostic skills; our courses cover a wide range of topics, from basic OBD2 diagnostics to advanced ECU programming. These programs are designed to equip you with the knowledge and skills you need to excel in the automotive industry.
10.3. Comprehensive Diagnostic Solutions
CAR-DIAGNOSTIC-TOOL.EDU.VN provides comprehensive diagnostic solutions, including tools, software, and support; we are committed to helping you achieve accurate and efficient vehicle diagnostics.
10.4. Stay Ahead with the Latest Technology
We stay up-to-date with the latest automotive diagnostic technology; CAR-DIAGNOSTIC-TOOL.EDU.VN ensures that you have access to the most advanced tools and information.
10.5. Success Stories and Testimonials
Read success stories and testimonials from our satisfied customers; discover how CAR-DIAGNOSTIC-TOOL.EDU.VN has helped technicians and enthusiasts improve their diagnostic capabilities.
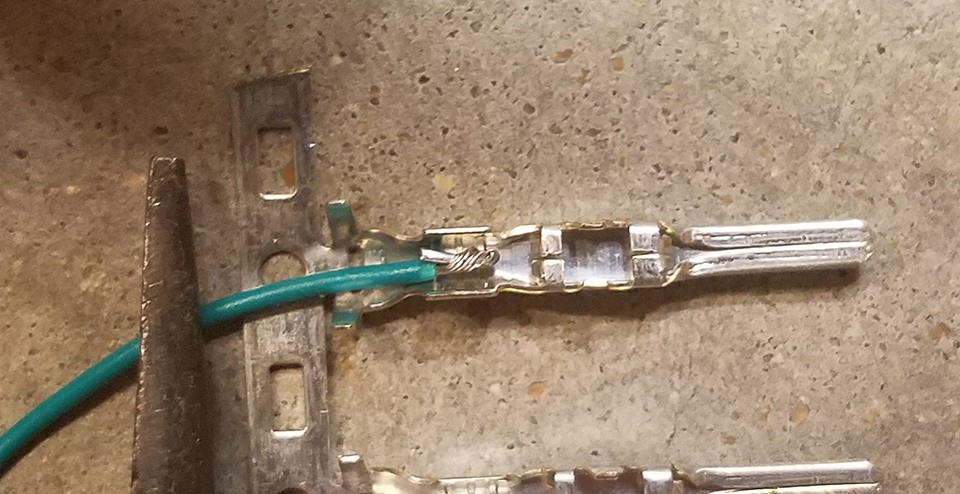 Close-up of wire and pin connector before soldering
11. Advanced Projects and Enhancements
11.1. Adding Bluetooth Connectivity
Enhance your DIY USB to OBD2 cable by adding Bluetooth connectivity; this allows you to wirelessly connect to your vehicle using a smartphone or tablet.
11.2. Integrating a Display
Integrate a small display into your cable to show real-time data; this provides a convenient way to monitor vehicle parameters without needing a computer.
11.3. Building a Custom Enclosure
Design and build a custom enclosure for your cable; this allows you to create a more professional and durable product.
11.4. Implementing Data Logging
Implement data logging functionality to record vehicle parameters over time; this is useful for diagnosing intermittent issues and analyzing performance.
12. The Future of DIY Automotive Diagnostics
12.1. Growing Popularity of Electric Vehicles
The growing popularity of electric vehicles (EVs) is driving the need for advanced diagnostic tools and techniques; DIY enthusiasts and technicians will need to adapt to the unique diagnostic requirements of EVs.
12.2. Increased Complexity of Vehicle Systems
Vehicle systems are becoming increasingly complex, with more electronic components and software; this requires more sophisticated diagnostic tools and skills.
12.3. Role of Artificial Intelligence
Artificial intelligence (AI) is playing an increasingly important role in automotive diagnostics; AI-powered diagnostic tools can analyze vast amounts of data and identify issues more quickly and accurately. According to a report by McKinsey, AI could improve automotive diagnostics efficiency by up to 30%.
12.4. Open-Source Diagnostic Tools
The rise of open-source diagnostic tools is empowering DIY enthusiasts and technicians; these tools provide greater flexibility and customization options.
13. DIY USB to OBD2 Cable: The Ethical Considerations
13.1. Data Privacy
Respect data privacy when accessing vehicle data; avoid sharing or using data without proper authorization.
13.2. Vehicle Security
Be aware of the potential security risks involved in modifying vehicle software; take precautions to protect your vehicle from unauthorized access.
13.3. Responsible Usage
Use your DIY USB to OBD2 cable responsibly; avoid using it for illegal or unethical purposes.
13.4. Compliance with Laws
Ensure that your activities comply with all applicable laws and regulations; be aware of any restrictions on accessing or modifying vehicle data.
14. Frequently Asked Questions (FAQs)
14.1. Can I Use a DIY USB to OBD2 Cable on Any Vehicle?
DIY USB to OBD2 cables should work on any vehicle that supports the OBD2 standard; however, compatibility may vary depending on the specific vehicle make and model, and the diagnostic software being used.
14.2. What are the Risks of Using a DIY USB to OBD2 Cable?
Potential risks include damaging the vehicle’s ECU, receiving inaccurate data, and compromising vehicle security. However, these risks can be minimized by following safety precautions and using reliable information.
14.3. Do I Need Special Software to Use a DIY USB to OBD2 Cable?
Yes, you need diagnostic software to interpret the data from the OBD2 port; many free and paid options are available, but compatibility with your vehicle should be verified.
14.4. How Can CAR-DIAGNOSTIC-TOOL.EDU.VN Help Me with My DIY Project?
CAR-DIAGNOSTIC-TOOL.EDU.VN offers remote support services and technician training programs to assist you with your DIY project, including guidance on wiring, troubleshooting, and software usage; our experts can help you overcome challenges and ensure a successful outcome.
14.5. What are the Benefits of Technician Training?
Technician training enhances your diagnostic skills, increases your knowledge of vehicle systems, and improves your ability to troubleshoot complex issues. This leads to more efficient and accurate diagnoses, saving time and money.
14.6. How Can I Stay Updated on the Latest Diagnostic Technologies?
Stay updated by following industry news, attending workshops and conferences, and subscribing to automotive diagnostic publications; CAR-DIAGNOSTIC-TOOL.EDU.VN also provides updates on the latest technologies through our training programs and support services.
14.7. What is the Difference Between CAN High and CAN Low?
CAN High and CAN Low are two wires used in the Controller Area Network (CAN) bus communication system; they transmit data in differential mode, which helps to reduce noise and interference. CAN High typically carries the higher voltage signal, while CAN Low carries the lower voltage signal.
14.8. How Do I Know Which OBD2 Pins to Connect?
Refer to your vehicle’s service manual or online resources for the specific OBD2 pinout; ensure that you verify the information with multiple sources to avoid errors.
14.9. What is ECU Programming and Should I Attempt It?
ECU programming involves modifying the software in the vehicle’s Engine Control Unit (ECU); this is an advanced procedure that should only be attempted by experienced technicians with specialized knowledge and equipment. Incorrect programming can damage the ECU and affect vehicle performance.
14.10. Where Can I Buy the Components for My DIY USB to OBD2 Cable?
You can buy the components from electronic component suppliers, online retailers, and automotive parts stores; ensure that you purchase high-quality components to ensure reliability.
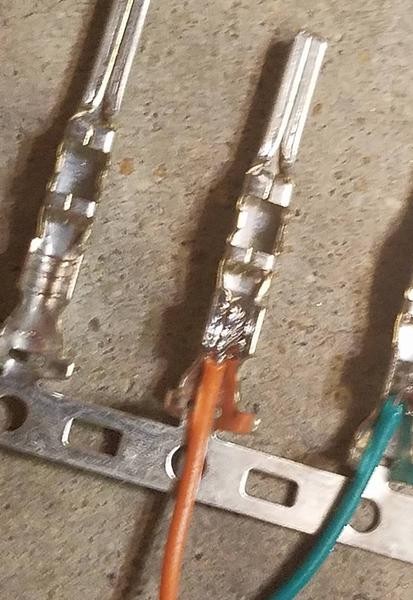 Soldered wire to the pin connector
15. Conclusion: Empowering Your Automotive Diagnostics with CAR-DIAGNOSTIC-TOOL.EDU.VN
Building a DIY USB to OBD2 cable is a rewarding project that enhances your understanding of automotive diagnostics and provides a cost-effective way to access vehicle data; by following the steps outlined in this guide and utilizing the resources available at CAR-DIAGNOSTIC-TOOL.EDU.VN, you can successfully create your own diagnostic tool and improve your automotive skills.
Whether you’re an automotive enthusiast or a professional technician, CAR-DIAGNOSTIC-TOOL.EDU.VN is committed to providing you with the tools, training, and support you need to excel in the world of automotive diagnostics. Our remote support services and specialized technician training programs are designed to empower you with the knowledge and skills to tackle even the most complex diagnostic challenges. With the right approach and the right resources, you can unlock the full potential of your vehicle’s diagnostic system and stay ahead in the ever-evolving automotive industry.
Ready to take your automotive diagnostics skills to the next level? Contact CAR-DIAGNOSTIC-TOOL.EDU.VN today at Whatsapp: +1 (641) 206-8880 or visit our website CAR-DIAGNOSTIC-TOOL.EDU.VN to learn more about our remote support services and technician training programs. Our office is located at 1100 Congress Ave, Austin, TX 78701, United States, and we’re here to help you succeed in all your automotive endeavors. Don’t wait – let us help you transform your passion for cars into a thriving career!