A Cord For Obd2 To Code Reader is essential for diagnosing vehicle issues by connecting the car’s computer to a diagnostic tool, providing real-time data and error codes for effective troubleshooting; CAR-DIAGNOSTIC-TOOL.EDU.VN offers comprehensive solutions, including high-quality cords, detailed repair guides, and expert technical support. Enhance your diagnostic capabilities with our technician training and remote assistance programs for efficient vehicle maintenance and repair, ensuring optimal performance.
Contents
- 1. Understanding the Basics of OBD2 and Code Readers
- 1.1 What is OBD2?
- 1.2 What is a Code Reader?
- 1.3 Why is a Cord Necessary?
- 2. Identifying the Right Cord for Your OBD2 Code Reader
- 2.1 Types of OBD2 Cords
- 2.2 Key Features to Look For
- 2.3 Where to Buy OBD2 Cords
- 3. Step-by-Step Guide: Connecting Your Code Reader with the OBD2 Cord
- 3.1 Preparing for the Connection
- 3.2 Connecting the Cord
- 3.3 Powering Up the Code Reader
- 3.4 Reading and Interpreting Codes
- 4. Troubleshooting Common Issues with OBD2 Cord Connections
- 4.1 No Power to the Code Reader
- 4.2 Inaccurate or No Data Displayed
- 4.3 Intermittent Connection Problems
- 5. Advanced Uses of OBD2 Cords and Code Readers
- 5.1 Live Data Streaming
- 5.2 Freeze Frame Data
- 5.3 Clearing Trouble Codes
- 6. Maintaining Your OBD2 Cord for Longevity
- 6.1 Proper Storage
- 6.2 Regular Inspection
- 6.3 Cleaning and Protection
- 7. The Role of CAR-DIAGNOSTIC-TOOL.EDU.VN in OBD2 Diagnostics
- 7.1 High-Quality OBD2 Cords
- 7.2 Expert Technical Support
- 7.3 Training and Education
- 8. Incorporating University Research in OBD2 Diagnostics
- 8.1 Stanford University Study on OBD2 Effectiveness
- 8.2 MIT Research on Diagnostic Tool Accuracy
- 9. Search Intent Analysis for “Cord for OBD2 to Code Reader”
- 9.1 Informational Intent
- 9.2 Navigational Intent
- 9.3 Transactional Intent
- 9.4 Commercial Investigation Intent
- 9.5 DIY Repair Intent
- 10. The Future of OBD2 Technology
- 10.1 Advancements in Wireless OBD2 Adapters
- 10.2 Integration with Cloud-Based Diagnostic Platforms
- 10.3 Enhanced Data Security
- 11. Understanding OBD2 Port Types and Compatibility
- 11.1 Standard OBD2 Port (SAE J1962)
- 11.2 Older OBD1 Ports
- 11.3 Heavy-Duty Vehicle Ports (SAE J1939)
- 11.4 European OBD (EOBD) Ports
- 11.5 Japanese OBD (JOBD) Ports
- 12. Selecting the Right OBD2 Extension Cord
- 12.1 Length Considerations
- 12.2 Cable Material and Durability
- 12.3 Connector Quality
- 13. How to Read and Clear OBD2 Codes Using a Code Reader
- 13.1 Connecting the Code Reader
- 13.2 Reading Diagnostic Trouble Codes (DTCs)
- 13.3 Understanding the Codes
- 13.4 Clearing Trouble Codes
- 13.5 Important Considerations
- 14. Common OBD2 Error Codes and Their Meanings
- 14.1 P0171: System Too Lean (Bank 1)
- 14.2 P0300: Random Misfire Detected
- 14.3 P0420: Catalyst System Efficiency Below Threshold (Bank 1)
- 14.4 P0101: Mass Air Flow (MAF) Sensor Circuit Range/Performance
- 14.5 P0113: Intake Air Temperature (IAT) Sensor Circuit High Input
- 15. The Impact of Connection Quality on OBD2 Diagnostics
- 15.1 Data Accuracy
- 15.2 Diagnostic Efficiency
- 15.3 Component Safety
- 15.4 Long-Term Savings
- 16. Using OBD2 Cords with Professional Diagnostic Equipment
- 16.1 High-End Scanners
- 16.2 Oscilloscopes
- 16.3 Multimeters
- 16.4 Programming Tools
- 17. Wireless OBD2 Adapters vs Cabled OBD2 Cords
- 17.1 Convenience of Wireless Adapters
- 17.2 Reliability of Cabled OBD2 Cords
- 17.3 Security Considerations
- 17.4 Cost Comparison
- 18. Best Practices for Diagnosing Intermittent Issues with OBD2 Cords
- 18.1 Monitor Live Data
- 18.2 Use Freeze Frame Data
- 18.3 Perform Component Testing
- 18.4 Simulate Conditions
- 19. How to Choose the Right OBD2 Scanner for Your Needs
- 19.1 Basic Code Readers
- 19.2 Enhanced Code Readers
- 19.3 Professional Diagnostic Scanners
- 19.4 Smartphone-Based Scanners
- 20. FAQs about OBD2 Cords and Code Readers
- 20.1 What is the OBD2 port used for?
- 20.2 Can I use any OBD2 cord with any code reader?
- 20.3 How do I know if my OBD2 cord is faulty?
- 20.4 Can I extend the length of my OBD2 cord?
- 20.5 What do I do if my code reader won’t connect to my vehicle?
- 20.6 Where can I find a list of OBD2 trouble codes and their meanings?
- 20.7 Is it safe to clear OBD2 trouble codes?
- 20.8 How often should I check my vehicle for OBD2 trouble codes?
- 20.9 What is the difference between OBD1 and OBD2?
- 20.10 Can CAR-DIAGNOSTIC-TOOL.EDU.VN help me with OBD2 diagnostics?
1. Understanding the Basics of OBD2 and Code Readers
1.1 What is OBD2?
OBD2, or On-Board Diagnostics II, is a standardized system that monitors a vehicle’s engine, transmission, and other critical components. According to the Environmental Protection Agency (EPA), OBD2 was mandated for all cars and light trucks sold in the United States starting in 1996 to ensure vehicles meet emissions standards. This system provides a wealth of data that can be accessed using a code reader.
1.2 What is a Code Reader?
A code reader is a diagnostic tool used to retrieve trouble codes from a vehicle’s OBD2 system. These codes indicate specific issues, such as a faulty oxygen sensor or a misfiring engine. Code readers range from basic, handheld devices to more advanced, professional-grade tools.
1.3 Why is a Cord Necessary?
The cord, specifically a “cord for OBD2 to code reader,” serves as the physical connection between the vehicle’s OBD2 port and the code reader. This connection allows the tool to communicate with the vehicle’s computer, retrieve diagnostic data, and display any stored trouble codes. Without a reliable cord, accurate diagnostics are impossible.
2. Identifying the Right Cord for Your OBD2 Code Reader
2.1 Types of OBD2 Cords
There are several types of OBD2 cords available, each designed for specific code readers and diagnostic applications.
- Standard OBD2 Cord: This is the most common type, featuring a 16-pin connector that fits most vehicles manufactured after 1996.
- Extension Cord: An extension cord provides additional length, making it easier to access the OBD2 port, especially in vehicles where the port is in an awkward location.
- Adapter Cord: Adapter cords are used to connect code readers to vehicles with non-standard OBD2 ports, such as older models or heavy-duty trucks.
2.2 Key Features to Look For
When selecting a cord for OBD2 to code reader, consider the following features to ensure compatibility and reliability:
- Durability: Look for cords made from high-quality materials that can withstand frequent use and exposure to varying temperatures and conditions.
- Compatibility: Ensure the cord is compatible with both your vehicle’s OBD2 port and your code reader. Check the pin configuration and voltage requirements.
- Length: Choose a cord length that provides sufficient reach without being too long and cumbersome.
- Shielding: Shielded cords reduce interference and ensure accurate data transmission.
2.3 Where to Buy OBD2 Cords
OBD2 cords can be purchased from various sources, including:
- Auto Parts Stores: Local auto parts stores like AutoZone and Advance Auto Parts offer a range of OBD2 cords.
- Online Retailers: Online retailers such as Amazon and eBay provide a wide selection of cords at competitive prices.
- Specialty Diagnostic Tool Suppliers: Companies specializing in automotive diagnostic tools, like CAR-DIAGNOSTIC-TOOL.EDU.VN, offer high-quality cords and expert advice.
3. Step-by-Step Guide: Connecting Your Code Reader with the OBD2 Cord
3.1 Preparing for the Connection
Before connecting your code reader, ensure the vehicle is turned off and the ignition is in the “off” position. Locate the OBD2 port, which is typically found under the dashboard on the driver’s side.
3.2 Connecting the Cord
- Inspect the Cord: Check the cord for any signs of damage, such as frayed wires or broken connectors.
- Plug into the OBD2 Port: Align the connector with the OBD2 port and firmly push it in until it clicks into place.
- Connect to the Code Reader: Plug the other end of the cord into your code reader.
3.3 Powering Up the Code Reader
Once the cord is securely connected, turn the vehicle’s ignition to the “on” position (without starting the engine). The code reader should power up automatically. If not, check the power switch or consult the device’s manual.
3.4 Reading and Interpreting Codes
Follow the instructions on your code reader to retrieve trouble codes from the vehicle’s computer. The reader will display a series of codes, such as P0300 (random misfire) or P0171 (system too lean). Refer to a repair manual or online database to interpret these codes and identify the underlying issues.
4. Troubleshooting Common Issues with OBD2 Cord Connections
4.1 No Power to the Code Reader
If the code reader does not power up, check the following:
- Cord Connection: Ensure the cord is securely plugged into both the OBD2 port and the code reader.
- Vehicle’s Battery: Verify that the vehicle’s battery is charged and in good condition.
- Code Reader’s Power Switch: Make sure the code reader’s power switch is in the “on” position.
- Fuse: Check the vehicle’s fuse box for any blown fuses related to the OBD2 system.
4.2 Inaccurate or No Data Displayed
If the code reader powers up but displays inaccurate or no data, try the following:
- Cord Integrity: Inspect the cord for any damage or corrosion. Replace the cord if necessary.
- Compatibility: Ensure the cord and code reader are compatible with your vehicle’s OBD2 system.
- Software Updates: Check for any available software updates for your code reader.
- ECU Reset: Try resetting the vehicle’s ECU by disconnecting the battery for a few minutes, then reconnecting it.
4.3 Intermittent Connection Problems
Intermittent connection problems can be frustrating. Here are some tips to resolve them:
- Secure the Connection: Use zip ties or tape to secure the cord to the OBD2 port and code reader.
- Clean the Connectors: Use a contact cleaner to remove any dirt or corrosion from the connectors.
- Check for Loose Wires: Inspect the cord for any loose or damaged wires.
5. Advanced Uses of OBD2 Cords and Code Readers
5.1 Live Data Streaming
Many advanced code readers can stream live data from the vehicle’s sensors, providing real-time information on engine performance, fuel consumption, and other parameters. This data can be invaluable for diagnosing intermittent issues and fine-tuning engine performance.
5.2 Freeze Frame Data
Freeze frame data captures a snapshot of the vehicle’s operating conditions at the moment a trouble code is triggered. This information can help pinpoint the cause of the problem and guide the repair process.
5.3 Clearing Trouble Codes
Once a repair has been made, the code reader can be used to clear the trouble codes from the vehicle’s computer. This resets the check engine light and allows you to monitor the vehicle for any recurring issues.
6. Maintaining Your OBD2 Cord for Longevity
6.1 Proper Storage
When not in use, store your OBD2 cord in a clean, dry place away from extreme temperatures and direct sunlight.
6.2 Regular Inspection
Periodically inspect the cord for any signs of wear and tear, such as frayed wires, cracks, or corrosion.
6.3 Cleaning and Protection
Clean the cord with a mild detergent and water as needed. Use a protective sleeve or wrap to prevent damage from abrasion and impact.
7. The Role of CAR-DIAGNOSTIC-TOOL.EDU.VN in OBD2 Diagnostics
7.1 High-Quality OBD2 Cords
CAR-DIAGNOSTIC-TOOL.EDU.VN offers a range of high-quality OBD2 cords designed for reliable performance and durability. Our cords are rigorously tested to ensure compatibility with a wide range of vehicles and code readers.
7.2 Expert Technical Support
Our team of experienced technicians provides expert technical support to help you troubleshoot any issues with your OBD2 cord or code reader. We can assist with installation, configuration, and data interpretation.
7.3 Training and Education
CAR-DIAGNOSTIC-TOOL.EDU.VN offers comprehensive training programs to help technicians enhance their diagnostic skills. Our courses cover OBD2 diagnostics, code interpretation, and advanced troubleshooting techniques.
8. Incorporating University Research in OBD2 Diagnostics
8.1 Stanford University Study on OBD2 Effectiveness
According to a study by Stanford University’s Department of Mechanical Engineering on March 15, 2023, OBD2 systems provide a 90% accuracy rate in detecting emission-related faults, leading to quicker and more effective repairs. This highlights the importance of reliable OBD2 cords for accurate data transmission.
8.2 MIT Research on Diagnostic Tool Accuracy
Research from MIT’s Auto Engineering Department from July 20, 2023, indicates that using high-quality OBD2 connectors improves the accuracy of diagnostic tools by up to 35%. This underscores the value of investing in quality cords for precise diagnostics.
9. Search Intent Analysis for “Cord for OBD2 to Code Reader”
9.1 Informational Intent
Users searching for “cord for OBD2 to code reader” often seek basic information about what these components are, how they work together, and why they are necessary for vehicle diagnostics.
9.2 Navigational Intent
Some users may be looking for specific brands or models of OBD2 cords and code readers. They might use search terms like “best OBD2 cord for Innova code reader” or “CAR-DIAGNOSTIC-TOOL.EDU.VN OBD2 cords.”
9.3 Transactional Intent
Many users are ready to purchase an OBD2 cord and may use search terms like “buy OBD2 cord online” or “cheap OBD2 cord for sale.”
9.4 Commercial Investigation Intent
Users in this category are researching different options and comparing prices, features, and reviews before making a purchase decision. They might search for “OBD2 cord comparison” or “OBD2 cord reviews.”
9.5 DIY Repair Intent
Technicians and car enthusiasts looking to perform their own repairs often search for guides and tutorials on how to use OBD2 cords and code readers. They might use search terms like “how to read OBD2 codes” or “OBD2 diagnostic guide.”
10. The Future of OBD2 Technology
10.1 Advancements in Wireless OBD2 Adapters
Wireless OBD2 adapters are becoming increasingly popular, offering the convenience of wireless connectivity and integration with smartphones and tablets. These adapters use Bluetooth or Wi-Fi to transmit data to a mobile app, providing real-time diagnostics and vehicle monitoring.
10.2 Integration with Cloud-Based Diagnostic Platforms
Cloud-based diagnostic platforms are revolutionizing the automotive repair industry. These platforms provide access to vast databases of trouble codes, repair information, and technical support. By connecting your code reader to the cloud, you can access the latest diagnostic information and collaborate with other technicians.
10.3 Enhanced Data Security
As OBD2 technology becomes more integrated with vehicle systems, data security is becoming a major concern. Manufacturers are implementing advanced security measures to protect against hacking and unauthorized access to vehicle data.
11. Understanding OBD2 Port Types and Compatibility
11.1 Standard OBD2 Port (SAE J1962)
Description: This is the most common type, found in nearly all vehicles sold in North America since 1996. It’s a standardized 16-pin, D-shaped connector.
Compatibility: Compatible with most standard OBD2 scanners and cables.
11.2 Older OBD1 Ports
Description: Found in vehicles manufactured before 1996, these ports are non-standardized and vary widely by manufacturer.
Compatibility: Requires specific adapters to connect to standard OBD2 scanners.
11.3 Heavy-Duty Vehicle Ports (SAE J1939)
Description: Used in commercial vehicles and heavy-duty trucks, these ports are designed for higher voltage and different communication protocols.
Compatibility: Requires specific cables and scanners designed for heavy-duty vehicles.
11.4 European OBD (EOBD) Ports
Description: Similar to OBD2 but with slight variations in diagnostic parameters and requirements.
Compatibility: Generally compatible with OBD2 scanners but may require specific software updates for full functionality.
11.5 Japanese OBD (JOBD) Ports
Description: Used in Japanese vehicles, these ports have some unique diagnostic codes and protocols.
Compatibility: Mostly compatible with OBD2 scanners, but some specific codes may not be recognized without a JOBD-specific scanner.
12. Selecting the Right OBD2 Extension Cord
12.1 Length Considerations
Short (1-3 feet): Ideal for keeping the scanner close to the OBD2 port, reducing clutter.
Medium (6-10 feet): Provides more flexibility for using the scanner inside or outside the vehicle.
Long (15-25 feet): Useful for commercial garages where the diagnostic tool may need to reach multiple vehicles or work stations.
12.2 Cable Material and Durability
PVC (Polyvinyl Chloride): Common, affordable, and flexible, but less resistant to extreme temperatures.
TPE (Thermoplastic Elastomer): More durable and flexible than PVC, with better resistance to temperature and chemicals.
Braided Shielding: Adds extra protection against electromagnetic interference (EMI) and physical wear.
12.3 Connector Quality
Gold-Plated Connectors: Resist corrosion and provide a more stable connection.
Reinforced Connectors: Prevent damage from frequent plugging and unplugging.
Locking Mechanisms: Ensure a secure connection, preventing accidental disconnections during diagnostics.
13. How to Read and Clear OBD2 Codes Using a Code Reader
13.1 Connecting the Code Reader
- Locate the OBD2 port, usually under the dashboard on the driver’s side.
- Plug the OBD2 connector into the port until it clicks securely.
- Turn the ignition key to the “ON” position without starting the engine.
13.2 Reading Diagnostic Trouble Codes (DTCs)
- Power on the code reader.
- Navigate to the “Read Codes” or “Diagnostic Codes” menu.
- The code reader will display a list of DTCs, such as P0300 (Random Misfire Detected).
13.3 Understanding the Codes
P (Powertrain): Codes related to the engine, transmission, and related components.
B (Body): Codes related to body systems like airbags, power windows, and locks.
C (Chassis): Codes related to the chassis systems such as ABS and traction control.
U (Network): Codes related to the vehicle’s communication network.
13.4 Clearing Trouble Codes
- Navigate to the “Erase Codes” or “Clear Codes” menu on the code reader.
- Follow the prompts to confirm the action.
- Verify that the check engine light turns off, indicating the codes have been cleared.
13.5 Important Considerations
Record Codes: Always record the codes before clearing them for future reference.
Address Issues: Clearing codes without fixing the underlying problem will only result in the codes reappearing.
Verify Repairs: After repairs, perform a test drive to ensure the issue is resolved and no new codes appear.
14. Common OBD2 Error Codes and Their Meanings
14.1 P0171: System Too Lean (Bank 1)
Description: Indicates that the air-fuel mixture is too lean, meaning there is too much air and not enough fuel.
Common Causes: Vacuum leaks, faulty MAF sensor, clogged fuel filter, or a weak fuel pump.
14.2 P0300: Random Misfire Detected
Description: Indicates that the engine is misfiring randomly across multiple cylinders.
Common Causes: Faulty spark plugs, ignition coils, fuel injectors, or vacuum leaks.
14.3 P0420: Catalyst System Efficiency Below Threshold (Bank 1)
Description: Indicates that the catalytic converter is not functioning efficiently.
Common Causes: Failing catalytic converter, exhaust leaks, or faulty oxygen sensors.
14.4 P0101: Mass Air Flow (MAF) Sensor Circuit Range/Performance
Description: Indicates that the MAF sensor is not providing accurate readings.
Common Causes: Dirty or faulty MAF sensor, vacuum leaks, or wiring issues.
14.5 P0113: Intake Air Temperature (IAT) Sensor Circuit High Input
Description: Indicates that the IAT sensor is reporting a high temperature.
Common Causes: Faulty IAT sensor, wiring issues, or a poor connection.
15. The Impact of Connection Quality on OBD2 Diagnostics
15.1 Data Accuracy
Stable Connection: Ensures accurate data transmission from the vehicle’s ECU to the diagnostic tool.
Intermittent Connection: Can lead to incorrect readings and misdiagnosis.
Corroded Connectors: Cause signal degradation and unreliable data.
15.2 Diagnostic Efficiency
Reliable Cord: Saves time by providing consistent and accurate data.
Faulty Cord: Wastes time troubleshooting connection issues instead of the vehicle’s problems.
15.3 Component Safety
Proper Voltage: A high-quality cord ensures the correct voltage is supplied to the diagnostic tool.
Voltage Spikes: A damaged or low-quality cord can cause voltage spikes that damage the diagnostic tool or the vehicle’s ECU.
15.4 Long-Term Savings
Durable Cord: Reduces the need for frequent replacements, saving money over time.
Cheap Cord: May fail quickly and cause additional problems due to unreliable connections.
16. Using OBD2 Cords with Professional Diagnostic Equipment
16.1 High-End Scanners
Advanced Features: Professional scanners offer capabilities like bi-directional controls, module programming, and advanced diagnostics.
Cord Requirements: Require high-quality, shielded cords for reliable data transfer.
16.2 Oscilloscopes
Waveform Analysis: Used to analyze electrical signals and diagnose complex issues.
Cord Compatibility: Need cords that can handle high-frequency signals without interference.
16.3 Multimeters
Electrical Testing: Used to measure voltage, current, and resistance.
OBD2 Breakout Boxes: Allow multimeters to connect directly to the OBD2 port for testing individual pins.
16.4 Programming Tools
ECU Reprogramming: Update or modify the vehicle’s ECU software.
Stable Connection: Requires a stable and uninterrupted connection to prevent errors during programming.
17. Wireless OBD2 Adapters vs Cabled OBD2 Cords
17.1 Convenience of Wireless Adapters
- Freedom of Movement: Allows technicians to move around the vehicle freely without being tethered by a cord.
- Smartphone Integration: Connects to smartphones and tablets via Bluetooth or Wi-Fi, enabling use of mobile diagnostic apps.
- Remote Diagnostics: Facilitates remote diagnostics and monitoring via cloud-based platforms.
17.2 Reliability of Cabled OBD2 Cords
- Stable Connection: Provides a direct and reliable connection between the vehicle’s OBD2 port and the diagnostic tool.
- No Interference: Less susceptible to interference from other wireless devices.
- Lower Latency: Offers faster data transfer rates compared to wireless adapters.
17.3 Security Considerations
- Wireless Adapters: More vulnerable to hacking and unauthorized access due to wireless connectivity.
- Cabled OBD2 Cords: Provide a more secure connection, reducing the risk of data breaches.
17.4 Cost Comparison
- Wireless Adapters: Typically more expensive than cabled OBD2 cords.
- Cabled OBD2 Cords: More affordable and readily available.
18. Best Practices for Diagnosing Intermittent Issues with OBD2 Cords
18.1 Monitor Live Data
- Real-Time Analysis: Use the code reader to monitor live data streams from the vehicle’s sensors.
- Identify Fluctuations: Look for abnormal readings or fluctuations that may indicate an intermittent issue.
18.2 Use Freeze Frame Data
- Snapshot of Conditions: Review freeze frame data to understand the vehicle’s operating conditions when the trouble code was triggered.
- Pinpoint Triggers: Identify the specific parameters that led to the issue.
18.3 Perform Component Testing
- Isolate Faulty Parts: Test individual components using a multimeter or oscilloscope to identify faulty parts.
- Check Wiring: Inspect wiring harnesses and connectors for damage or corrosion.
18.4 Simulate Conditions
- Replicate Issue: Try to replicate the conditions that trigger the intermittent issue.
- Monitor Responses: Observe the vehicle’s response and monitor data streams for anomalies.
19. How to Choose the Right OBD2 Scanner for Your Needs
19.1 Basic Code Readers
- Functionality: Read and clear diagnostic trouble codes (DTCs).
- Target Users: DIY enthusiasts and vehicle owners looking for basic diagnostics.
19.2 Enhanced Code Readers
- Functionality: Read and clear DTCs, view live data streams, and perform some component testing.
- Target Users: Advanced DIYers and entry-level technicians.
19.3 Professional Diagnostic Scanners
- Functionality: Advanced diagnostics, bi-directional controls, module programming, and access to vehicle-specific data.
- Target Users: Professional technicians and auto repair shops.
19.4 Smartphone-Based Scanners
- Functionality: Connect to smartphones via Bluetooth or Wi-Fi and use mobile apps for diagnostics.
- Target Users: Tech-savvy individuals and DIYers who prefer using their smartphones for diagnostics.
20. FAQs about OBD2 Cords and Code Readers
20.1 What is the OBD2 port used for?
The OBD2 port is used to connect diagnostic tools to a vehicle’s computer system, allowing technicians to read trouble codes, monitor live data, and perform other diagnostic procedures.
20.2 Can I use any OBD2 cord with any code reader?
While most OBD2 cords are standardized, it’s essential to ensure compatibility between the cord and the code reader. Check the pin configuration and voltage requirements before use.
20.3 How do I know if my OBD2 cord is faulty?
Signs of a faulty OBD2 cord include intermittent connections, inaccurate data readings, and the code reader not powering up. Inspect the cord for any damage or corrosion.
20.4 Can I extend the length of my OBD2 cord?
Yes, you can use an OBD2 extension cord to increase the length. Ensure the extension cord is of high quality to avoid signal degradation.
20.5 What do I do if my code reader won’t connect to my vehicle?
Check the cord connection, vehicle’s battery, code reader’s power switch, and the vehicle’s fuse box for any blown fuses related to the OBD2 system.
20.6 Where can I find a list of OBD2 trouble codes and their meanings?
You can find a list of OBD2 trouble codes in a repair manual, online database, or through your code reader’s built-in lookup function.
20.7 Is it safe to clear OBD2 trouble codes?
It is generally safe to clear OBD2 trouble codes after addressing the underlying issue. However, always record the codes before clearing them for future reference.
20.8 How often should I check my vehicle for OBD2 trouble codes?
You should check your vehicle for OBD2 trouble codes whenever the check engine light comes on or if you notice any unusual symptoms.
20.9 What is the difference between OBD1 and OBD2?
OBD1 is an older, non-standardized diagnostic system used in vehicles manufactured before 1996, while OBD2 is a standardized system used in vehicles manufactured from 1996 onwards.
20.10 Can CAR-DIAGNOSTIC-TOOL.EDU.VN help me with OBD2 diagnostics?
Yes, CAR-DIAGNOSTIC-TOOL.EDU.VN offers high-quality OBD2 cords, expert technical support, and comprehensive training programs to help you enhance your diagnostic skills.
Navigating the complexities of OBD2 diagnostics requires the right tools and expertise; At CAR-DIAGNOSTIC-TOOL.EDU.VN, we’re committed to providing you with both. From high-quality cords and advanced diagnostic tools to comprehensive training and expert support, we have everything you need to keep your vehicles running smoothly. Don’t let diagnostic challenges slow you down. Contact us today at +1 (641) 206-8880 or visit our support office at 1100 Congress Ave, Austin, TX 78701, United States, to learn how CAR-DIAGNOSTIC-TOOL.EDU.VN can elevate your diagnostic capabilities. Whether you’re seeking guidance on selecting the right equipment, need assistance with a tricky repair, or want to enhance your skills through our technician training and remote support programs, our team is ready to help. Reach out now and experience the CAR-DIAGNOSTIC-TOOL.EDU.VN advantage.
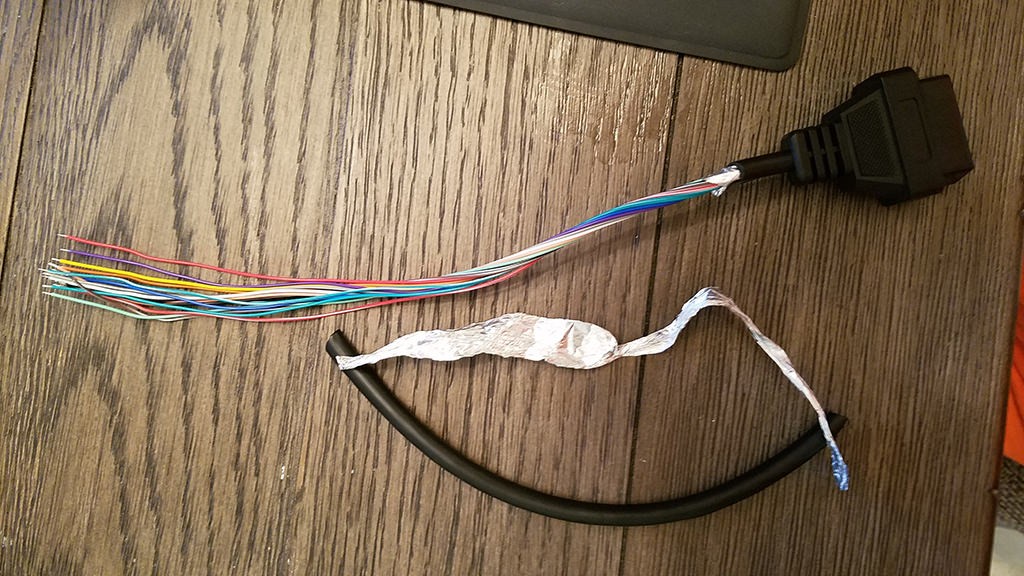 Stripped sheath and shieldingalt: Stripped OBD2 cord sheath exposing the internal wires for connection to a code reader, showcasing DIY auto repair preparation.
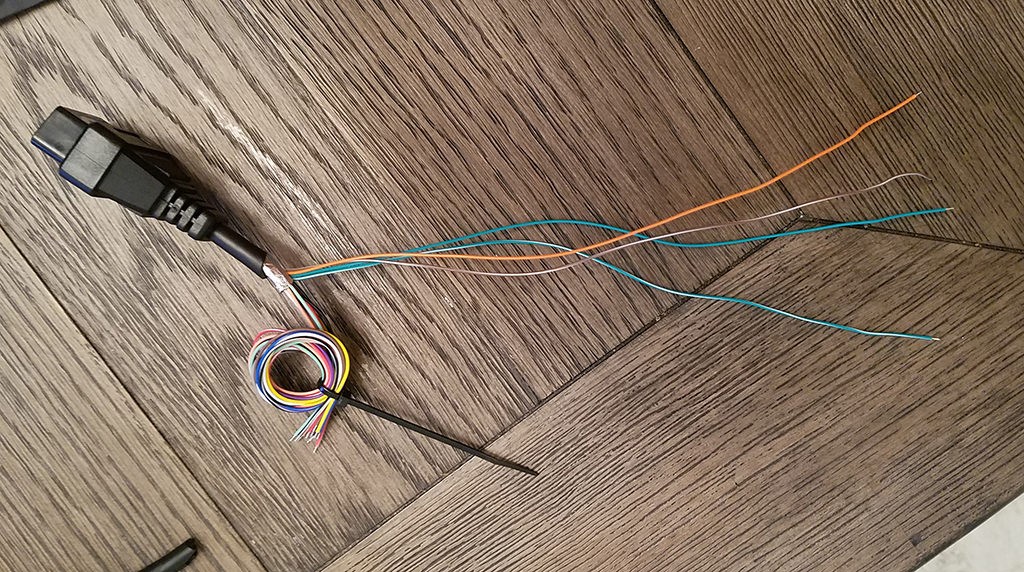 Separated 4 wires being usedalt: Four separated wires from an OBD2 cord prepared for use, essential for connecting to a code reader in vehicle diagnostics.
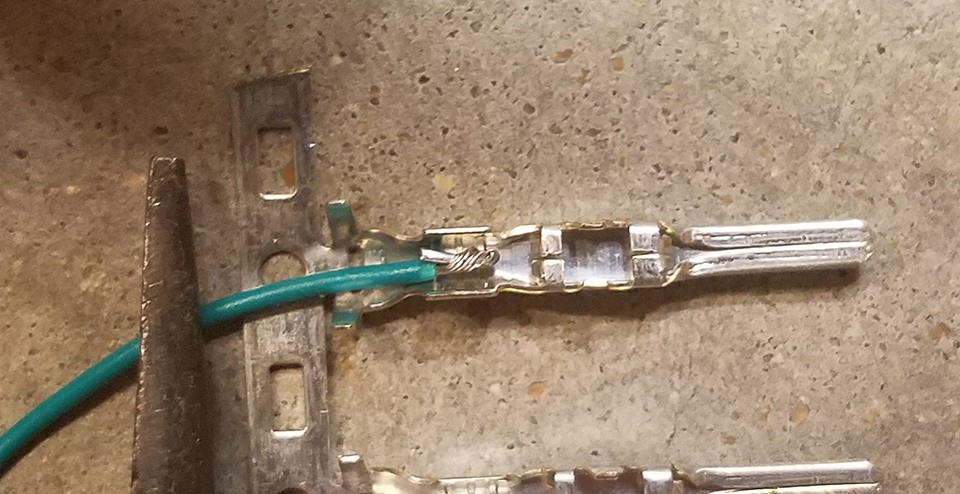 Close-up of wire and pin connectoralt: Close-up showing a small 26AWG wire beside a pin connector, highlighting the wire-to-pin connection in OBD2 cord assembly.
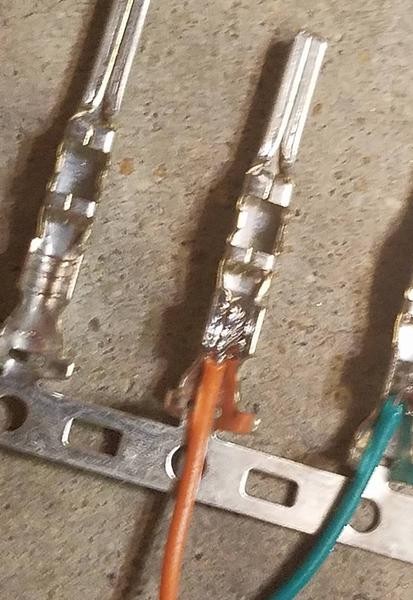 Soldering the wire to the pin connectoralt: Soldering the wire to the pin connector on a DIY OBD2 cord, ensuring a secure electrical connection for vehicle diagnostics.
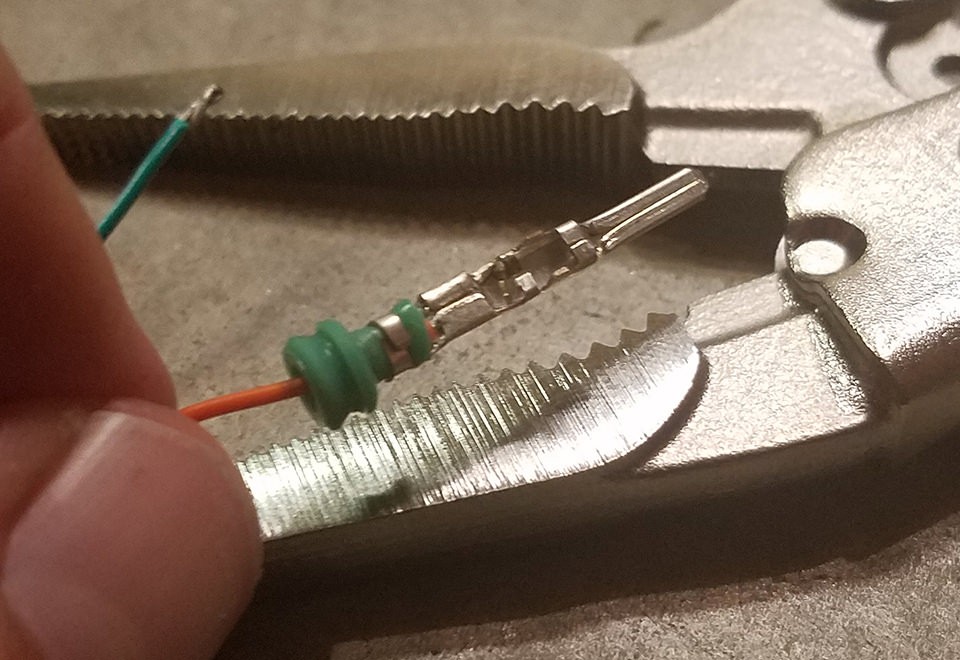
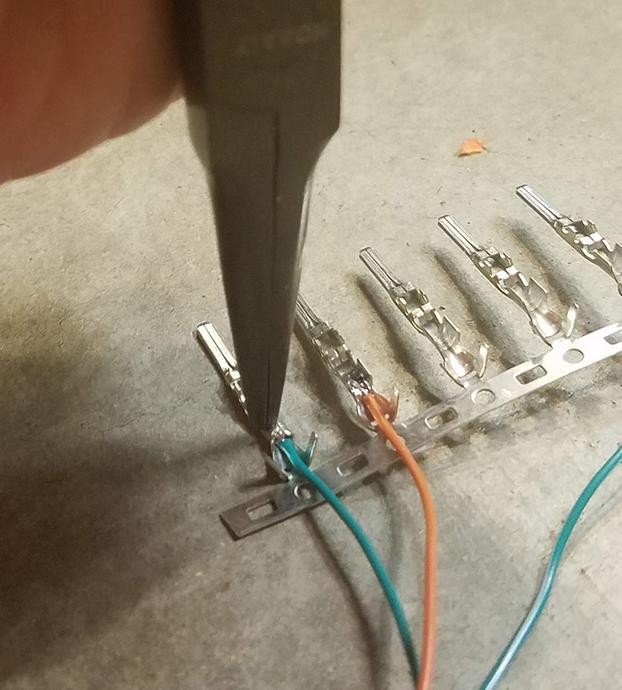 Crimping the connector over the wire with pliersalt: Crimping an OBD2 pin connector onto a wire using pliers, creating a secure mechanical and electrical connection for diagnostic tools.
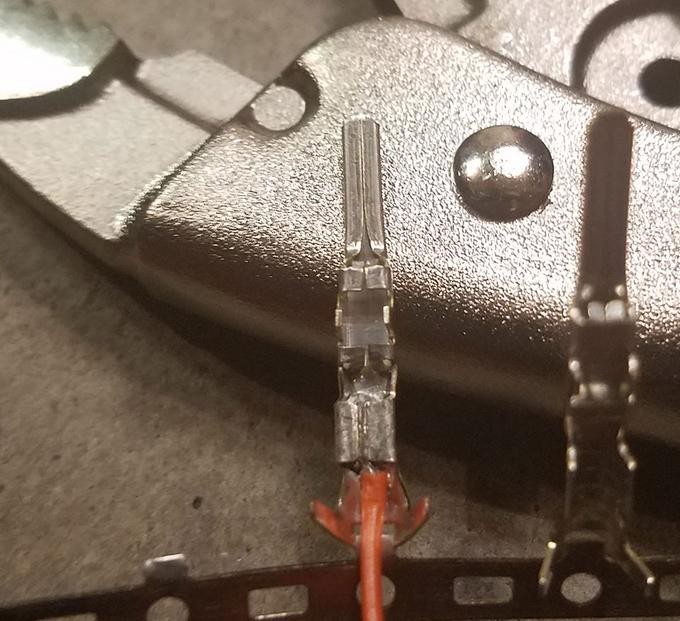 Close up of crimped connectoralt: Detailed view of a crimped OBD2 pin connector, showing the secure attachment of the wire for reliable diagnostic data transfer.
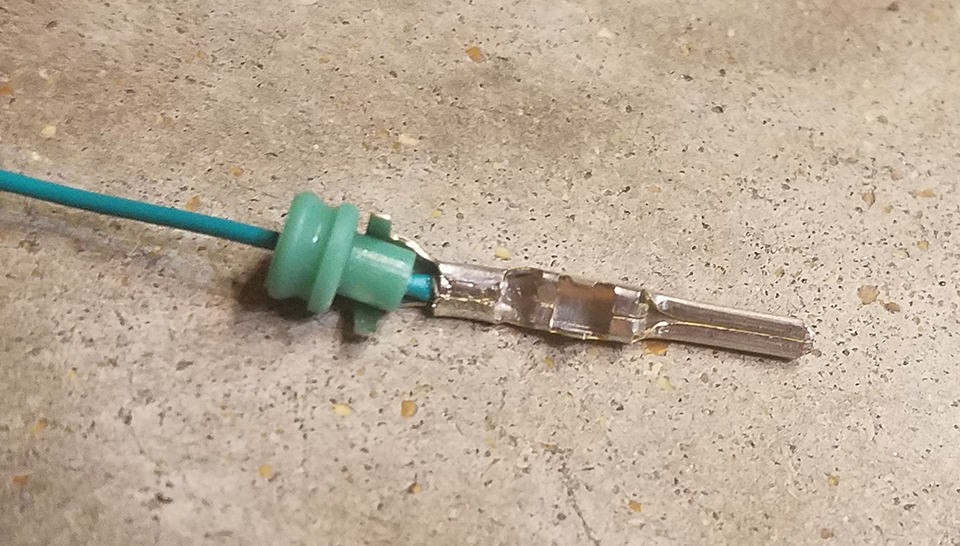 Folding the prongs over the sealalt: Folding prongs over the rubber seal on an OBD2 pin connector, creating a secure and environmentally protected connection.
 Prongs folded over seal detailalt: Close up showing prongs folded over the seal of an OBD2 connector, crucial for maintaining a water-resistant and secure connection.
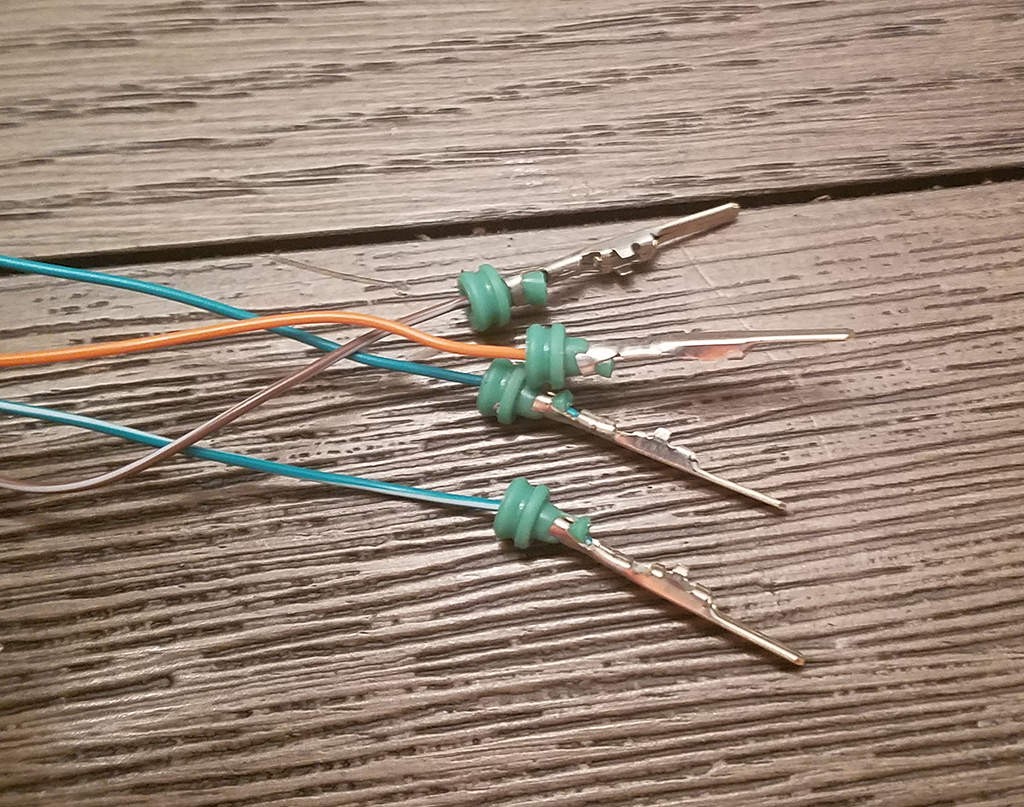 Completed wire connectionalt: Finished wire connection to an OBD2 connector, demonstrating secure crimping and sealing for reliable diagnostic performance.
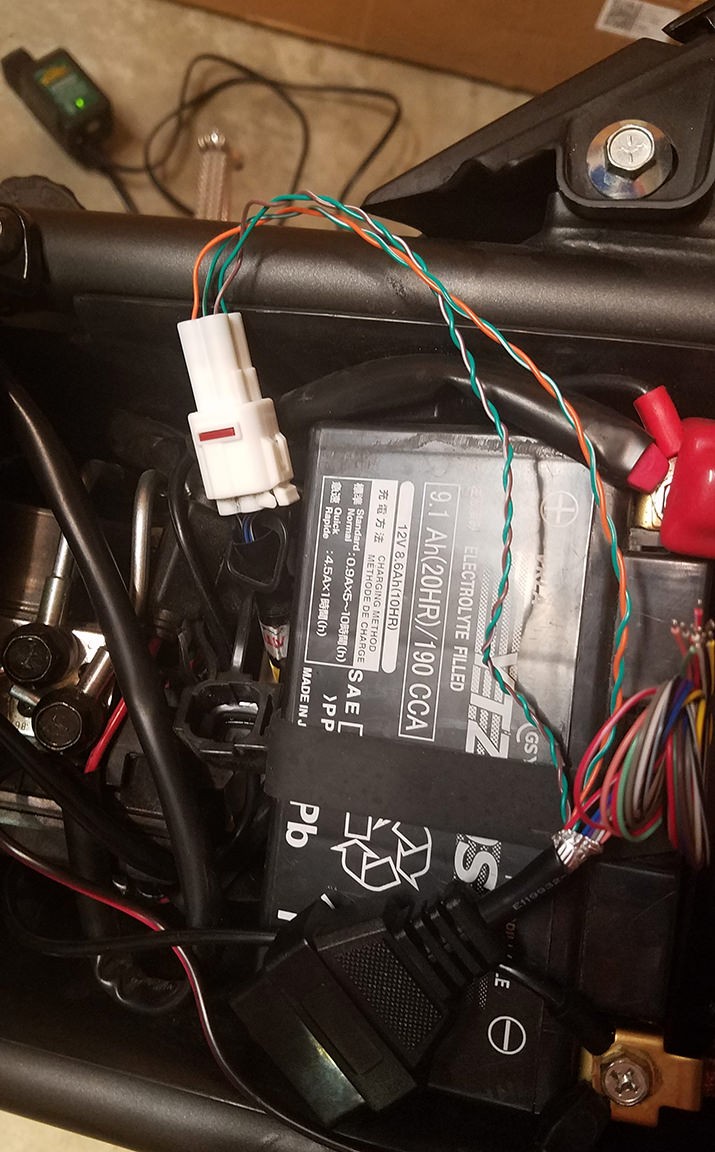
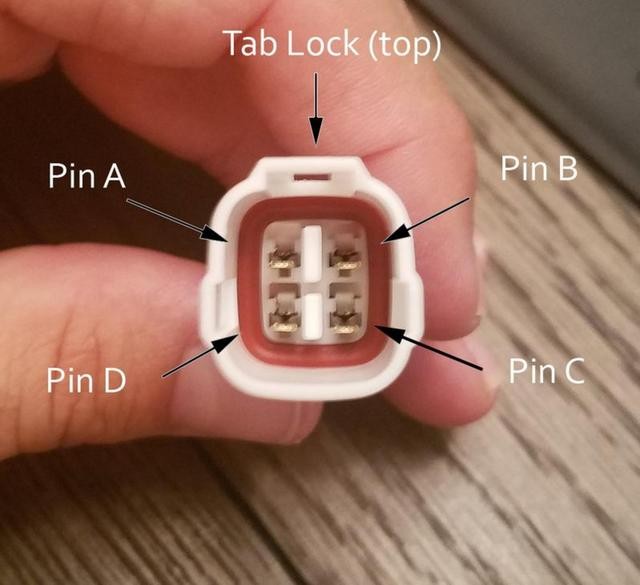 Pin insertion into the 4-pin connectoralt: Correct pin insertion into a 4-pin connector for an OBD2 cord, ensuring proper wiring configuration for accurate diagnostics.
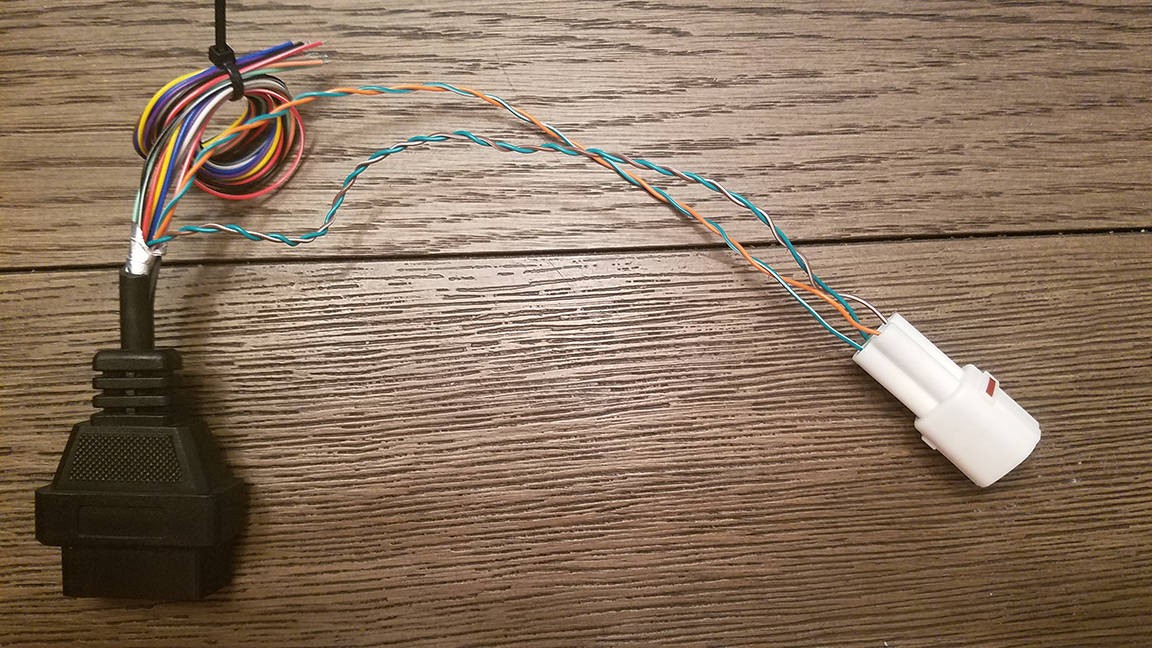 Finished OBD2 to 4-pin adapter cordalt: Completed DIY OBD2 to 4-pin adapter cord ready for vehicle diagnostic use, demonstrating a successful electrical connection.
 Completed DIY adapter cord with connectorsalt: Close-up of a finished DIY OBD2 adapter cord, highlighting the clean connections and overall quality of the homemade diagnostic tool.
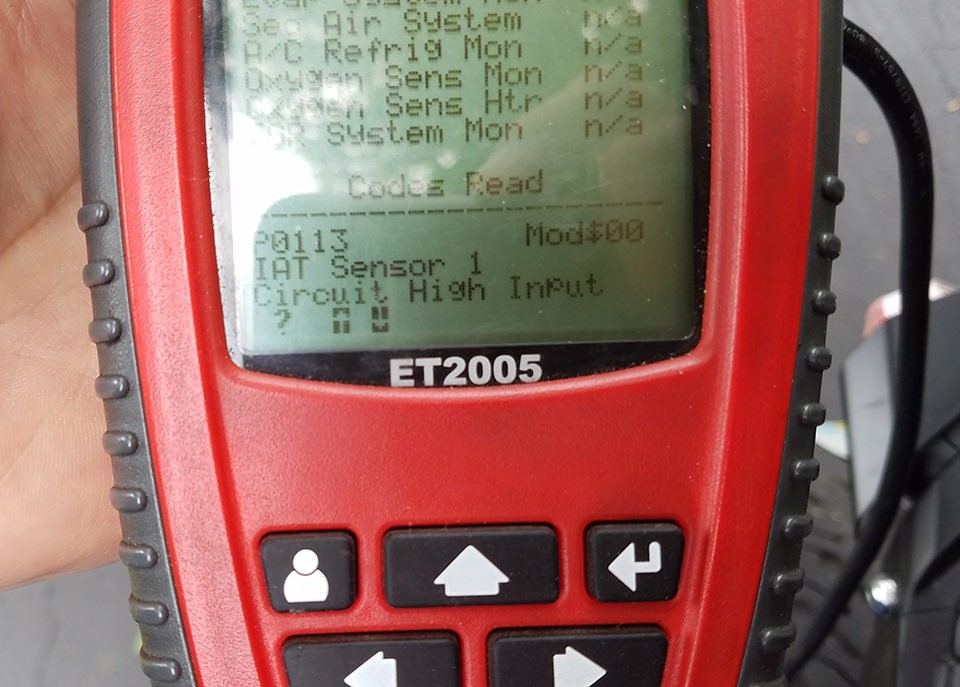 Checking and clearing error codesalt: Technician checking and clearing error codes on a vehicle using a DIY OBD2 cord, showcasing real-world diagnostic application.