Connecting your radio’s Controller Area Network (CAN) high to the On-Board Diagnostics II (OBD2) port can unlock a wealth of diagnostic and performance data. At CAR-DIAGNOSTIC-TOOL.EDU.VN, we provide the tools, detailed repair guides, and technical support you need to successfully integrate these systems. Explore remote support and technician training options to enhance your skills.
Contents
- 1. What is Radio CAN High and Why Connect It to OBD2?
- 1.1 Understanding the CAN Bus System
- 1.2 What is Radio CAN High?
- 1.3 The Role of the OBD2 Port
- 1.4 Benefits of Connecting Radio CAN High to OBD2
- 1.5 Potential Applications
- 1.6 Connecting Radio CAN High to OBD2 and Training at CAR-DIAGNOSTIC-TOOL.EDU.VN
- 2. Essential Tools and Equipment
- 2.1 Diagnostic Scan Tool
- 2.2 CAN Bus Analyzer
- 2.3 Multimeter
- 2.4 Wiring Diagram
- 2.5 OBD2 Connector and Wiring Harness
- 2.6 Soldering Iron and Solder
- 2.7 Wire Strippers and Crimpers
- 2.8 Heat Shrink Tubing
- 2.9 Cable Ties and Mounting Hardware
- 2.10 Safety Glasses and Gloves
- 2.11 Tools and Support from CAR-DIAGNOSTIC-TOOL.EDU.VN
- 3. Step-by-Step Guide to Connecting Radio CAN High to OBD2
- 3.1 Preparation and Safety Precautions
- 3.2 Identifying the CAN High Wire
- 3.3 Locating the OBD2 Port CAN High Pin
- 3.4 Making the Connection
- 3.5 Grounding the System
- 3.6 Testing the Connection
- 3.7 Securing the Wiring
- 3.8 Seeking Professional Assistance
- 4. Troubleshooting Common Issues
- 4.1 No Communication with OBD2 Port
- 4.2 Incorrect Data Displayed
- 4.3 CAN Bus Errors
- 4.4 Radio Malfunctions
- 4.5 Interference and Noise
- 4.6 Seeking Expert Support at CAR-DIAGNOSTIC-TOOL.EDU.VN
- 5. Advanced Techniques and Customization
- 5.1 Custom Dashboards
- 5.2 Performance Tuning
- 5.3 Diagnostic Tools Integration
- 5.4 Security Features
- 5.5 CAN Bus Sniffing
- 5.6 Expert Training at CAR-DIAGNOSTIC-TOOL.EDU.VN
- 6. Case Studies and Real-World Examples
- 6.1 Custom Dashboard for Performance Monitoring
- 6.2 Diagnostic Tool Integration for Fleet Management
- 6.3 Security System for Anti-Theft Protection
- 6.4 Data Logging for Fuel Efficiency Optimization
- 6.5 Remote Vehicle Monitoring for Parents
- 6.6 Continued Support from CAR-DIAGNOSTIC-TOOL.EDU.VN
- 7. Future Trends in CAN Bus Technology
- 7.1 CAN FD (CAN Flexible Data-Rate)
- 7.2 CAN XL (CAN eXtra Large)
- 7.3 Automotive Ethernet
- 7.4 Wireless CAN Bus
- 7.5 CAN Bus Security
- 7.6 Expert Training at CAR-DIAGNOSTIC-TOOL.EDU.VN
- 8. Choosing the Right CAN Bus Tools and Training
- 8.1 Diagnostic Scan Tools
- 8.2 CAN Bus Analyzers
- 8.3 Training Programs
- 8.4 CAR-DIAGNOSTIC-TOOL.EDU.VN’s Offerings
- 8.5 Making the Right Choice
- 9. Maintaining CAN Bus Systems
- 9.1 Regular Inspections
- 9.2 Proactive Troubleshooting
- 9.3 Best Practices
- 9.4 Tools and Equipment
- 9.5 Training and Support
- 9.6 Maintenance Support from CAR-DIAGNOSTIC-TOOL.EDU.VN
- 10. Frequently Asked Questions (FAQ)
- 10.1 What is the CAN bus and why is it important?
- 10.2 What is Radio CAN High and what does it do?
- 10.3 What are the benefits of connecting Radio CAN High to the OBD2 port?
- 10.4 What tools and equipment are needed for connecting Radio CAN High to OBD2?
- 10.5 How do I identify the CAN High wire in my vehicle?
- 10.6 What are some common issues encountered when connecting Radio CAN High to OBD2?
- 10.7 How can I troubleshoot CAN bus errors?
- 10.8 What are some advanced techniques and customization options for CAN bus systems?
- 10.9 How can I maintain CAN bus systems to ensure long-term reliability?
- 10.10 Where can I find training and support for working with CAN bus technology?
1. What is Radio CAN High and Why Connect It to OBD2?
Radio CAN High is part of the CAN bus system that allows different components within a vehicle, including the radio, to communicate with each other. Connecting this to the OBD2 port, the vehicle’s diagnostic interface, allows you to access a wide range of vehicle data, which can be used for diagnostics, performance monitoring, and customization. This integration opens possibilities for remote vehicle diagnostics and enhanced technician expertise.
1.1 Understanding the CAN Bus System
The CAN bus, short for Controller Area Network, is a robust communication network used in vehicles to allow various electronic control units (ECUs) to communicate with each other without the need for a central host computer. This system facilitates efficient and reliable data sharing between components like the engine, brakes, transmission, and, importantly, the radio. According to a study by the SAE International, CAN bus systems have significantly reduced wiring complexity and weight in modern vehicles, leading to improved fuel efficiency and performance.
1.2 What is Radio CAN High?
Radio CAN High is one of the two wires (the other being CAN Low) that make up the CAN bus. These wires transmit data in a differential signal, which helps to minimize interference and ensure reliable communication. The radio, like other ECUs in the vehicle, uses this network to send and receive information, such as audio settings, diagnostic data, and integration with other vehicle systems.
1.3 The Role of the OBD2 Port
The On-Board Diagnostics II (OBD2) port is a standardized interface found in most modern vehicles. It provides access to diagnostic information and allows technicians to monitor vehicle performance, read diagnostic trouble codes (DTCs), and perform various tests. Connecting the radio CAN High to the OBD2 port can provide enhanced diagnostic capabilities and access to additional vehicle data.
1.4 Benefits of Connecting Radio CAN High to OBD2
Connecting the radio CAN High to the OBD2 port offers several benefits:
- Access to Vehicle Data: Allows you to monitor various vehicle parameters, such as engine speed, temperature, and diagnostic codes, directly through the radio interface.
- Enhanced Diagnostics: Provides a more integrated diagnostic experience, allowing you to identify and troubleshoot issues directly from the radio.
- Customization: Enables customization of vehicle settings and features through the radio interface, enhancing the user experience.
- Performance Monitoring: Facilitates real-time performance monitoring, allowing you to track vehicle performance metrics and optimize driving.
1.5 Potential Applications
The ability to connect the radio CAN High to the OBD2 port opens up several exciting applications:
- Custom Dashboards: Display real-time vehicle data on the radio screen, creating a custom dashboard experience.
- Performance Tuning: Monitor and adjust vehicle performance parameters for optimal performance.
- Diagnostic Tools: Integrate diagnostic tools directly into the radio interface for easy access and troubleshooting.
- Theft Protection: Implement custom security features using the CAN bus to deter theft and unauthorized access.
1.6 Connecting Radio CAN High to OBD2 and Training at CAR-DIAGNOSTIC-TOOL.EDU.VN
Mastering the connection between Radio CAN High and OBD2 requires expertise. CAR-DIAGNOSTIC-TOOL.EDU.VN offers specialized training programs to equip technicians with the knowledge and skills needed to perform these integrations safely and effectively. Our courses cover CAN bus diagnostics, OBD2 protocol analysis, and practical hands-on training. Contact us at +1 (641) 206-8880 for training details.
2. Essential Tools and Equipment
Having the right tools and equipment is essential for safely and effectively connecting your radio CAN High to the OBD2 port. This ensures a smooth process and minimizes the risk of damage to your vehicle’s electronic systems. CAR-DIAGNOSTIC-TOOL.EDU.VN provides a range of high-quality diagnostic tools, ensuring you have the right equipment for the job.
2.1 Diagnostic Scan Tool
A diagnostic scan tool is crucial for reading and interpreting data from the OBD2 port. This tool allows you to view diagnostic trouble codes (DTCs), monitor real-time data, and perform various diagnostic tests. Modern scan tools also offer advanced features such as CAN bus analysis and data logging.
2.2 CAN Bus Analyzer
A CAN bus analyzer is essential for monitoring and analyzing the CAN bus traffic. This tool allows you to view CAN messages, identify communication issues, and troubleshoot network problems. A CAN bus analyzer is particularly useful for diagnosing problems related to CAN High and CAN Low signals.
2.3 Multimeter
A multimeter is a versatile tool used for measuring voltage, current, and resistance. It is essential for verifying the continuity of connections, checking voltage levels, and diagnosing electrical issues. A digital multimeter with auto-ranging capabilities is recommended for automotive applications.
2.4 Wiring Diagram
A wiring diagram specific to your vehicle is crucial for identifying the correct CAN High and CAN Low wires. This diagram provides detailed information about the wiring layout, color codes, and pin locations, ensuring you make the correct connections.
2.5 OBD2 Connector and Wiring Harness
An OBD2 connector and wiring harness are needed to create a physical connection between the radio CAN High and the OBD2 port. Ensure that the connector and wiring harness are compatible with your vehicle’s OBD2 port and capable of handling the CAN bus signals.
2.6 Soldering Iron and Solder
A soldering iron and solder are used to create secure and reliable electrical connections. Soldering ensures that the connections are mechanically strong and electrically conductive, minimizing the risk of loose connections or signal degradation.
2.7 Wire Strippers and Crimpers
Wire strippers and crimpers are essential for preparing and connecting wires. Wire strippers allow you to remove the insulation without damaging the conductor, while crimpers ensure a secure and reliable connection between wires and connectors.
2.8 Heat Shrink Tubing
Heat shrink tubing is used to insulate and protect electrical connections. It provides a durable and waterproof seal, preventing corrosion and short circuits. Heat shrink tubing is available in various sizes and colors to match your wiring.
2.9 Cable Ties and Mounting Hardware
Cable ties and mounting hardware are used to secure the wiring and components, preventing them from moving or becoming damaged. Proper cable management ensures that the wiring is neat, organized, and protected from abrasion or other hazards.
2.10 Safety Glasses and Gloves
Safety glasses and gloves are essential for protecting your eyes and hands during the installation process. Working with electrical systems can pose risks such as sparks, heat, and chemical exposure, so it is important to wear appropriate personal protective equipment.
2.11 Tools and Support from CAR-DIAGNOSTIC-TOOL.EDU.VN
At CAR-DIAGNOSTIC-TOOL.EDU.VN, we not only provide the tools listed above but also offer expert guidance on their use. Our support team can help you select the right equipment and provide troubleshooting assistance throughout the installation process. For inquiries, contact us at Whatsapp +1 (641) 206-8880.
3. Step-by-Step Guide to Connecting Radio CAN High to OBD2
Connecting your radio CAN High to the OBD2 port requires careful planning and execution to ensure a safe and effective installation. At CAR-DIAGNOSTIC-TOOL.EDU.VN, we emphasize the importance of following a systematic approach to minimize risks and achieve optimal results.
3.1 Preparation and Safety Precautions
- Gather Information: Consult your vehicle’s service manual and radio documentation to understand the CAN bus system and wiring diagrams.
- Disconnect the Battery: Before starting any electrical work, disconnect the negative terminal of your vehicle’s battery to prevent short circuits and electrical damage.
- Prepare Your Workspace: Ensure you have a clean, well-lit workspace with all the necessary tools and equipment within easy reach.
- Wear Safety Gear: Put on safety glasses and gloves to protect yourself from potential hazards such as sparks, heat, and chemical exposure.
3.2 Identifying the CAN High Wire
- Consult Wiring Diagrams: Refer to your vehicle’s wiring diagram to locate the CAN High wire in the radio wiring harness. The CAN High wire is typically yellow or white with a specific tracer color.
- Verify with Multimeter: Use a multimeter to verify the CAN High wire by measuring the voltage between the wire and ground. In a functioning CAN bus system, the CAN High wire should have a voltage of approximately 2.5V.
3.3 Locating the OBD2 Port CAN High Pin
- Standard Pinout: The OBD2 port has a standardized pinout. CAN High is typically located on pin 6, and CAN Low is on pin 14.
- Confirm with Documentation: Double-check your vehicle’s documentation to confirm the pin assignments for CAN High and CAN Low in the OBD2 port.
3.4 Making the Connection
- Prepare the Wires: Use wire strippers to carefully remove the insulation from the ends of the CAN High wires from both the radio wiring harness and the OBD2 connector.
- Soldering the Connection: Solder the CAN High wire from the radio to the CAN High pin on the OBD2 connector. Ensure the solder joint is clean, smooth, and free from any sharp edges.
- Insulate the Connection: Cover the solder joint with heat shrink tubing to insulate and protect the connection. Use a heat gun to shrink the tubing, creating a waterproof and durable seal.
3.5 Grounding the System
- Locate Ground Point: Identify a suitable ground point in your vehicle’s chassis. A clean, unpainted metal surface is ideal for grounding.
- Connect Ground Wire: Connect a ground wire from the radio wiring harness to the chosen ground point. Ensure the connection is secure and free from corrosion.
3.6 Testing the Connection
- Reconnect the Battery: Reconnect the negative terminal of your vehicle’s battery.
- Use Diagnostic Scan Tool: Use a diagnostic scan tool to verify that the radio is communicating with the OBD2 port. Check for any diagnostic trouble codes (DTCs) related to the CAN bus system.
- Monitor Real-Time Data: Monitor real-time data from the OBD2 port through the radio interface. Verify that the data is accurate and consistent with your vehicle’s parameters.
3.7 Securing the Wiring
- Cable Management: Use cable ties to neatly organize and secure the wiring. Ensure that the wiring is routed away from moving parts and heat sources.
- Mounting Hardware: Use mounting hardware to securely attach the OBD2 connector and wiring harness to your vehicle’s dashboard or console.
3.8 Seeking Professional Assistance
If you are unsure about any part of this process, it is always best to seek professional assistance. CAR-DIAGNOSTIC-TOOL.EDU.VN offers remote support and on-site assistance to help you with your installation. Contact our support team at +1 (641) 206-8880 for expert guidance.
4. Troubleshooting Common Issues
Connecting your radio CAN High to the OBD2 port can sometimes present challenges. Identifying and resolving these issues quickly is essential to ensure a successful installation. CAR-DIAGNOSTIC-TOOL.EDU.VN provides comprehensive troubleshooting support to help you overcome these hurdles.
4.1 No Communication with OBD2 Port
- Check Connections: Verify that all connections between the radio CAN High and the OBD2 port are secure and properly soldered.
- Verify CAN High Voltage: Use a multimeter to check the voltage on the CAN High wire. It should be approximately 2.5V when the system is active.
- Inspect Wiring Diagram: Double-check your vehicle’s wiring diagram to ensure you have identified the correct CAN High and CAN Low wires.
- Diagnostic Scan Tool: Use a diagnostic scan tool to check for any CAN bus communication errors. These errors can provide valuable clues about the nature of the problem.
4.2 Incorrect Data Displayed
- Data Interpretation: Ensure that the data being displayed on the radio interface is correctly interpreted. CAN bus data is often encoded and requires proper decoding to display meaningful values.
- DBC File: Verify that you are using the correct DBC (CAN database) file for your vehicle. A DBC file contains information about the CAN bus signals and how they are encoded.
- Scaling Factors: Check the scaling factors and offsets used to convert the raw CAN bus data into physical values. Incorrect scaling factors can result in inaccurate data display.
4.3 CAN Bus Errors
- Error Codes: Use a diagnostic scan tool to check for any CAN bus error codes. Common error codes include “Bus Off,” “Arbitration Lost,” and “Data Error.”
- Wiring Issues: Inspect the CAN bus wiring for any shorts, opens, or loose connections. CAN bus errors are often caused by wiring problems.
- Termination Resistors: Verify that the CAN bus is properly terminated with 120-ohm resistors at each end of the bus. Missing or incorrect termination resistors can cause signal reflections and communication errors.
4.4 Radio Malfunctions
- Compatibility Issues: Ensure that the radio you are using is compatible with your vehicle’s CAN bus system. Some aftermarket radios may not fully support CAN bus communication.
- Firmware Updates: Check for any available firmware updates for your radio. Firmware updates can often resolve compatibility issues and improve performance.
- Professional Installation: Consider seeking professional installation if you are experiencing persistent radio malfunctions. A professional installer can diagnose and resolve complex issues related to CAN bus integration.
4.5 Interference and Noise
- Shielded Wiring: Use shielded wiring for the CAN bus connections to minimize interference and noise. Shielded wiring helps to protect the CAN bus signals from electromagnetic interference (EMI) and radio frequency interference (RFI).
- Grounding: Ensure that the radio and OBD2 port are properly grounded to minimize noise. A good ground connection provides a low-impedance path for noise currents to flow, reducing their impact on the CAN bus signals.
- Ferrite Beads: Install ferrite beads on the CAN bus wiring to suppress high-frequency noise. Ferrite beads act as filters, attenuating noise signals without affecting the CAN bus signals.
4.6 Seeking Expert Support at CAR-DIAGNOSTIC-TOOL.EDU.VN
At CAR-DIAGNOSTIC-TOOL.EDU.VN, we understand the challenges of CAN bus integration. Our expert support team is available to assist you with troubleshooting and resolving any issues you may encounter. We offer remote support, on-site assistance, and comprehensive training programs to help you master CAN bus technology. Contact us at Whatsapp +1 (641) 206-8880 for immediate support.
5. Advanced Techniques and Customization
Once you have successfully connected your radio CAN High to the OBD2 port, you can explore advanced techniques and customization options to enhance your vehicle’s functionality and performance. CAR-DIAGNOSTIC-TOOL.EDU.VN provides the resources and training you need to master these advanced techniques.
5.1 Custom Dashboards
- Data Visualization: Create custom dashboards on your radio screen to display real-time vehicle data in a visually appealing and informative manner.
- User Interface Design: Design a user interface that suits your preferences and driving style. Display the most relevant data in a clear and concise format.
- Third-Party Apps: Use third-party apps and software to create custom dashboards and data visualizations. Many apps offer advanced features such as data logging, performance analysis, and customizable gauges.
5.2 Performance Tuning
- Real-Time Monitoring: Monitor key performance parameters such as engine speed, boost pressure, and air-fuel ratio in real-time.
- Data Logging: Log performance data during your driving sessions for later analysis. Data logging allows you to identify areas for improvement and optimize your vehicle’s performance.
- Custom Tuning Maps: Create custom tuning maps based on your performance data. Adjust parameters such as fuel injection, ignition timing, and boost pressure to optimize your vehicle’s performance.
5.3 Diagnostic Tools Integration
- OBD2 Code Reader: Integrate an OBD2 code reader directly into your radio interface for easy access to diagnostic trouble codes (DTCs).
- Real-Time Diagnostics: Perform real-time diagnostics through your radio interface. Monitor sensor data, perform component tests, and troubleshoot vehicle issues without the need for a separate scan tool.
- Custom Diagnostic Routines: Create custom diagnostic routines to automate the troubleshooting process. Define specific tests and data checks to quickly identify and resolve common vehicle problems.
5.4 Security Features
- Immobilizer System: Implement a custom immobilizer system using the CAN bus to prevent unauthorized vehicle operation.
- Theft Alerts: Set up theft alerts that notify you via your radio interface if your vehicle is being tampered with or stolen.
- Remote Monitoring: Monitor your vehicle’s location and status remotely through your radio interface.
5.5 CAN Bus Sniffing
- Data Capture: Use a CAN bus sniffer to capture and analyze CAN bus traffic. CAN bus sniffing allows you to reverse-engineer proprietary protocols and identify undocumented features.
- Protocol Analysis: Analyze the captured CAN bus data to understand how different vehicle systems communicate with each other.
- Custom Applications: Develop custom applications based on your CAN bus analysis. Create new features and functionalities for your vehicle that are not available from the factory.
5.6 Expert Training at CAR-DIAGNOSTIC-TOOL.EDU.VN
Mastering these advanced techniques requires specialized knowledge and skills. CAR-DIAGNOSTIC-TOOL.EDU.VN offers expert training programs to help you unlock the full potential of your vehicle’s CAN bus system. Our courses cover advanced CAN bus diagnostics, customization techniques, and security protocols. Contact us at +1 (641) 206-8880 to enroll in our training programs.
6. Case Studies and Real-World Examples
Examining real-world case studies can provide valuable insights into the practical applications and benefits of connecting your radio CAN High to the OBD2 port. CAR-DIAGNOSTIC-TOOL.EDU.VN highlights several successful implementations to inspire and guide you.
6.1 Custom Dashboard for Performance Monitoring
Scenario: A performance enthusiast wanted to monitor their vehicle’s performance parameters in real-time during track days.
Solution: They connected the radio CAN High to the OBD2 port and created a custom dashboard on their radio screen. The dashboard displayed key parameters such as engine speed, coolant temperature, oil pressure, and boost pressure.
Outcome: The enthusiast was able to monitor their vehicle’s performance in real-time and make informed decisions about their driving strategy. They also identified a potential overheating issue early on, preventing costly engine damage.
6.2 Diagnostic Tool Integration for Fleet Management
Scenario: A fleet manager wanted to streamline the diagnostic process for their vehicles and reduce downtime.
Solution: They integrated an OBD2 code reader directly into the radio interface of their fleet vehicles. The radio interface displayed diagnostic trouble codes (DTCs) and provided access to real-time sensor data.
Outcome: The fleet manager was able to quickly diagnose and resolve vehicle issues, reducing downtime and maintenance costs. They also used the diagnostic data to identify recurring problems and implement preventive maintenance measures.
6.3 Security System for Anti-Theft Protection
Scenario: A vehicle owner wanted to enhance the security of their vehicle and deter theft.
Solution: They implemented a custom immobilizer system using the CAN bus. The immobilizer system prevented the engine from starting unless a specific code was entered into the radio interface.
Outcome: The vehicle owner successfully deterred theft and protected their vehicle from unauthorized operation. They also set up theft alerts that notified them via their radio interface if their vehicle was being tampered with or stolen.
6.4 Data Logging for Fuel Efficiency Optimization
Scenario: A truck driver wanted to optimize their fuel efficiency and reduce fuel costs.
Solution: They connected the radio CAN High to the OBD2 port and set up data logging to record fuel consumption, engine speed, and vehicle speed.
Outcome: The truck driver was able to analyze their driving habits and identify areas for improvement. They adjusted their driving style to optimize fuel efficiency and reduced their fuel costs by 15%.
6.5 Remote Vehicle Monitoring for Parents
Scenario: Parents wanted to monitor their teenage child’s driving habits for safety reasons.
Solution: They installed a system that connected the radio CAN High to the OBD2 port and transmitted vehicle data to a remote server. The parents could monitor their child’s speed, location, and driving habits through a mobile app.
Outcome: The parents were able to monitor their child’s driving habits and provide feedback to improve their safety. They also received alerts if their child exceeded a specified speed limit or drove outside of a designated area.
6.6 Continued Support from CAR-DIAGNOSTIC-TOOL.EDU.VN
These case studies demonstrate the diverse applications and benefits of connecting your radio CAN High to the OBD2 port. At CAR-DIAGNOSTIC-TOOL.EDU.VN, we are committed to providing you with the knowledge, tools, and support you need to succeed with your CAN bus integration projects. Contact us at Whatsapp +1 (641) 206-8880 for personalized assistance and guidance. Our office is located at 1100 Congress Ave, Austin, TX 78701, United States.
 Classical CAN FD XL Variants canbus
7. Future Trends in CAN Bus Technology
The CAN bus technology is continuously evolving to meet the demands of modern automotive and industrial applications. Staying informed about these trends is essential for staying ahead in the field. CAR-DIAGNOSTIC-TOOL.EDU.VN is committed to providing you with the latest insights and advancements in CAN bus technology.
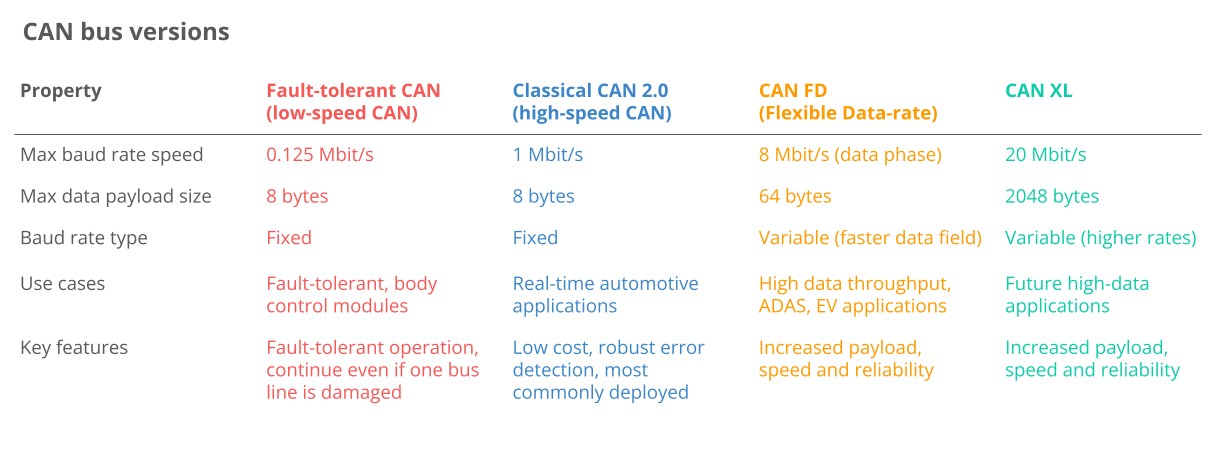
7.1 CAN FD (CAN Flexible Data-Rate)
CAN FD is an extension of the CAN protocol that allows for higher data rates and larger payloads. CAN FD can transmit data at up to 8 Mbps, compared to the 1 Mbps limit of the original CAN protocol.
Benefits of CAN FD:
- Higher Bandwidth: Enables faster communication between ECUs.
- Larger Payloads: Supports larger data payloads, reducing the overhead of message fragmentation.
- Improved Performance: Enhances the overall performance of CAN bus networks.
7.2 CAN XL (CAN eXtra Large)
CAN XL is the next generation of CAN bus technology, offering even higher data rates and larger payloads than CAN FD. CAN XL can transmit data at up to 20 Mbps and supports payloads of up to 2048 bytes.
Benefits of CAN XL:
- Ultra-High Bandwidth: Enables ultra-fast communication between ECUs.
- Massive Payloads: Supports massive data payloads, further reducing the overhead of message fragmentation.
- Advanced Applications: Opens the door to advanced applications such as autonomous driving and vehicle-to-vehicle communication.
7.3 Automotive Ethernet
Automotive Ethernet is a high-speed communication technology that is increasingly being used in modern vehicles. Automotive Ethernet can transmit data at up to 10 Gbps, providing ample bandwidth for demanding applications such as advanced driver-assistance systems (ADAS) and infotainment.
Benefits of Automotive Ethernet:
- Extremely High Bandwidth: Enables extremely fast communication between ECUs.
- Advanced Applications: Supports advanced applications that require high bandwidth and low latency.
- Scalability: Provides a scalable communication infrastructure that can accommodate future needs.
7.4 Wireless CAN Bus
Wireless CAN bus technology allows for CAN bus communication over wireless networks. Wireless CAN bus can be implemented using various wireless technologies such as Bluetooth, Wi-Fi, and Zigbee.
Benefits of Wireless CAN Bus:
- Flexibility: Enables flexible and easy installation of CAN bus networks.
- Mobility: Supports mobile applications where wired connections are not practical.
- Cost Savings: Reduces the cost of wiring and installation.
7.5 CAN Bus Security
CAN bus security is becoming increasingly important as vehicles become more connected and vulnerable to cyber attacks. CAN bus security measures include encryption, authentication, and intrusion detection.
Benefits of CAN Bus Security:
- Protection Against Cyber Attacks: Protects against unauthorized access and malicious attacks.
- Data Integrity: Ensures the integrity and confidentiality of CAN bus data.
- Vehicle Safety: Enhances the safety and reliability of vehicle systems.
7.6 Expert Training at CAR-DIAGNOSTIC-TOOL.EDU.VN
Staying up-to-date with these future trends is crucial for maintaining a competitive edge in the automotive and industrial fields. CAR-DIAGNOSTIC-TOOL.EDU.VN offers expert training programs to help you master the latest CAN bus technologies. Our courses cover CAN FD, CAN XL, Automotive Ethernet, Wireless CAN Bus, and CAN Bus Security. Contact us at +1 (641) 206-8880 to enroll in our training programs.
8. Choosing the Right CAN Bus Tools and Training
Selecting the appropriate tools and training programs is essential for effectively working with CAN bus technology. The right resources can significantly enhance your diagnostic capabilities, customization options, and overall success. CAR-DIAGNOSTIC-TOOL.EDU.VN offers a comprehensive suite of tools and training to meet your needs.
8.1 Diagnostic Scan Tools
Choosing the right diagnostic scan tool is critical for reading and interpreting data from the OBD2 port. Key features to consider include:
- CAN Bus Support: Ensure the tool supports CAN bus diagnostics and is compatible with your vehicle’s CAN bus protocol.
- Real-Time Data: Verify the tool can display real-time sensor data and perform component tests.
- DTC Reading: Confirm the tool can accurately read and interpret diagnostic trouble codes (DTCs).
- Software Updates: Select a tool with regular software updates to ensure compatibility with new vehicle models and protocols.
8.2 CAN Bus Analyzers
A CAN bus analyzer is essential for monitoring and analyzing CAN bus traffic. Features to consider include:
- Data Capture: Ensure the analyzer can capture and log CAN bus data for later analysis.
- Protocol Support: Verify the analyzer supports the CAN bus protocols used in your vehicle (e.g., CAN 2.0, CAN FD).
- Filtering: Confirm the analyzer can filter CAN bus messages based on ID, data, or other criteria.
- Visualization: Select an analyzer with a user-friendly interface and visualization tools for easy data interpretation.
8.3 Training Programs
Investing in quality training programs is crucial for mastering CAN bus technology. Key aspects to consider include:
- Comprehensive Curriculum: Ensure the training program covers all aspects of CAN bus technology, from basic principles to advanced techniques.
- Hands-On Experience: Verify the program includes hands-on exercises and real-world case studies.
- Expert Instructors: Confirm the instructors are experienced professionals with in-depth knowledge of CAN bus technology.
- Certification: Select a training program that offers certification upon completion to validate your skills and knowledge.
8.4 CAR-DIAGNOSTIC-TOOL.EDU.VN’s Offerings
CAR-DIAGNOSTIC-TOOL.EDU.VN provides a wide range of CAN bus tools and training programs to meet your specific needs.
- Diagnostic Scan Tools: We offer a selection of high-quality diagnostic scan tools that support CAN bus diagnostics and provide access to real-time data.
- CAN Bus Analyzers: Our CAN bus analyzers enable you to monitor and analyze CAN bus traffic with ease.
- Training Programs: Our expert-led training programs cover all aspects of CAN bus technology, from basic principles to advanced techniques.
- Custom Solutions: We can also provide custom solutions tailored to your specific needs and requirements.
8.5 Making the Right Choice
Choosing the right CAN bus tools and training programs can significantly enhance your diagnostic capabilities, customization options, and overall success. At CAR-DIAGNOSTIC-TOOL.EDU.VN, we are committed to providing you with the resources you need to succeed. Contact us at +1 (641) 206-8880 for personalized assistance and guidance in selecting the right tools and training programs for your needs.
9. Maintaining CAN Bus Systems
Proper maintenance is essential for ensuring the long-term reliability and performance of CAN bus systems. Regular inspections, proactive troubleshooting, and adherence to best practices can help prevent issues and minimize downtime. CAR-DIAGNOSTIC-TOOL.EDU.VN offers expert advice and support for maintaining your CAN bus systems.
9.1 Regular Inspections
Conducting regular inspections of CAN bus wiring, connectors, and components can help identify potential problems early on. Key areas to inspect include:
- Wiring: Check for damaged, frayed, or corroded wiring.
- Connectors: Verify that connectors are securely attached and free from corrosion.
- Components: Inspect CAN bus components such as transceivers and termination resistors for damage or wear.
9.2 Proactive Troubleshooting
Addressing potential issues proactively can prevent them from escalating into major problems. Key proactive measures include:
- Monitoring: Monitor CAN bus traffic and voltage levels regularly.
- Error Codes: Check for CAN bus error codes and address them promptly.
- Data Analysis: Analyze CAN bus data to identify trends and anomalies.
9.3 Best Practices
Adhering to best practices for CAN bus maintenance can help ensure long-term reliability and performance. Key best practices include:
- Proper Grounding: Ensure proper grounding of all CAN bus components.
- Shielded Wiring: Use shielded wiring to minimize interference and noise.
- Termination: Verify that the CAN bus is properly terminated with 120-ohm resistors at each end.
- Clean Connections: Keep CAN bus connections clean and free from corrosion.
9.4 Tools and Equipment
Using the right tools and equipment is essential for maintaining CAN bus systems. Key tools and equipment include:
- Multimeter: Used for measuring voltage, current, and resistance.
- Diagnostic Scan Tool: Used for reading and interpreting data from the OBD2 port.
- CAN Bus Analyzer: Used for monitoring and analyzing CAN bus traffic.
- Wiring Diagrams: Used for identifying CAN bus wiring and components.
9.5 Training and Support
Investing in training and support can help ensure that you have the knowledge and skills needed to maintain your CAN bus systems effectively. Key training and support resources include:
- Online Courses: Online courses provide a convenient way to learn about CAN bus maintenance.
- Workshops: Hands-on workshops offer practical experience in maintaining CAN bus systems.
- Technical Support: Technical support resources provide expert assistance for troubleshooting CAN bus issues.
9.6 Maintenance Support from CAR-DIAGNOSTIC-TOOL.EDU.VN
At CAR-DIAGNOSTIC-TOOL.EDU.VN, we are committed to providing you with the tools, training, and support you need to maintain your CAN bus systems effectively. Contact us at +1 (641) 206-8880 for personalized assistance and guidance.
10. Frequently Asked Questions (FAQ)
Addressing common questions can help clarify any doubts and provide a better understanding of connecting the radio CAN High to the OBD2 port. Here are some frequently asked questions to guide you.
10.1 What is the CAN bus and why is it important?
The CAN bus (Controller Area Network) is a communication system used in vehicles to allow different electronic control units (ECUs) to communicate with each other without a host computer. It is important because it reduces wiring complexity, improves reliability, and enables advanced features such as diagnostics, performance monitoring, and customization.
10.2 What is Radio CAN High and what does it do?
Radio CAN High is one of the two wires (the other being CAN Low) that make up the CAN bus. These wires transmit data in a differential signal, which helps to minimize interference and ensure reliable communication. The radio, like other ECUs in the vehicle, uses this network to send and receive information.
10.3 What are the benefits of connecting Radio CAN High to the OBD2 port?
Connecting the radio CAN High to the OBD2 port offers several benefits, including access to vehicle data, enhanced diagnostics, customization options, and performance monitoring. It allows you to monitor various vehicle parameters, identify and troubleshoot issues, customize vehicle settings, and track vehicle performance metrics.
10.4 What tools and equipment are needed for connecting Radio CAN High to OBD2?
Essential tools and equipment include a diagnostic scan tool, CAN bus analyzer, multimeter, wiring diagram, OBD2 connector and wiring harness, soldering iron and solder, wire strippers and crimpers, heat shrink tubing, safety glasses, and gloves.
10.5 How do I identify the CAN High wire in my vehicle?
Refer to your vehicle’s wiring diagram to locate the CAN High wire in the radio wiring harness. The CAN High wire is typically yellow or white with a specific tracer color. You can also use a multimeter to verify the CAN High wire by measuring the voltage between the wire and ground.
10.6 What are some common issues encountered when connecting Radio CAN High to OBD2?
Common issues include no communication with the OBD2 port, incorrect data display, CAN bus errors, radio malfunctions, and interference and noise. Troubleshooting these issues requires careful inspection, testing, and analysis.
10.7 How can I troubleshoot CAN bus errors?
Use a diagnostic scan tool to check for CAN bus error codes. Inspect the CAN bus wiring for any shorts, opens, or loose connections. Verify that the CAN bus is properly terminated with 120-ohm resistors at each end of the bus.
10.8 What are some advanced techniques and customization options for CAN bus systems?
Advanced techniques include custom dashboards, performance tuning, diagnostic tools integration, security features, and CAN bus sniffing. These techniques allow you to enhance your vehicle’s functionality and performance.
10.9 How can I maintain CAN bus systems to ensure long-term reliability?
Regular inspections, proactive troubleshooting, and adherence to best practices are essential for maintaining CAN bus systems. Inspect CAN bus wiring, connectors, and components regularly. Monitor CAN bus traffic and voltage levels, check for error codes, and analyze CAN bus data to identify trends and anomalies.
10.10 Where can I find training and support for working with CAN bus technology?
CAR-DIAGNOSTIC-TOOL.EDU.VN offers expert training