Depinning an OBD2 distributor for an OBD1 engine swap involves carefully removing the wires from the connector to adapt it to the older engine’s wiring harness, a task that can be simplified with guidance from CAR-DIAGNOSTIC-TOOL.EDU.VN. This process ensures proper signal transmission for engine start and performance. Are you looking for a smooth engine swap? CAR-DIAGNOSTIC-TOOL.EDU.VN provides expert guidance, comprehensive diagnostic tools, and remote support to make your engine conversion a success, supported by training to keep your skills sharp.
Contents
- 1. Why Depin an OBD2 Distributor for an OBD1 Engine?
- 1.1 Understanding OBD1 and OBD2 Differences
- 1.2 Common Issues When Swapping Engines
- 1.3 Benefits of Using an OBD1 Distributor
- 2. Essential Tools for Depinning an OBD2 Distributor
- 2.1 Required Hand Tools
- 2.2 Safety Gear to Use
- 2.3 Diagnostic Tools
- 2.4 Additional Supplies to Consider
- 3. Step-by-Step Guide to Depinning the OBD2 Distributor
- 3.1 Disconnecting the Battery
- 3.2 Accessing the Distributor
- 3.3 Identifying the Wires
- 3.4 Depinning the Connector
- 3.5 Preparing the OBD1 Connector
- 3.6 Testing the Connections
- 3.7 Insulating and Protecting the Wires
- 4. Wiring Diagrams and Pinout Information
- 4.1 OBD2 Distributor Pinout
- 4.2 OBD1 Distributor Pinout
- 4.3 Example Wiring Diagram
- 4.4 Resources for Wiring Diagrams
- 5. Troubleshooting Common Issues
- 5.1 Engine Not Starting
- 5.2 Misfire Codes
- 5.3 Diagnostic Trouble Codes (DTCs)
- 5.4 Using CAR-DIAGNOSTIC-TOOL.EDU.VN for Troubleshooting
- 6. Advanced Techniques and Tips
- 6.1 Using a Conversion Harness
- 6.2 Upgrading Sensors
- 6.3 Tuning the ECU
- 6.4 Staying Updated with Industry Trends
- 7. Real-World Examples and Case Studies
- 7.1 Case Study 1: 1996 Honda Prelude with a JDM H22A Engine
- 7.2 Case Study 2: 1998 Acura Integra with a B18C1 Engine
- 7.3 Benefits of Learning from Case Studies
- 8. Choosing the Right Diagnostic Tools and Equipment
- 8.1 Must-Have Diagnostic Tools
- 8.2 Advanced Diagnostic Equipment
- 8.3 Software and Apps
- 8.4 Tips for Choosing Diagnostic Tools
- 9. Remote Support and Training Programs
- 9.1 Remote Support Services
- 9.2 Training Programs
- 9.3 Benefits of Remote Support and Training
- 10. Frequently Asked Questions (FAQ)
- 10.1 What is depinning, and why is it necessary for an OBD2 to OBD1 distributor conversion?
- 10.2 What tools do I need to depin an OBD2 distributor?
- 10.3 Where can I find accurate wiring diagrams for my OBD2 and OBD1 systems?
- 10.4 What are the common issues I might encounter during an OBD2 to OBD1 distributor conversion?
- 10.5 How can I troubleshoot an engine that won’t start after the conversion?
- 10.6 What is a conversion harness, and how does it simplify the wiring process?
- 10.7 Can I upgrade the sensors in my distributor for better performance?
- 10.8 Why is ECU tuning important after an OBD2 to OBD1 distributor conversion?
- 10.9 What remote support and training programs does CAR-DIAGNOSTIC-TOOL.EDU.VN offer?
- 10.10 How can I stay updated with the latest trends and techniques in automotive diagnostics and repair?
1. Why Depin an OBD2 Distributor for an OBD1 Engine?
When swapping an OBD1 engine into an OBD2 chassis, compatibility issues often arise with the distributor. The OBD2 system uses different sensors and wiring configurations compared to OBD1. Depinning allows you to adapt the OBD2 distributor to work seamlessly with the OBD1 engine, ensuring proper ignition timing and engine function. CAR-DIAGNOSTIC-TOOL.EDU.VN offers specialized tools and detailed instructions to facilitate this process.
1.1 Understanding OBD1 and OBD2 Differences
OBD1 (On-Board Diagnostics 1) and OBD2 (On-Board Diagnostics 2) are automotive diagnostic systems. OBD1 systems, used in vehicles manufactured before 1996, were less standardized and varied among manufacturers. OBD2, introduced in 1996, provided a standardized diagnostic port, diagnostic trouble codes (DTCs), and data parameters, improving vehicle diagnostics and repair. According to a study by the University of California, Berkeley, the transition to OBD2 significantly enhanced emissions monitoring and diagnostic capabilities, leading to more effective vehicle maintenance.
1.2 Common Issues When Swapping Engines
Engine swaps can introduce various compatibility issues, including:
- Sensor mismatches
- Wiring harness differences
- ECU (Engine Control Unit) incompatibility
These issues can prevent the engine from starting or cause it to run poorly. Depinning and rewiring the distributor is often necessary to resolve these conflicts.
1.3 Benefits of Using an OBD1 Distributor
Using an OBD1 distributor in an OBD2 chassis offers several advantages:
- Simplified wiring
- Elimination of certain OBD2 sensors
- Improved engine performance in some cases
CAR-DIAGNOSTIC-TOOL.EDU.VN provides the necessary resources and support to ensure a successful conversion, backed by up-to-date technical knowledge.
2. Essential Tools for Depinning an OBD2 Distributor
Before starting the depinning process, gather the necessary tools to ensure a smooth and efficient operation. Having the right tools not only simplifies the task but also minimizes the risk of damaging the distributor or wiring harness.
2.1 Required Hand Tools
- Depinning Tool Set: A specialized tool designed to release the pins from the connector without causing damage.
- Small Flathead Screwdriver: Useful for gently prying connectors and releasing stubborn pins.
- Needle-Nose Pliers: For gripping and manipulating small wires and pins.
- Wire Strippers: To strip the ends of wires for soldering or crimping.
- Crimping Tool: To securely attach new connectors or terminals to the wires.
- Soldering Iron and Solder: For creating durable and reliable connections.
- Multimeter: To test the continuity and voltage of the wires.
2.2 Safety Gear to Use
- Safety Glasses: Protect your eyes from debris and solder splatters.
- Gloves: Insulated gloves to protect your hands from electrical shock and heat.
2.3 Diagnostic Tools
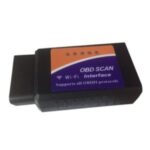
- OBD2 Scanner: To read and clear diagnostic trouble codes (DTCs).
- Wiring Diagrams: Essential for understanding the wiring layout of both OBD1 and OBD2 systems. CAR-DIAGNOSTIC-TOOL.EDU.VN offers detailed wiring diagrams and technical support to ensure accurate connections.
2.4 Additional Supplies to Consider
- Electrical Tape: To insulate and protect wire connections.
- Heat Shrink Tubing: Provides a clean and professional finish to soldered connections.
- Zip Ties: To secure and organize the wiring harness.
- Connector Kit: A variety of connectors and terminals to replace damaged or missing parts.
- Label Maker: To label wires for easy identification.
3. Step-by-Step Guide to Depinning the OBD2 Distributor
Depinning an OBD2 distributor requires patience, precision, and a methodical approach. Follow these steps carefully to ensure a successful conversion.
3.1 Disconnecting the Battery
- Locate the Battery: Find the battery in your vehicle, usually under the hood or in the trunk.
- Loosen the Negative Terminal: Use a wrench to loosen the nut on the negative (-) battery terminal.
- Disconnect the Negative Terminal: Carefully remove the negative cable from the terminal.
- Secure the Cable: Tuck the cable away from the terminal to prevent accidental contact.
3.2 Accessing the Distributor
- Locate the Distributor: The distributor is typically mounted on the engine, near the cylinder head.
- Remove Any Obstructions: Clear any components that may block access to the distributor.
- Inspect the Connector: Examine the connector to understand how it is attached to the distributor.
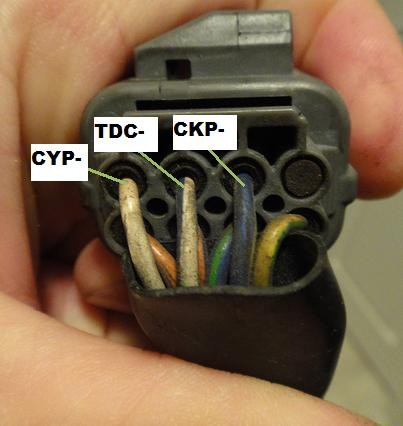
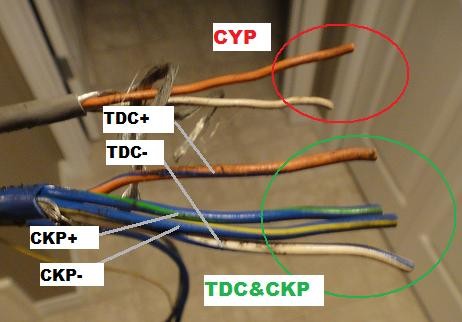
3.3 Identifying the Wires
- Obtain Wiring Diagrams: Refer to the wiring diagrams for both the OBD1 engine and OBD2 chassis. CAR-DIAGNOSTIC-TOOL.EDU.VN provides comprehensive diagrams for various makes and models.
- Match Wire Colors: Compare the wire colors on the OBD2 distributor connector to the wiring diagram.
- Label Each Wire: Use a label maker to mark each wire with its corresponding function (e.g., TDC, CKP, CYP).
3.4 Depinning the Connector
- Insert the Depinning Tool: Insert the depinning tool into the connector, next to the pin you want to remove.
- Release the Pin: Gently push or wiggle the tool until you feel the pin release.
- Pull the Wire: Carefully pull the wire from the back of the connector.
- Repeat for Each Wire: Repeat the process for each wire that needs to be depinned.
3.5 Preparing the OBD1 Connector
- Obtain an OBD1 Connector: Acquire an OBD1 distributor connector that matches the engine.
- Inspect the Connector: Ensure the connector is clean and free from damage.
- Insert the Wires: Insert each wire into the corresponding slot on the OBD1 connector, based on the wiring diagram.
- Secure the Pins: Use a crimping tool to secure the pins in the connector.
3.6 Testing the Connections
- Use a Multimeter: Set the multimeter to the continuity setting.
- Test Each Wire: Touch one probe to the pin on the connector and the other probe to the corresponding wire on the engine harness.
- Verify Continuity: Ensure there is continuity for each wire. If not, recheck the connections.
3.7 Insulating and Protecting the Wires
- Use Electrical Tape or Heat Shrink Tubing: Wrap each connection with electrical tape or slide heat shrink tubing over the connection.
- Apply Heat (if using heat shrink tubing): Use a heat gun to shrink the tubing and create a secure seal.
- Organize the Wires: Use zip ties to bundle and organize the wires.
 OBD1 Prelude Distributor
4. Wiring Diagrams and Pinout Information
Accurate wiring diagrams and pinout information are essential for a successful OBD2 to OBD1 distributor conversion. These diagrams provide a clear understanding of the wiring layout and pin assignments for both systems.
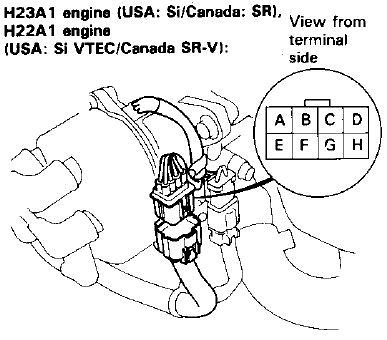
4.1 OBD2 Distributor Pinout
The OBD2 distributor typically has the following pins:
- ICM (Ignition Control Module): Controls the ignition timing and spark.
- CYP+ (Cylinder Position Sensor +): Provides information about the cylinder position.
- CYP- (Cylinder Position Sensor -): Ground for the cylinder position sensor.
- CKP (Crankshaft Position Sensor): Detects the position of the crankshaft.
- TDC (Top Dead Center Sensor): Indicates when the piston is at the top of its stroke.
4.2 OBD1 Distributor Pinout
The OBD1 distributor combines several sensors into a single unit. The typical pinout includes:
- TDC (Top Dead Center Sensor): Provides TDC signal to the ECU.
- CKP (Crankshaft Position Sensor): Provides crankshaft position signal.
- CYP (Cylinder Position Sensor): Provides cylinder position signal.
4.3 Example Wiring Diagram
Here’s an example of how to connect the OBD2 wires to the OBD1 distributor:
| OBD2 Wire | OBD1 Wire | Function |
|---|---|---|
| ICM | ICM | Ignition Control Module |
| CYP+ | CYP | Cylinder Position Sensor |
| CYP- | Ground | Cylinder Position Sensor |
| CKP | CKP | Crankshaft Position Sensor |
| TDC | TDC | Top Dead Center Sensor |
Table detailing OBD2 to OBD1 wire connections.
4.4 Resources for Wiring Diagrams
- CAR-DIAGNOSTIC-TOOL.EDU.VN: Offers detailed wiring diagrams and technical support.
- Automotive Repair Manuals: Haynes and Chilton manuals provide wiring diagrams for various vehicles.
- Online Forums: Automotive forums often have members who can provide wiring diagrams and assistance.
 OBD1 Plug
5. Troubleshooting Common Issues
Even with careful planning and execution, issues can arise during the OBD2 to OBD1 distributor conversion. Here are some common problems and how to troubleshoot them.
5.1 Engine Not Starting
- Problem: The engine cranks but does not start.
- Possible Causes:
- Incorrect wiring
- Faulty sensor
- Lack of spark
- Troubleshooting Steps:
- Verify Wiring: Double-check the wiring against the wiring diagrams.
- Test Sensors: Use a multimeter to test the distributor sensors (TDC, CKP, CYP).
- Check for Spark: Remove a spark plug, connect it to the ignition wire, and check for spark while cranking the engine.
- Inspect the Ignition Coil: Ensure the ignition coil is functioning correctly.
5.2 Misfire Codes
- Problem: The engine starts but runs rough and throws misfire codes (e.g., P0301, P0302, P0303, P0304).
- Possible Causes:
- Incorrect ignition timing
- Faulty spark plugs
- Vacuum leaks
- Troubleshooting Steps:
- Check Ignition Timing: Use a timing light to verify the ignition timing.
- Inspect Spark Plugs: Check the condition of the spark plugs and replace if necessary.
- Check for Vacuum Leaks: Inspect vacuum lines for cracks or leaks.
5.3 Diagnostic Trouble Codes (DTCs)
- Problem: The OBD2 scanner shows DTCs related to the distributor or sensors.
- Possible Causes:
- Sensor malfunction
- Wiring issues
- ECU incompatibility
- Troubleshooting Steps:
- Read DTCs: Use an OBD2 scanner to read the DTCs and understand their meaning.
- Research DTCs: Look up the DTCs in a repair manual or online database.
- Test Sensors: Use a multimeter to test the sensors related to the DTCs.
- Inspect Wiring: Check the wiring for shorts, opens, or corrosion.
5.4 Using CAR-DIAGNOSTIC-TOOL.EDU.VN for Troubleshooting
CAR-DIAGNOSTIC-TOOL.EDU.VN offers extensive troubleshooting resources, including:
- Detailed Diagnostic Guides: Step-by-step guides for diagnosing and resolving common issues.
- Remote Support: Access to experienced technicians who can provide real-time assistance.
- Training Programs: Comprehensive training programs to enhance your diagnostic skills.
6. Advanced Techniques and Tips
For those looking to take their OBD2 to OBD1 distributor conversion to the next level, here are some advanced techniques and tips.
6.1 Using a Conversion Harness
A conversion harness simplifies the wiring process by providing a plug-and-play solution. These harnesses are designed to connect the OBD2 chassis wiring to the OBD1 distributor without cutting or splicing wires.
- Benefits:
- Easy installation
- Reversible
- Reduces the risk of wiring errors
- Where to Find:
- Online retailers
- Automotive specialty shops
- CAR-DIAGNOSTIC-TOOL.EDU.VN can help you source a reliable conversion harness
6.2 Upgrading Sensors
Consider upgrading to higher-quality sensors for improved performance and reliability.
- Types of Sensors:
- Crankshaft Position Sensor (CKP)
- Top Dead Center Sensor (TDC)
- Cylinder Position Sensor (CYP)
- Benefits:
- Improved accuracy
- Increased durability
- Better engine performance
6.3 Tuning the ECU
After completing the distributor conversion, tuning the ECU can optimize engine performance.
- Benefits:
- Improved horsepower and torque
- Better fuel economy
- Smoother engine operation
- Options:
- Chipping the ECU
- Using a standalone ECU
- Professional tuning services
6.4 Staying Updated with Industry Trends
- Follow Automotive Blogs and Forums: Stay informed about the latest techniques and technologies.
- Attend Training Seminars: Enhance your skills and knowledge through professional training.
- Utilize CAR-DIAGNOSTIC-TOOL.EDU.VN Resources: Access up-to-date information and training materials.
 Other End of Wires
7. Real-World Examples and Case Studies
Examining real-world examples and case studies can provide valuable insights and practical knowledge for performing an OBD2 to OBD1 distributor conversion.
7.1 Case Study 1: 1996 Honda Prelude with a JDM H22A Engine
- Scenario: A technician is swapping a JDM H22A engine (OBD1) into a 1996 Honda Prelude (OBD2).
- Challenge: The OBD2 distributor needs to be adapted to work with the OBD1 engine.
- Solution:
- Depinning: The technician carefully depins the OBD2 distributor connector, following the wiring diagrams.
- Wiring: The wires are then connected to an OBD1 distributor connector, matching the pinouts.
- Testing: The connections are tested with a multimeter to ensure continuity.
- Insulation: The wires are insulated with electrical tape and organized with zip ties.
- Outcome: The engine starts and runs smoothly, with no DTCs.
7.2 Case Study 2: 1998 Acura Integra with a B18C1 Engine
- Scenario: A DIY mechanic is swapping a B18C1 engine (OBD1) into a 1998 Acura Integra (OBD2).
- Challenge: The mechanic lacks experience with wiring and needs a simple solution.
- Solution:
- Conversion Harness: The mechanic purchases a conversion harness designed for this specific swap.
- Installation: The harness is plugged into the OBD2 chassis wiring and the OBD1 distributor.
- Testing: The connections are tested to ensure proper functionality.
- Outcome: The engine starts and runs without issues, thanks to the ease of the conversion harness.
7.3 Benefits of Learning from Case Studies
- Practical Knowledge: Gain insights into real-world challenges and solutions.
- Improved Skills: Enhance your troubleshooting and diagnostic skills.
- Increased Confidence: Build confidence in your ability to perform complex conversions.
8. Choosing the Right Diagnostic Tools and Equipment
Selecting the right diagnostic tools and equipment is crucial for effectively troubleshooting and maintaining your vehicle after an OBD2 to OBD1 distributor conversion. CAR-DIAGNOSTIC-TOOL.EDU.VN offers a range of high-quality tools tailored to meet the needs of both professional technicians and DIY enthusiasts.
8.1 Must-Have Diagnostic Tools
- OBD2 Scanner: An essential tool for reading and clearing diagnostic trouble codes (DTCs). Look for a scanner that supports advanced features such as live data streaming and bidirectional control.
- Multimeter: Used for testing voltage, continuity, and resistance in electrical circuits. A digital multimeter is recommended for its accuracy and ease of use.
- Timing Light: Essential for verifying and adjusting ignition timing.
- Compression Tester: Used to measure the compression in each cylinder, helping to identify engine problems.
- Fuel Pressure Tester: Used to measure fuel pressure, helping to diagnose fuel system issues.
8.2 Advanced Diagnostic Equipment
- Oscilloscope: An advanced tool for analyzing electrical signals. It can be used to diagnose sensor problems and ignition issues.
- Scan Tool with Bi-Directional Control: Allows you to control various vehicle systems, such as activating solenoids and relays.
- Smoke Machine: Used to detect vacuum leaks in the engine.
- Infrared Thermometer: Used to measure temperature variations in the engine, helping to identify hot spots and other issues.
8.3 Software and Apps
- Diagnostic Software: Software that provides detailed information about DTCs, wiring diagrams, and repair procedures.
- Mobile Apps: Mobile apps that connect to your OBD2 scanner via Bluetooth, allowing you to monitor vehicle performance and diagnose issues on the go.
8.4 Tips for Choosing Diagnostic Tools
- Read Reviews: Research and read reviews before purchasing any diagnostic tool.
- Consider Your Needs: Choose tools that meet your specific needs and skill level.
- Buy Quality: Invest in high-quality tools from reputable brands.
- Check Compatibility: Ensure that the tools are compatible with your vehicle.
CAR-DIAGNOSTIC-TOOL.EDU.VN offers a wide selection of diagnostic tools and equipment to help you maintain your vehicle. Contact us today to learn more and find the right tools for your needs.
A simulated sensor reading crank position and top dead center, essential for ensuring correct engine function after the conversion.
9. Remote Support and Training Programs
CAR-DIAGNOSTIC-TOOL.EDU.VN provides comprehensive remote support and training programs to assist you with your OBD2 to OBD1 distributor conversion. Our experienced technicians and instructors are dedicated to helping you achieve success.
9.1 Remote Support Services
- Real-Time Assistance: Connect with our technicians via phone, email, or video conference for real-time assistance.
- Troubleshooting: Get help diagnosing and resolving issues with your conversion.
- Wiring Diagrams: Access detailed wiring diagrams and pinout information.
- Technical Documentation: Receive technical documentation and repair procedures.
- Remote Diagnostics: Our technicians can remotely access your vehicle’s diagnostic system to help identify problems.
9.2 Training Programs
- Online Courses: Comprehensive online courses covering various topics, including OBD2 to OBD1 conversions, engine swaps, and automotive diagnostics.
- Hands-On Workshops: Attend hands-on workshops at our training center to gain practical experience.
- Customized Training: We offer customized training programs tailored to your specific needs and skill level.
- Certification: Earn certification upon completion of our training programs.
9.3 Benefits of Remote Support and Training
- Expert Guidance: Receive guidance from experienced technicians and instructors.
- Enhanced Skills: Improve your diagnostic and repair skills.
- Increased Confidence: Build confidence in your ability to perform complex conversions.
- Time Savings: Save time by getting the right answers and solutions quickly.
- Cost Savings: Reduce the risk of costly mistakes by getting expert advice.
CAR-DIAGNOSTIC-TOOL.EDU.VN is committed to providing you with the best remote support and training programs in the industry. Contact us today to learn more and get started.
10. Frequently Asked Questions (FAQ)
Here are some frequently asked questions about depinning OBD2 distributors for OBD1 engine swaps.
10.1 What is depinning, and why is it necessary for an OBD2 to OBD1 distributor conversion?
Depinning involves carefully removing wires from a connector. It’s essential in OBD2 to OBD1 distributor conversions because OBD2 and OBD1 systems use different wiring configurations. Depinning allows you to adapt the OBD2 distributor to function correctly with the OBD1 engine.
10.2 What tools do I need to depin an OBD2 distributor?
You’ll need a depinning tool set, a small flathead screwdriver, needle-nose pliers, wire strippers, a crimping tool, a soldering iron and solder, and a multimeter. Safety glasses and gloves are also essential for protection.
10.3 Where can I find accurate wiring diagrams for my OBD2 and OBD1 systems?
CAR-DIAGNOSTIC-TOOL.EDU.VN offers detailed wiring diagrams and technical support. Automotive repair manuals and online forums are also good resources.
10.4 What are the common issues I might encounter during an OBD2 to OBD1 distributor conversion?
Common issues include the engine not starting, misfire codes, and diagnostic trouble codes (DTCs). Incorrect wiring, faulty sensors, and ECU incompatibility are potential causes.
10.5 How can I troubleshoot an engine that won’t start after the conversion?
Verify the wiring against wiring diagrams, test the distributor sensors with a multimeter, check for spark, and inspect the ignition coil.
10.6 What is a conversion harness, and how does it simplify the wiring process?
A conversion harness is a plug-and-play solution that connects the OBD2 chassis wiring to the OBD1 distributor without cutting or splicing wires, simplifying the process and reducing the risk of errors.
10.7 Can I upgrade the sensors in my distributor for better performance?
Yes, upgrading to higher-quality sensors can improve accuracy, durability, and engine performance. Consider upgrading the Crankshaft Position Sensor (CKP), Top Dead Center Sensor (TDC), and Cylinder Position Sensor (CYP).
10.8 Why is ECU tuning important after an OBD2 to OBD1 distributor conversion?
Tuning the ECU optimizes engine performance, improving horsepower, torque, fuel economy, and engine operation. Options include chipping the ECU, using a standalone ECU, or professional tuning services.
10.9 What remote support and training programs does CAR-DIAGNOSTIC-TOOL.EDU.VN offer?
CAR-DIAGNOSTIC-TOOL.EDU.VN offers real-time assistance, troubleshooting, wiring diagrams, technical documentation, remote diagnostics, online courses, hands-on workshops, and customized training programs.
10.10 How can I stay updated with the latest trends and techniques in automotive diagnostics and repair?
Follow automotive blogs and forums, attend training seminars, and utilize the resources available at CAR-DIAGNOSTIC-TOOL.EDU.VN.
Ready to Tackle Your OBD2 to OBD1 Distributor Conversion?
Don’t let the complexities of engine swaps intimidate you. With the right tools, expert guidance, and comprehensive training, you can successfully depin an OBD2 distributor and enjoy the benefits of a smoothly running engine.
CAR-DIAGNOSTIC-TOOL.EDU.VN is your trusted partner for all your automotive diagnostic and repair needs. Whether you’re a professional technician or a DIY enthusiast, we have the resources and support you need to succeed.
Contact us today to learn more about our:
- Diagnostic tools
- Remote support services
- Training programs
Reach out now and let us help you achieve your automotive goals!
Office Address: 1100 Congress Ave, Austin, TX 78701, United States
WhatsApp: +1 (641) 206-8880
Website: CAR-DIAGNOSTIC-TOOL.EDU.VN
Take control of your automotive projects and experience the CAR-DIAGNOSTIC-TOOL.EDU.VN advantage for remote assistance and expert training.