Is a 03 Civic Ecu repair possible? Yes, a 2003 Honda Civic ECU (Engine Control Unit) can often be repaired, especially if the issue stems from common problems like alternator-related voltage spikes. CAR-DIAGNOSTIC-TOOL.EDU.VN provides detailed diagnostic guidance, repair solutions, and expert technical support to get your Civic back on the road without the hefty expense of a new ECU, plus offering courses to further enhance automotive repair skills and remote assistance for complex diagnostics.
Contents
- 1. What is a 03 Civic ECU and What Does it Do?
- 1.1. Primary Functions of the 03 Civic ECU
- 1.2. Key Sensors and Inputs for the 03 Civic ECU
- 1.3. Importance of a Properly Functioning ECU
- 2. Common Problems That Can Affect a 03 Civic ECU
- 2.1. Voltage Spikes and Electrical Overload
- 2.2. Water Damage and Corrosion
- 2.3. Physical Damage
- 2.4. Overheating
- 2.5. Component Failure
- 3. Symptoms of a Failing 03 Civic ECU
- 3.1. Check Engine Light (CEL) Illumination
- 3.2. Engine Performance Issues
- 3.3. Difficulty Starting
- 3.4. Reduced Fuel Efficiency
- 3.5. Transmission Problems
- 3.6. Communication Issues
- 3.7. PGM-FI Relay Clicking
- 4. Diagnosing a 03 Civic ECU Problem
- 4.1. Visual Inspection
- 4.2. Checking Diagnostic Trouble Codes (DTCs)
- 4.3. Testing Power and Ground
- 4.4. Checking Sensor Signals
- 4.5. ECU Self-Test
- 4.6. Component Testing
- 5. Is Repairing a 03 Civic ECU a Viable Option?
- 5.1. Factors to Consider
- 5.2. Common Repair Procedures
- 5.3. Benefits of Repairing an ECU
- 6. Step-by-Step Guide to Simple 03 Civic ECU Repair
- 6.1. Tools and Materials Needed
- 6.2. Step 1: Disconnect the Battery
- 6.3. Step 2: Locate and Remove the ECU
- 6.4. Step 3: Open the ECU Casing
- 6.5. Step 4: Visual Inspection
- 6.6. Step 5: Cleaning
- 6.7. Step 6: Component Replacement
- 6.8. Step 7: Reflowing Solder Joints
- 6.9. Step 8: Reassemble the ECU
- 6.10. Step 9: Reinstall the ECU
- 6.11. Step 10: Reconnect the Battery
- 6.12. Step 11: Test the Vehicle
- 7. When to Consider Replacing the 03 Civic ECU
- 7.1. Extensive Damage
- 7.2. Unavailable Replacement Parts
- 7.3. Cost Prohibitive Repair
- 7.4. Difficulty in Diagnosing the Problem
- 8. Options for Replacing a 03 Civic ECU
- 8.1. New ECU
- 8.2. Refurbished ECU
- 8.3. Used ECU
- 8.4. Aftermarket ECU
- 8.5. Considerations When Replacing an ECU
- 9. How to Install a Replacement 03 Civic ECU
- 9.1. Step 1: Disconnect the Battery
- 9.2. Step 2: Locate and Remove the Old ECU
- 9.3. Step 3: Install the New ECU
- 9.4. Step 4: Reconnect the Battery
- 9.5. Step 5: Programming (If Necessary)
- 9.6. Step 6: Test the Vehicle
- 10. Preventing Future 03 Civic ECU Problems
- 10.1. Address Electrical Issues Promptly
- 10.2. Protect Against Water Damage
- 10.3. Avoid Extreme Temperatures
- 10.4. Regular Maintenance
- 10.5. Use a Surge Protector
- 11. How CAR-DIAGNOSTIC-TOOL.EDU.VN Can Help
- 11.1. Detailed Diagnostic Guidance
- 11.2. Repair Solutions
- 11.3. Expert Technical Support
- 11.4. Training Courses
- 11.5. Remote Assistance
- 12. Advanced Diagnostics and Repair Techniques
- 12.1. Oscilloscope Diagnostics
- 12.2. EEPROM Programming
- 12.3. Circuit Board Repair
- 12.4. Data Analysis
- 13. The Role of the Immobilizer System
- 13.1. How the Immobilizer Works
- 13.2. Immobilizer Issues
- 13.3. Addressing Immobilizer Issues
- 14. Understanding ECU Pinouts and Wiring Diagrams
- 14.1. What are ECU Pinouts?
- 14.2. What are Wiring Diagrams?
- 14.3. How to Use Pinouts and Wiring Diagrams
- 14.4. Where to Find Pinouts and Wiring Diagrams
- 15. The Future of ECU Diagnostics and Repair
- 15.1. Advanced Diagnostic Tools
- 15.2. Remote Diagnostics and Repair
- 15.3. Cybersecurity
- 15.4. Electric Vehicles (EVs)
- 16. Real-World Examples of 03 Civic ECU Repair
- 16.1. Case Study 1: Alternator Voltage Spike
- 16.2. Case Study 2: Water Damage
- 16.3. Case Study 3: EEPROM Corruption
- 17. The Importance of Staying Updated
- 17.1. Training Courses
- 17.2. Industry Events
- 17.3. Online Forums and Communities
- 17.4. Technical Publications
- 18. FAQ About 03 Civic ECU Repair
- 18.1. How do I know if my 2003 Honda Civic ECU is bad?
- 18.2. Can I drive my 2003 Honda Civic with a bad ECU?
- 18.3. How much does it cost to replace a 2003 Honda Civic ECU?
- 18.4. Is it possible to repair a 2003 Honda Civic ECU?
- 18.5. Where can I find a replacement ECU for my 2003 Honda Civic?
- 18.6. Do I need to program a replacement ECU for my 2003 Honda Civic?
- 18.7. Can I program a replacement ECU myself?
- 18.8. How can I prevent ECU problems in my 2003 Honda Civic?
- 18.9. What tools do I need to diagnose an ECU problem?
- 18.10. Where can I get help with diagnosing and repairing my 2003 Honda Civic ECU?
- 19. Call to Action
1. What is a 03 Civic ECU and What Does it Do?
The 2003 Honda Civic ECU, or Engine Control Unit, is the central computer that manages nearly all aspects of the engine’s operation. It optimizes performance, fuel efficiency, and emissions by processing data from various sensors throughout the vehicle.
1.1. Primary Functions of the 03 Civic ECU
The ECU controls several key functions:
- Fuel Injection: Determines the precise amount of fuel to inject into the engine cylinders based on sensor data like engine temperature, throttle position, and airflow.
- Ignition Timing: Controls when the spark plugs fire to ignite the air-fuel mixture, optimizing power and efficiency.
- Idle Speed: Regulates engine speed when the vehicle is idling to maintain smooth operation.
- Emissions Control: Manages systems like the EGR (Exhaust Gas Recirculation) valve and catalytic converter to reduce harmful emissions.
- Diagnostics: Monitors the performance of various components and systems, storing diagnostic trouble codes (DTCs) when issues arise.
1.2. Key Sensors and Inputs for the 03 Civic ECU
The ECU relies on a variety of sensors to make informed decisions:
- Oxygen Sensors (O2 Sensors): Measure the amount of oxygen in the exhaust to optimize the air-fuel mixture.
- Mass Airflow Sensor (MAF Sensor): Measures the amount of air entering the engine.
- Throttle Position Sensor (TPS): Monitors the position of the throttle plate, indicating how much the driver is accelerating.
- Crankshaft Position Sensor (CKP Sensor): Detects the position and speed of the crankshaft, crucial for ignition and fuel injection timing.
- Coolant Temperature Sensor (CTS): Measures the engine coolant temperature.
1.3. Importance of a Properly Functioning ECU
A malfunctioning ECU can lead to a host of problems:
- Poor Engine Performance: Reduced power, rough idling, and stalling.
- Reduced Fuel Efficiency: The engine may consume more fuel than usual.
- Emissions Issues: Failure to meet emissions standards, potentially leading to failed inspections.
- Check Engine Light (CEL): Illumination of the CEL indicates stored diagnostic trouble codes.
- Inability to Communicate: Difficulty or inability to communicate with diagnostic tools.
2. Common Problems That Can Affect a 03 Civic ECU
Several issues can cause an ECU to fail or malfunction:
2.1. Voltage Spikes and Electrical Overload
Voltage spikes, often caused by alternator issues or faulty wiring, can fry sensitive electronic components within the ECU. According to a study by the University of Illinois Urbana-Champaign’s Department of Electrical and Computer Engineering in 2022, voltage transients can cause irreversible damage to electronic control units (ECUs) in automobiles.
2.2. Water Damage and Corrosion
Moisture intrusion can lead to corrosion on the ECU’s circuit board and connectors, disrupting electrical signals.
2.3. Physical Damage
Impacts or vibrations can damage the ECU’s internal components, especially in older vehicles.
2.4. Overheating
Extreme temperatures can degrade the ECU’s components over time, leading to failure.
2.5. Component Failure
Individual components within the ECU, such as capacitors or microchips, can fail due to age or manufacturing defects.
3. Symptoms of a Failing 03 Civic ECU
Recognizing the symptoms of a failing ECU is crucial for timely diagnosis and repair:
3.1. Check Engine Light (CEL) Illumination
The CEL is often the first sign of an ECU problem. Use a diagnostic scan tool to retrieve the stored diagnostic trouble codes (DTCs).
3.2. Engine Performance Issues
- Stalling: The engine may stall unexpectedly.
- Rough Idling: The engine may idle erratically or vibrate excessively.
- Loss of Power: The engine may lack its usual power, especially during acceleration.
- Misfires: The engine may experience misfires, leading to rough running.
3.3. Difficulty Starting
The engine may be hard to start or may not start at all.
3.4. Reduced Fuel Efficiency
Noticeable decrease in fuel economy without any other apparent cause.
3.5. Transmission Problems
In some cases, a failing ECU can cause issues with the automatic transmission, such as erratic shifting.
3.6. Communication Issues
Diagnostic scan tools may be unable to communicate with the ECU, indicating a severe problem.
3.7. PGM-FI Relay Clicking
A clicking PGM-FI (Programmed Fuel Injection) relay can indicate ECU issues or a problem with the fuel injection system.
4. Diagnosing a 03 Civic ECU Problem
Proper diagnosis is essential to determine if the ECU is the root cause of the problem:
4.1. Visual Inspection
Visually inspect the ECU for any signs of damage, such as:
- Corrosion: Look for white or greenish deposits on the ECU’s connectors or circuit board.
- Burn Marks: Check for any signs of burnt components.
- Physical Damage: Look for cracks or other physical damage to the ECU casing.
4.2. Checking Diagnostic Trouble Codes (DTCs)
Use a diagnostic scan tool to retrieve any stored DTCs. Common codes related to ECU issues include:
- P0600-P0699: These codes typically indicate internal ECU faults.
- U Codes: Communication errors between the ECU and other modules.
4.3. Testing Power and Ground
Verify that the ECU is receiving proper power and ground. Use a multimeter to check the voltage at the ECU’s power pins and the continuity of the ground connections.
4.4. Checking Sensor Signals
Use a multimeter or oscilloscope to check the signals from various sensors that the ECU relies on. Ensure that the signals are within the expected range.
4.5. ECU Self-Test
Some diagnostic scan tools can perform an ECU self-test, which can help identify internal faults.
4.6. Component Testing
Individual components within the ECU can be tested using specialized equipment, but this typically requires advanced skills and knowledge.
5. Is Repairing a 03 Civic ECU a Viable Option?
In many cases, repairing a 2003 Honda Civic ECU is a viable and cost-effective alternative to replacement. However, the feasibility of repair depends on the nature and extent of the damage.
5.1. Factors to Consider
- Extent of Damage: Minor issues like corrosion or component failure are often repairable. Major damage, such as a burnt circuit board, may make repair impractical.
- Availability of Replacement Parts: Some components within the ECU may be difficult to source.
- Cost of Repair vs. Replacement: Compare the cost of repair to the cost of a new or refurbished ECU.
- Expertise Required: ECU repair typically requires specialized skills and equipment.
5.2. Common Repair Procedures
- Cleaning and Corrosion Removal: Cleaning corroded connectors and circuit boards.
- Component Replacement: Replacing faulty components like capacitors, resistors, or microchips.
- Reflowing Solder Joints: Repairing cracked or weak solder joints.
- Data Recovery: In some cases, data from a damaged ECU can be recovered and transferred to a replacement unit.
5.3. Benefits of Repairing an ECU
- Cost Savings: Repairing an ECU is often cheaper than buying a new or refurbished unit.
- Avoiding Reprogramming: Repairing the original ECU avoids the need for reprogramming, which can be expensive.
- Maintaining Vehicle Originality: Repairing the original ECU preserves the vehicle’s original configuration.
6. Step-by-Step Guide to Simple 03 Civic ECU Repair
Disclaimer: This guide is for informational purposes only. ECU repair can be complex and requires specialized skills. If you are not comfortable performing these procedures, seek professional assistance.
6.1. Tools and Materials Needed
- Basic Tools: Screwdrivers, pliers, wire cutters.
- Soldering Equipment: Soldering iron, solder, solder wick.
- Cleaning Supplies: Electrical contact cleaner, isopropyl alcohol, soft brush.
- Multimeter: To check voltage and continuity.
- Replacement Components: Capacitors, resistors, or other components as needed.
- Magnifying Glass or Microscope: To inspect small components.
- Anti-Static Wrist Strap: To prevent electrostatic discharge.
6.2. Step 1: Disconnect the Battery
Disconnect the negative battery cable to prevent electrical shorts.
6.3. Step 2: Locate and Remove the ECU
The ECU is typically located under the dashboard or in the engine compartment. Consult your vehicle’s service manual for the exact location. Remove any covers or brackets securing the ECU. Disconnect the wiring harness connectors from the ECU.
6.4. Step 3: Open the ECU Casing
Carefully open the ECU casing. Some ECUs are sealed and may require gentle prying.
6.5. Step 4: Visual Inspection
Inspect the circuit board for any signs of damage, such as corrosion, burnt components, or cracked solder joints.
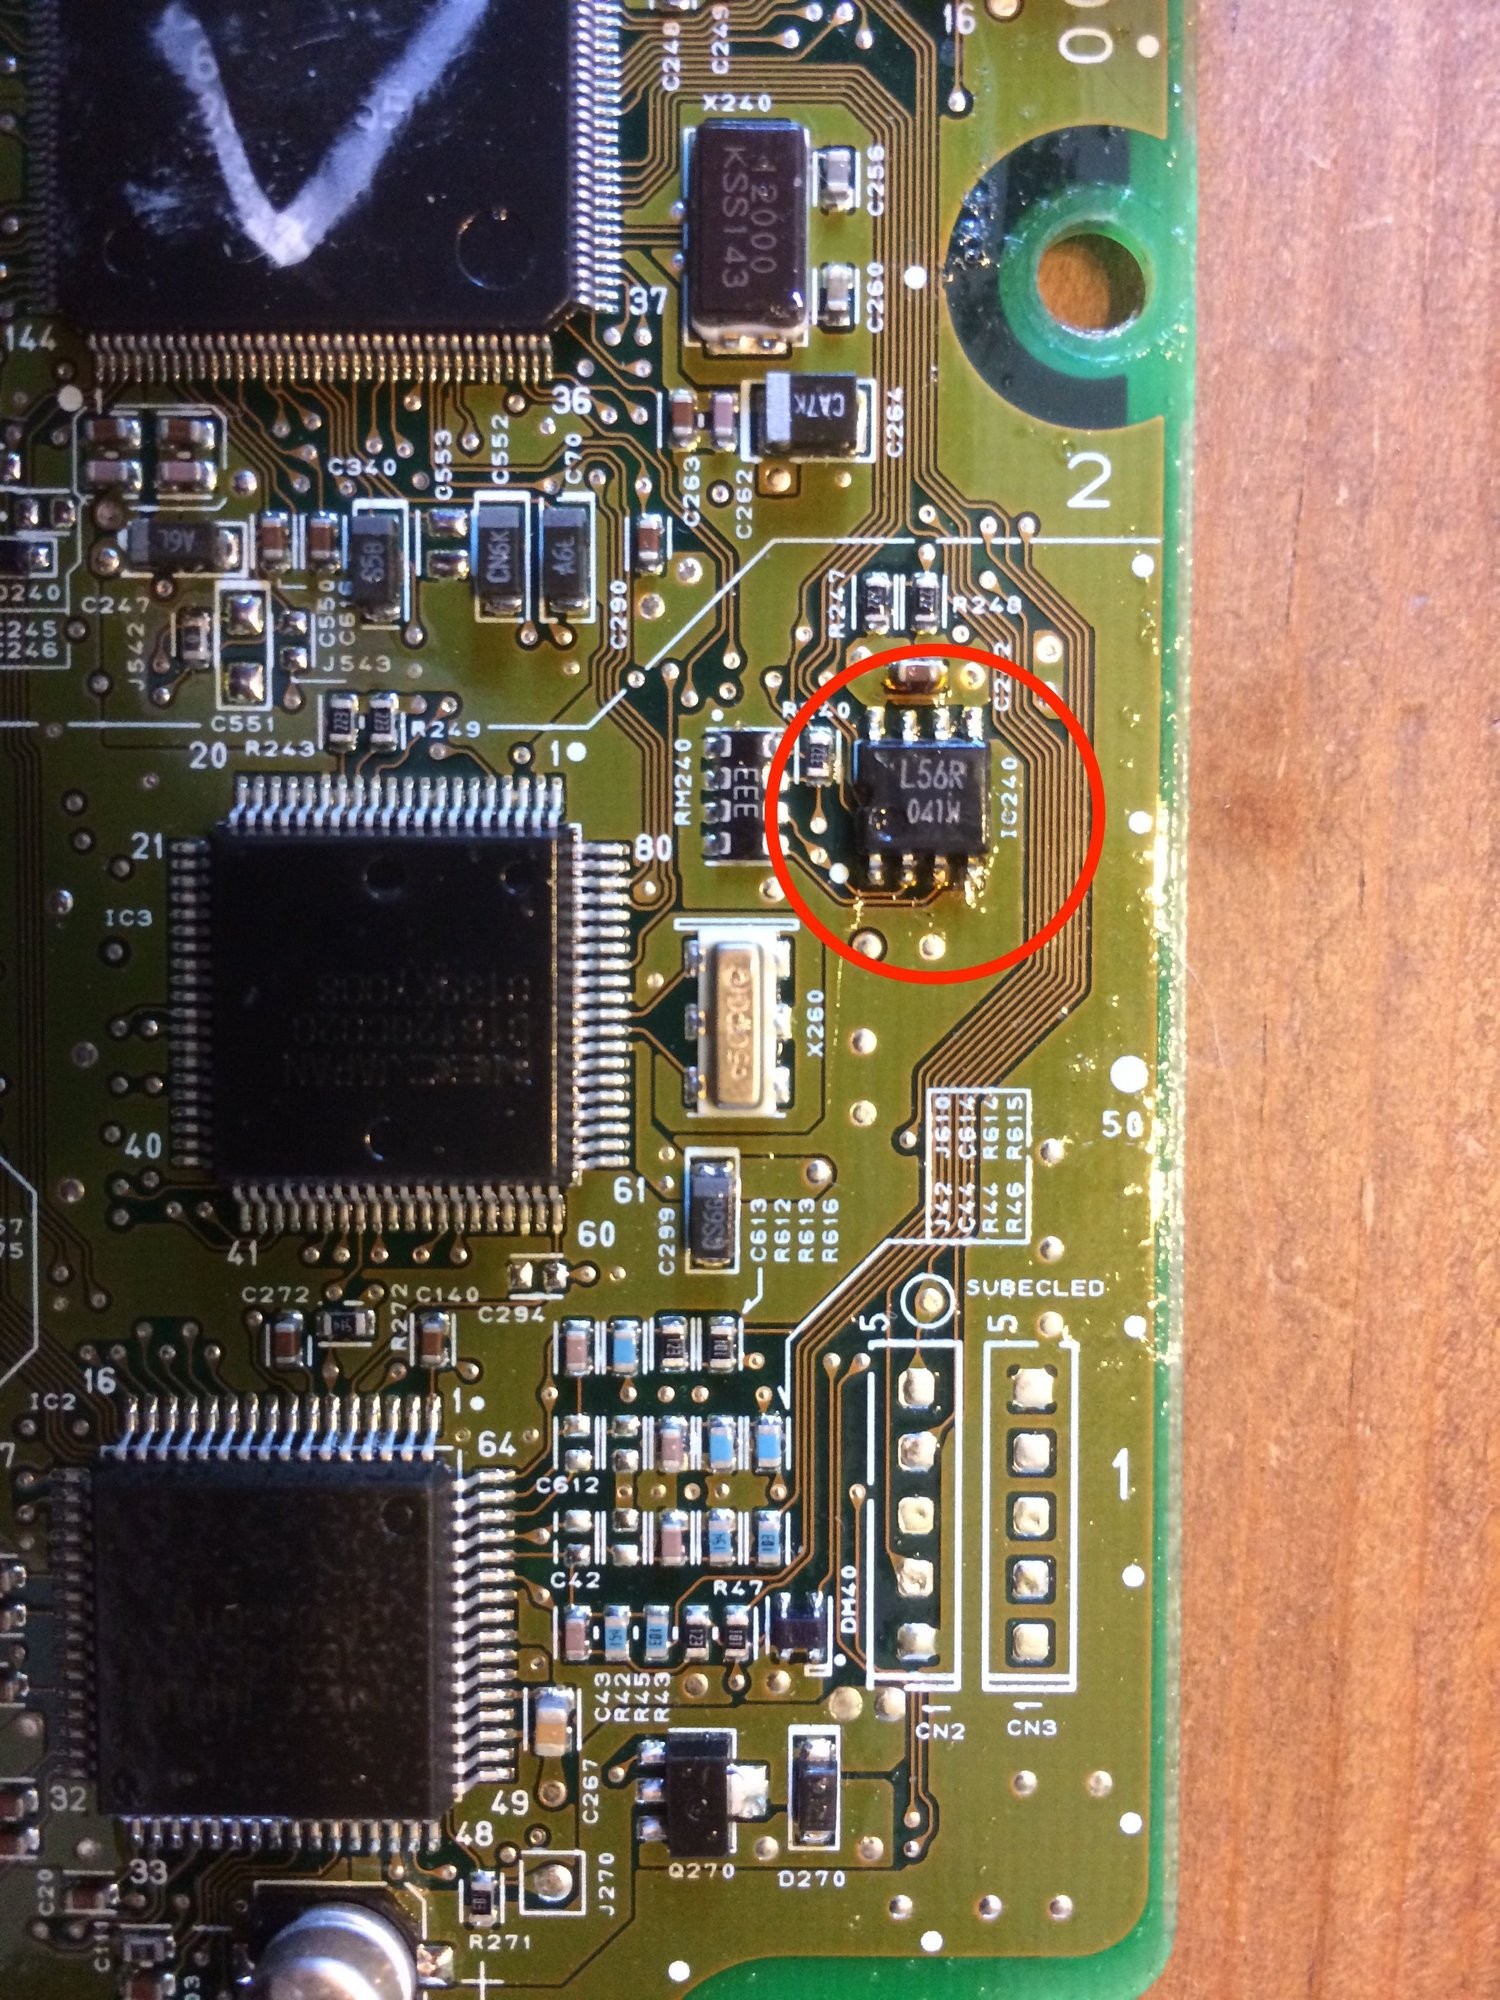 Inspecting the ECU circuit board for damage
6.6. Step 5: Cleaning
If you find any corrosion, gently clean the affected areas with electrical contact cleaner and a soft brush. Use isopropyl alcohol to remove any residue.
6.7. Step 6: Component Replacement
If you identify any faulty components, such as bulging or leaking capacitors, replace them. Use a soldering iron and solder wick to remove the old components and solder in the new ones.
6.8. Step 7: Reflowing Solder Joints
If you find any cracked solder joints, reflow them with a soldering iron. Apply a small amount of solder to the joint and heat it until the solder melts and flows smoothly.
6.9. Step 8: Reassemble the ECU
Carefully reassemble the ECU casing and secure it with screws or clips.
6.10. Step 9: Reinstall the ECU
Reconnect the wiring harness connectors to the ECU. Reinstall the ECU in its original location and secure it with covers or brackets.
6.11. Step 10: Reconnect the Battery
Reconnect the negative battery cable.
6.12. Step 11: Test the Vehicle
Start the vehicle and check for any improvement in performance. Use a diagnostic scan tool to clear any stored DTCs and monitor the ECU’s operation.
7. When to Consider Replacing the 03 Civic ECU
While repair is often a viable option, there are situations where replacing the ECU is the more practical choice:
7.1. Extensive Damage
If the ECU has suffered extensive damage, such as a burnt circuit board or severe corrosion, repair may not be feasible.
7.2. Unavailable Replacement Parts
If the necessary replacement components are not available, replacing the ECU may be the only option.
7.3. Cost Prohibitive Repair
If the cost of repairing the ECU is close to or exceeds the cost of a new or refurbished unit, replacement may be the more economical choice.
7.4. Difficulty in Diagnosing the Problem
If the ECU problem is difficult to diagnose, and you’re unsure whether repair will solve the issue, replacement may be a safer bet.
8. Options for Replacing a 03 Civic ECU
If you decide to replace the ECU, you have several options:
8.1. New ECU
Buying a new ECU from a Honda dealer ensures that you get a genuine part that is specifically designed for your vehicle. However, new ECUs can be expensive.
8.2. Refurbished ECU
Refurbished ECUs are used units that have been tested and repaired. They are typically cheaper than new ECUs and can be a good option if you’re on a budget.
8.3. Used ECU
Used ECUs are the cheapest option, but they may come with risks. It’s important to buy from a reputable source and ensure that the ECU is in good working condition.
8.4. Aftermarket ECU
Aftermarket ECUs are designed to offer improved performance and features compared to the factory ECU. However, they may require professional installation and tuning.
8.5. Considerations When Replacing an ECU
- Compatibility: Ensure that the replacement ECU is compatible with your vehicle’s make, model, and year.
- Programming: Some ECUs may need to be programmed to match your vehicle’s immobilizer and other systems.
- Warranty: Check if the replacement ECU comes with a warranty.
9. How to Install a Replacement 03 Civic ECU
Installing a replacement ECU is a straightforward process:
9.1. Step 1: Disconnect the Battery
Disconnect the negative battery cable to prevent electrical shorts.
9.2. Step 2: Locate and Remove the Old ECU
The ECU is typically located under the dashboard or in the engine compartment. Consult your vehicle’s service manual for the exact location. Remove any covers or brackets securing the ECU. Disconnect the wiring harness connectors from the ECU.
9.3. Step 3: Install the New ECU
Connect the wiring harness connectors to the new ECU. Reinstall the ECU in its original location and secure it with covers or brackets.
9.4. Step 4: Reconnect the Battery
Reconnect the negative battery cable.
9.5. Step 5: Programming (If Necessary)
Some ECUs may need to be programmed to match your vehicle’s immobilizer and other systems. Follow the manufacturer’s instructions or seek professional assistance.
9.6. Step 6: Test the Vehicle
Start the vehicle and check for proper operation. Use a diagnostic scan tool to clear any stored DTCs and monitor the ECU’s performance.
10. Preventing Future 03 Civic ECU Problems
Taking preventive measures can help extend the life of your ECU:
10.1. Address Electrical Issues Promptly
Fix any electrical problems, such as alternator issues or faulty wiring, as soon as they arise to prevent voltage spikes.
10.2. Protect Against Water Damage
Ensure that the ECU is properly sealed to protect it from water damage. Check for any leaks in the vehicle’s body or seals.
10.3. Avoid Extreme Temperatures
Park the vehicle in shaded areas or use a sunshade to protect the ECU from extreme temperatures.
10.4. Regular Maintenance
Perform regular maintenance on the vehicle’s electrical system, including checking the battery, alternator, and wiring.
10.5. Use a Surge Protector
Consider using a surge protector to protect the ECU from voltage spikes caused by external sources.
11. How CAR-DIAGNOSTIC-TOOL.EDU.VN Can Help
CAR-DIAGNOSTIC-TOOL.EDU.VN offers comprehensive solutions for diagnosing, repairing, and preventing ECU problems in 2003 Honda Civics.
11.1. Detailed Diagnostic Guidance
Access detailed diagnostic procedures and troubleshooting guides to accurately identify ECU-related issues.
11.2. Repair Solutions
Find step-by-step repair instructions and component replacement guides to fix common ECU problems.
11.3. Expert Technical Support
Get expert technical support from experienced technicians who can help you diagnose and repair ECU issues. Contact us via Whatsapp at +1 (641) 206-8880.
11.4. Training Courses
Enroll in our training courses to enhance your automotive repair skills and learn advanced diagnostic techniques.
11.5. Remote Assistance
Receive remote assistance from our team of experts, who can guide you through the diagnostic and repair process.
12. Advanced Diagnostics and Repair Techniques
For complex ECU issues, advanced diagnostics and repair techniques may be necessary:
12.1. Oscilloscope Diagnostics
Using an oscilloscope to analyze sensor signals and ECU outputs can provide valuable insights into the ECU’s operation.
12.2. EEPROM Programming
In some cases, the ECU’s EEPROM (Electrically Erasable Programmable Read-Only Memory) may need to be reprogrammed to restore proper function.
12.3. Circuit Board Repair
Repairing damaged circuit boards requires specialized skills and equipment, such as a rework station and microscope.
12.4. Data Analysis
Analyzing data from the ECU, such as fuel trims and sensor readings, can help identify underlying issues that may be affecting the ECU’s performance.
13. The Role of the Immobilizer System
The immobilizer system is a security feature that prevents the vehicle from starting if the correct key is not present. The ECU is a key part of this system.
13.1. How the Immobilizer Works
The immobilizer system consists of a transponder chip in the key, an antenna around the ignition switch, and the ECU. When the key is inserted into the ignition, the antenna reads the transponder chip and sends the information to the ECU. If the information matches the stored code in the ECU, the engine is allowed to start.
13.2. Immobilizer Issues
If the immobilizer system is not working correctly, the engine may not start. Common causes of immobilizer issues include:
- Faulty Transponder Chip: The transponder chip in the key may be damaged or not programmed correctly.
- Antenna Problems: The antenna around the ignition switch may be damaged or disconnected.
- ECU Problems: The ECU may have lost its stored immobilizer code.
13.3. Addressing Immobilizer Issues
Addressing immobilizer issues may require:
- Key Reprogramming: Reprogramming the key to match the ECU.
- Antenna Replacement: Replacing the antenna around the ignition switch.
- ECU Replacement or Reprogramming: Replacing or reprogramming the ECU to restore the immobilizer function.
14. Understanding ECU Pinouts and Wiring Diagrams
ECU pinouts and wiring diagrams are essential for diagnosing and repairing ECU problems.
14.1. What are ECU Pinouts?
ECU pinouts are diagrams that show the location and function of each pin on the ECU’s connectors.
14.2. What are Wiring Diagrams?
Wiring diagrams show how the ECU is connected to various sensors, actuators, and other components in the vehicle.
14.3. How to Use Pinouts and Wiring Diagrams
Pinouts and wiring diagrams can be used to:
- Check Continuity: Verify that there are no breaks in the wiring between the ECU and various components.
- Check Voltage: Measure the voltage at various pins on the ECU to ensure that it is receiving proper power and ground.
- Identify Components: Identify the function of various wires and components in the vehicle’s electrical system.
14.4. Where to Find Pinouts and Wiring Diagrams
Pinouts and wiring diagrams can be found in:
- Vehicle Service Manuals: These manuals provide detailed information about the vehicle’s electrical system.
- Online Databases: Several online databases provide access to pinouts and wiring diagrams.
- Diagnostic Software: Some diagnostic software programs include pinouts and wiring diagrams.
15. The Future of ECU Diagnostics and Repair
The field of ECU diagnostics and repair is constantly evolving:
15.1. Advanced Diagnostic Tools
New diagnostic tools are being developed that offer more advanced features, such as:
- Artificial Intelligence (AI): AI-powered diagnostic tools can analyze data from the ECU and provide insights into potential problems.
- Cloud-Based Diagnostics: Cloud-based diagnostic tools allow technicians to access real-time data and collaborate with experts remotely.
15.2. Remote Diagnostics and Repair
Remote diagnostics and repair are becoming increasingly common. Technicians can use remote access tools to diagnose and repair ECU problems from anywhere in the world.
15.3. Cybersecurity
As vehicles become more connected, cybersecurity is becoming increasingly important. ECU security is essential to protect against hacking and unauthorized access.
15.4. Electric Vehicles (EVs)
The rise of EVs is leading to new challenges in ECU diagnostics and repair. EVs have more complex ECUs and require specialized diagnostic tools and techniques.
16. Real-World Examples of 03 Civic ECU Repair
Let’s look at some real-world examples of how ECU repair can save time and money:
16.1. Case Study 1: Alternator Voltage Spike
Problem: A 2003 Honda Civic experienced a sudden loss of power and the check engine light came on. The diagnostic scan tool revealed a code indicating an internal ECU fault.
Diagnosis: Further investigation revealed that the alternator was producing excessive voltage, which had damaged the ECU.
Solution: The ECU was removed and inspected. A faulty capacitor was identified and replaced. The ECU was reinstalled, and the vehicle ran normally.
Cost Savings: The repair cost $200, compared to $1,000 for a new ECU.
16.2. Case Study 2: Water Damage
Problem: A 2003 Honda Civic experienced intermittent engine stalling and rough running. The check engine light was on, and the diagnostic scan tool showed multiple sensor codes.
Diagnosis: Inspection of the ECU revealed signs of water damage and corrosion on the circuit board.
Solution: The ECU was removed and cleaned. Corroded connectors were replaced, and the circuit board was treated with corrosion inhibitor. The ECU was reinstalled, and the vehicle ran normally.
Cost Savings: The repair cost $150, compared to $800 for a refurbished ECU.
16.3. Case Study 3: EEPROM Corruption
Problem: A 2003 Honda Civic experienced a no-start condition. The check engine light was on, and the diagnostic scan tool was unable to communicate with the ECU.
Diagnosis: Further investigation revealed that the ECU’s EEPROM had become corrupted.
Solution: The ECU was removed, and the EEPROM was reprogrammed with the correct data. The ECU was reinstalled, and the vehicle started normally.
Cost Savings: The repair cost $300, compared to $1,200 for a new ECU and programming.
17. The Importance of Staying Updated
The automotive industry is constantly evolving, and it’s important to stay updated on the latest diagnostic and repair techniques:
17.1. Training Courses
Enroll in training courses to learn about new technologies and techniques. CAR-DIAGNOSTIC-TOOL.EDU.VN offers a range of training courses for automotive technicians.
17.2. Industry Events
Attend industry events to network with other professionals and learn about the latest trends.
17.3. Online Forums and Communities
Participate in online forums and communities to share knowledge and learn from others.
17.4. Technical Publications
Read technical publications to stay informed about new technologies and techniques.
18. FAQ About 03 Civic ECU Repair
18.1. How do I know if my 2003 Honda Civic ECU is bad?
Look for symptoms like a check engine light, poor engine performance, difficulty starting, reduced fuel efficiency, or communication issues with diagnostic tools.
18.2. Can I drive my 2003 Honda Civic with a bad ECU?
It’s not recommended. A faulty ECU can cause unpredictable engine behavior, potentially leading to safety hazards.
18.3. How much does it cost to replace a 2003 Honda Civic ECU?
Replacement costs can range from $800 to $1,500, including the cost of the ECU and programming.
18.4. Is it possible to repair a 2003 Honda Civic ECU?
Yes, often it is. Minor issues like corrosion or component failure can be repaired, saving you money.
18.5. Where can I find a replacement ECU for my 2003 Honda Civic?
You can find replacement ECUs at Honda dealers, online retailers, or auto salvage yards.
18.6. Do I need to program a replacement ECU for my 2003 Honda Civic?
Yes, in most cases. The ECU needs to be programmed to match your vehicle’s immobilizer and other systems.
18.7. Can I program a replacement ECU myself?
Programming an ECU typically requires specialized tools and knowledge. It’s best to seek professional assistance.
18.8. How can I prevent ECU problems in my 2003 Honda Civic?
Address electrical issues promptly, protect against water damage, avoid extreme temperatures, and perform regular maintenance on the vehicle’s electrical system.
18.9. What tools do I need to diagnose an ECU problem?
You’ll need a diagnostic scan tool, multimeter, and possibly an oscilloscope for advanced diagnostics.
18.10. Where can I get help with diagnosing and repairing my 2003 Honda Civic ECU?
CAR-DIAGNOSTIC-TOOL.EDU.VN offers detailed diagnostic guidance, repair solutions, expert technical support, and training courses. Contact us via Whatsapp at +1 (641) 206-8880.
19. Call to Action
Experiencing ECU issues with your 2003 Honda Civic? Don’t let a faulty ECU keep you off the road. Contact CAR-DIAGNOSTIC-TOOL.EDU.VN today for expert assistance. Whether you need diagnostic guidance, repair solutions, or remote support, our team is here to help. Call us at +1 (641) 206-8880 or visit our website at CAR-DIAGNOSTIC-TOOL.EDU.VN for more information. Our office is located at 1100 Congress Ave, Austin, TX 78701, United States. Let us help you get your Civic running smoothly again.