The Ecu-b Fuse Toyota Meaning refers to a vital component in your Toyota’s electrical system, protecting various electronic control units. If you’re facing issues with your vehicle’s starting system or suspect problems with the ECU-B fuse, CAR-DIAGNOSTIC-TOOL.EDU.VN provides comprehensive diagnostic tools, repair guides, and expert technical support to help you resolve these issues efficiently. With our detailed troubleshooting assistance and technician training programs, you can enhance your diagnostic skills and ensure reliable repairs, supported by remote assistance for complex problems.
1. What Does the ECU-B Fuse in a Toyota Do?
The ECU-B fuse in a Toyota safeguards the backup power supply to various electronic control units (ECUs), including the engine control module (ECM), transmission control module (TCM), and other critical systems. This fuse ensures that these ECUs retain essential memory and settings even when the ignition is off. According to Toyota’s official documentation, the ECU-B fuse is crucial for maintaining the operational parameters of various vehicle systems.
- Why it matters: The ECU-B fuse is essential because it maintains the memory functions of the engine control unit (ECU) and other electronic components, ensuring that learned settings and diagnostic trouble codes (DTCs) are preserved. Without a functioning ECU-B fuse, your car might experience issues such as loss of stored data, difficulty starting, or abnormal engine performance.
- How to check: You can quickly check this fuse to prevent further issues, making sure your car runs smoothly. First, turn off the engine and open the fuse box, usually under the dashboard or in the engine bay. Use the fuse diagram to find the ECU-B fuse. Pull it out with fuse pullers and inspect. If the wire inside is broken, it’s blown and needs to be replaced.
- CAR-DIAGNOSTIC-TOOL.EDU.VN’s role: At CAR-DIAGNOSTIC-TOOL.EDU.VN, we offer comprehensive diagnostic tools, detailed repair guides, and expert technical support to accurately diagnose and resolve ECU-B fuse related issues, ensuring your Toyota’s electronic systems operate optimally. We provide step-by-step troubleshooting assistance and technician training programs to enhance your diagnostic skills and repair capabilities. Our remote support is available for complex problems, ensuring you have the resources to handle any diagnostic challenge.
2. What are the Common Symptoms of a Blown ECU-B Fuse in a Toyota?
A blown ECU-B fuse in a Toyota can manifest in several ways, affecting various systems that rely on constant power from the ECU. Here are some common symptoms:
- Difficulty Starting the Vehicle: One of the most common symptoms is difficulty starting the engine. The ECU relies on continuous power to maintain essential settings needed for startup. A blown fuse can cause the ECU to lose these settings, making it hard to start the car.
- Loss of Radio Presets and Settings: The radio’s memory, including saved stations and settings, can be erased when the ECU-B fuse is blown. This happens because the radio relies on the ECU for continuous power to retain its memory.
- Loss of Trip Computer Data: Information stored in the trip computer, such as fuel economy, average speed, and trip distance, may be lost. The trip computer needs constant power to retain this data, which is provided through the ECU.
- Check Engine Light (CEL): A blown ECU-B fuse can trigger the Check Engine Light. The ECU continuously monitors various sensors and systems, and a blown fuse can disrupt this monitoring, causing the CEL to illuminate.
- Transmission Issues: The transmission control module (TCM) also relies on the ECU-B fuse for power. A blown fuse can cause transmission problems such as erratic shifting or failure to shift properly.
- ABS and Traction Control Problems: The anti-lock braking system (ABS) and traction control system may malfunction. These systems require constant power to maintain their settings and operational parameters.
- Idle Issues: The engine may idle roughly or stall, as the ECU needs continuous power to maintain the correct idle settings.
- Clock Resetting: The vehicle’s clock may reset to its default setting each time the ignition is turned off.
- Decreased Fuel Efficiency: Loss of learned settings can lead to the car running less efficiently as the car’s computer may be running in open-loop mode.
3. What Causes the ECU-B Fuse to Blow in a Toyota?
Several factors can cause the ECU-B fuse to blow in a Toyota. Understanding these causes can help you diagnose and prevent future issues. Here are the common reasons:
- Electrical Overload: An electrical overload occurs when too much current flows through the circuit. This can happen due to faulty wiring, short circuits, or the addition of aftermarket accessories that draw excessive power.
- Short Circuit: A short circuit happens when there is an unintended path for current to flow, usually to ground. This can result from damaged or frayed wires, loose connections, or moisture intrusion.
- Faulty Wiring: Damaged or deteriorated wiring can lead to shorts and overloads. Wires can become frayed, cracked, or exposed over time due to age, heat, or physical damage.
- Moisture Intrusion: Water or moisture can cause corrosion and short circuits in the electrical system. This is more common in areas with high humidity or where the vehicle is exposed to water.
- Bad ECU or Other Modules: A failing ECU or other electronic module can draw excessive current, causing the fuse to blow. Internal component failures can lead to shorts or increased power consumption.
- Aftermarket Accessories: Incorrectly installed or incompatible aftermarket accessories can overload the circuit. This includes items like audio systems, lighting, and security systems.
- Loose Connections: Loose or corroded connections can increase resistance in the circuit, leading to heat buildup and eventually causing the fuse to blow.
- Voltage Spikes: Sudden voltage spikes can exceed the fuse’s capacity and cause it to blow. These spikes can come from the alternator or other components in the charging system.
- Aging Electrical Components: Over time, electrical components can degrade and become more prone to failure. This can lead to increased current draw and blown fuses.
4. How Do You Diagnose a Blown ECU-B Fuse in a Toyota?
Diagnosing a blown ECU-B fuse in a Toyota involves a systematic approach to identify the root cause. Here’s a step-by-step guide:
-
Step 1: Visual Inspection of the Fuse:
- Procedure: Locate the fuse box (usually under the dashboard or in the engine bay). Use the fuse diagram to find the ECU-B fuse. Remove the fuse and visually inspect it.
- Expected Result: If the fuse is blown, the wire inside will be broken or the glass will be darkened.
-
Step 2: Replace the Fuse and Monitor:
- Procedure: Replace the blown fuse with a new one of the same amperage rating. Start the vehicle and monitor its performance.
- Expected Result: If the new fuse blows immediately or shortly after replacement, there is likely a short circuit or overload in the system.
-
Step 3: Check for Short Circuits:
- Procedure: Use a multimeter to check for continuity between the fuse terminals and ground. Disconnect components on the circuit to isolate the short.
- Expected Result: High continuity indicates a short circuit. Identify and repair the shorted wire or component.
-
Step 4: Inspect Wiring and Connections:
- Procedure: Examine the wiring harness and connectors associated with the ECU and other modules powered by the ECU-B fuse. Look for frayed wires, loose connections, or signs of corrosion.
- Expected Result: Repair or replace any damaged wiring or connectors. Clean corroded connections.
-
Step 5: Test the ECU and Other Modules:
- Procedure: Use a diagnostic scan tool to check for error codes related to the ECU and other modules. Monitor the current draw of these modules.
- Expected Result: Unusual current draw or error codes may indicate a faulty ECU or module.
-
Step 6: Check Aftermarket Accessories:
- Procedure: Disconnect any aftermarket accessories connected to the electrical system. Replace the fuse and monitor.
- Expected Result: If the fuse no longer blows after disconnecting the accessories, one of them is likely causing the issue.
-
Step 7: Verify Proper Grounding:
- Procedure: Check the grounding points for the ECU and other modules. Ensure they are clean and securely connected to the chassis.
- Expected Result: Poor grounding can cause increased resistance and blown fuses. Clean and tighten grounding connections.
-
Step 8: Check for Moisture Intrusion:
- Procedure: Inspect the ECU and wiring for signs of moisture or corrosion. Dry out any affected areas and clean corroded connections.
- Expected Result: Moisture can cause short circuits and blown fuses.
-
Step 9: Consult a Professional:
- Procedure: If you are unable to identify the cause of the blown fuse, consult a professional mechanic or electrician.
- Expected Result: A professional can use advanced diagnostic tools and techniques to pinpoint the problem.
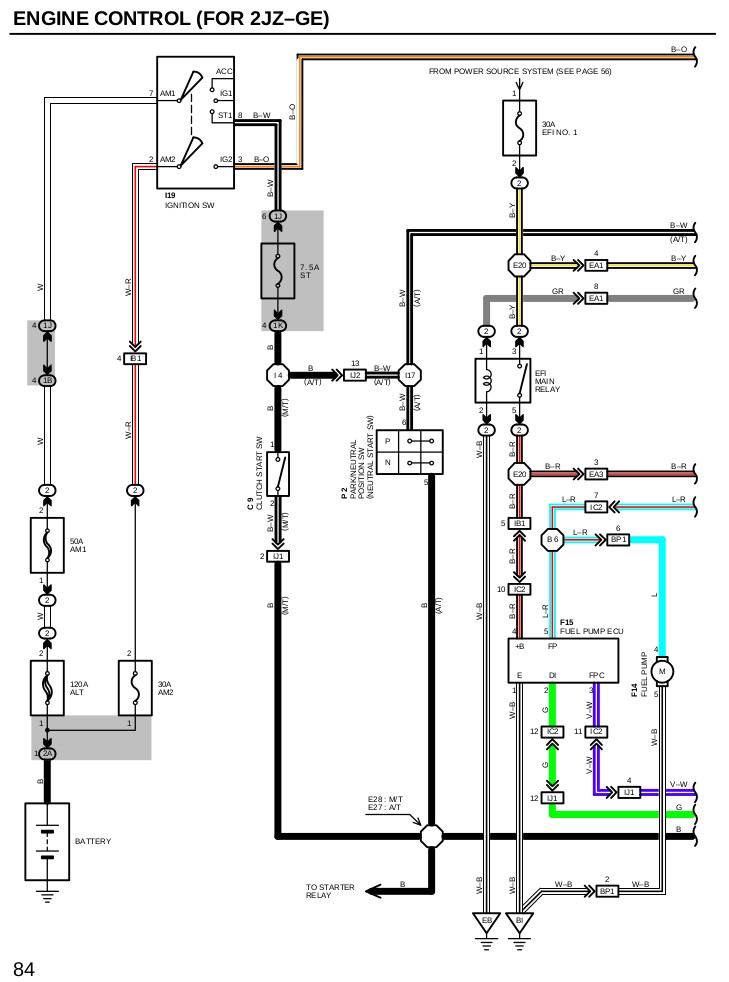
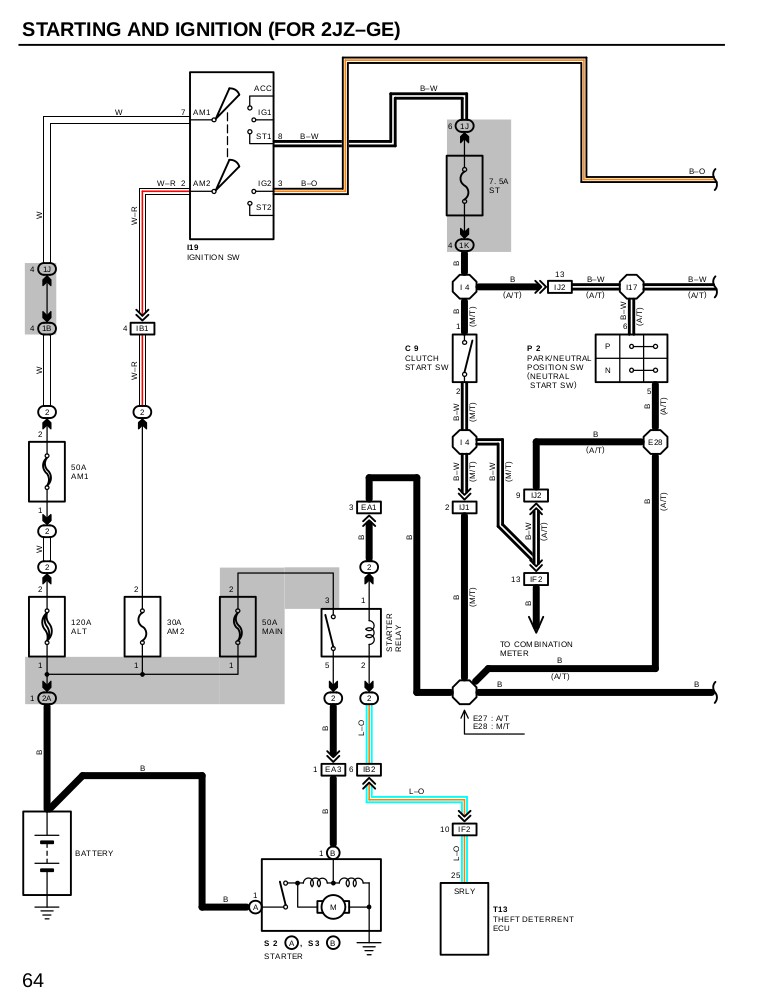 Fuse Box Diagram for Toyota Vehicle Showing ECU-B Fuse Location
5. What Tools are Needed to Diagnose and Fix ECU-B Fuse Issues?
Diagnosing and fixing ECU-B fuse issues in a Toyota requires specific tools to ensure accurate and effective repairs. Here’s a list of essential tools:
-
Multimeter:
- Function: Measures voltage, current, and resistance to diagnose electrical issues such as short circuits and overloads.
- Usage: Use to check for continuity, voltage drops, and current draw in the ECU-B fuse circuit.
-
Fuse Puller:
- Function: Safely removes fuses from the fuse box without damaging them or the surrounding components.
- Usage: Essential for removing and inspecting the ECU-B fuse.
-
Diagnostic Scan Tool:
- Function: Reads diagnostic trouble codes (DTCs) from the ECU and other modules to identify potential issues.
- Usage: Use to check for error codes related to the ECU and other systems affected by the ECU-B fuse.
-
Wiring Diagram:
- Function: Provides a visual representation of the vehicle’s electrical system, helping you trace circuits and identify components.
- Usage: Essential for understanding the ECU-B fuse circuit and identifying potential problem areas.
-
Socket Set and Wrenches:
- Function: Used to disconnect and reconnect electrical components and grounding points.
- Usage: Needed for accessing and inspecting wiring and connectors.
-
Wire Strippers and Crimpers:
- Function: Used to repair damaged wiring and create secure connections.
- Usage: Necessary for fixing frayed wires or replacing connectors.
-
Electrical Contact Cleaner:
- Function: Cleans corroded electrical connections to ensure good conductivity.
- Usage: Use to clean connectors and grounding points in the ECU-B fuse circuit.
-
Test Light:
- Function: Verifies the presence of voltage in a circuit.
- Usage: Use to check if power is reaching the ECU-B fuse and related components.
-
Insulated Screwdrivers:
- Function: Prevents electrical shock when working on the electrical system.
- Usage: Use for disconnecting and reconnecting electrical components.
-
OBD-II Connector Breakout Box:
- Function: Allows direct access to the pins in the OBD-II connector for testing and diagnosis.
- Usage: Useful for advanced diagnostics and troubleshooting communication issues.
6. Step-by-Step Guide to Replacing a Blown ECU-B Fuse in a Toyota
Replacing a blown ECU-B fuse in a Toyota is a straightforward process. Here’s a detailed, step-by-step guide:
-
Step 1: Gather Necessary Tools and Materials:
- New ECU-B fuse (same amperage rating as the original)
- Fuse puller
- Vehicle owner’s manual (for fuse box location and diagram)
-
Step 2: Locate the Fuse Box:
- Consult your vehicle’s owner’s manual to find the location of the fuse box. In most Toyotas, the fuse box is located under the dashboard on the driver’s side or in the engine bay.
-
Step 3: Identify the ECU-B Fuse:
- Refer to the fuse box diagram (usually printed on the fuse box cover or in the owner’s manual) to locate the ECU-B fuse. The diagram will indicate the fuse’s location and amperage rating.
-
Step 4: Turn Off the Vehicle:
- Ensure the ignition is turned off before replacing the fuse. This prevents accidental electrical shorts or shocks.
-
Step 5: Remove the Fuse Box Cover:
- Open the fuse box cover. It may be held in place by clips or screws.
-
Step 6: Remove the Blown Fuse:
- Use the fuse puller to gently remove the ECU-B fuse. Avoid using pliers or other metal tools, as they can damage the fuse box or cause a short circuit.
-
Step 7: Inspect the Fuse:
- Examine the fuse to confirm it is blown. A blown fuse will have a broken wire inside or a darkened glass.
-
Step 8: Install the New Fuse:
- Insert the new ECU-B fuse into the empty slot. Ensure it is fully seated.
-
Step 9: Replace the Fuse Box Cover:
- Put the fuse box cover back in place. Make sure it is securely fastened.
-
Step 10: Test the Vehicle:
- Start the vehicle and check if the symptoms associated with the blown fuse are resolved. Verify that the radio presets, trip computer data, and other settings are retained.
 Toyota Fuse Replacement Using Fuse Puller Tool
7. What Precautions Should You Take When Working with Fuses in a Toyota?
When working with fuses in a Toyota, it’s essential to take certain precautions to ensure your safety and prevent damage to the vehicle’s electrical system. Here are some key precautions:
-
Turn Off the Ignition:
- Always turn off the ignition before working with fuses to prevent electrical shocks or short circuits.
-
Use the Correct Fuse:
- Replace blown fuses with new ones of the same amperage rating. Using a fuse with a higher rating can overload the circuit and cause damage.
-
Avoid Using Metal Tools:
- Use a fuse puller to remove fuses. Avoid using metal tools like pliers or screwdrivers, as they can damage the fuse box or cause a short circuit.
-
Check the Fuse Box Diagram:
- Consult the fuse box diagram to identify the correct fuse. The diagram is usually located on the fuse box cover or in the owner’s manual.
-
Inspect Fuses Visually:
- Before replacing a fuse, visually inspect it to confirm it is blown. A blown fuse will have a broken wire inside or a darkened glass.
-
Avoid Touching Metal Contacts:
- Avoid touching the metal contacts inside the fuse box to prevent electrical shock or damage to the contacts.
-
Ensure Proper Seating:
- When installing a new fuse, ensure it is fully seated in the fuse box to maintain a secure connection.
-
Do Not Bypass Fuses:
- Never bypass a fuse with a wire or other conductive material. This can overload the circuit and cause a fire.
-
Handle Fuses with Care:
- Handle fuses gently to avoid damaging them. Store spare fuses in a dry, safe place.
-
Consult a Professional:
- If you are unsure about working with fuses or have difficulty identifying the correct fuse, consult a professional mechanic or electrician.
8. How Does the ECU-B Fuse Relate to Other Electrical Components in a Toyota?
The ECU-B fuse is a critical component in a Toyota’s electrical system, as it provides continuous power to various electronic control units (ECUs). Understanding its relationship with other components can help in diagnosing and resolving electrical issues. Here’s how the ECU-B fuse relates to other key components:
-
Engine Control Module (ECM):
- The ECU-B fuse supplies backup power to the ECM, which controls engine functions such as fuel injection, ignition timing, and emissions. Continuous power ensures the ECM retains learned settings and diagnostic trouble codes (DTCs).
-
Transmission Control Module (TCM):
- The TCM, responsible for controlling the transmission, also receives backup power from the ECU-B fuse. This ensures the TCM retains shift patterns and adaptive learning data.
-
Anti-lock Braking System (ABS) Module:
- The ABS module relies on the ECU-B fuse for constant power to maintain its settings and operational parameters. This ensures the ABS functions correctly during emergency braking situations.
-
Supplemental Restraint System (SRS) Module:
- The SRS module, which controls airbags and seatbelt pretensioners, also depends on the ECU-B fuse for continuous power. This ensures the SRS is ready to deploy in the event of a collision.
-
Body Control Module (BCM):
- The BCM manages various body functions, such as lighting, power windows, and door locks. The ECU-B fuse provides backup power to the BCM, ensuring these functions operate correctly.
-
Radio and Audio System:
- The radio and audio system rely on the ECU-B fuse for continuous power to retain presets and settings. A blown fuse can result in loss of radio stations and other audio preferences.
-
Trip Computer:
- The trip computer, which tracks fuel economy, average speed, and trip distance, also needs continuous power from the ECU-B fuse. A blown fuse can cause loss of trip data.
-
Clock and Memory Functions:
- The ECU-B fuse ensures the vehicle’s clock retains the correct time and that memory functions for various systems are maintained.
9. Can Upgrading Your Toyota’s Electrical System Cause Issues with the ECU-B Fuse?
Upgrading your Toyota’s electrical system can potentially cause issues with the ECU-B fuse if not done correctly. Here’s how electrical upgrades can affect the ECU-B fuse:
-
Increased Electrical Load:
- Adding aftermarket accessories, such as high-powered audio systems, auxiliary lighting, or performance parts, can increase the electrical load on the vehicle’s system. If the added load exceeds the capacity of the ECU-B fuse circuit, it can cause the fuse to blow.
-
Incorrect Wiring:
- Improperly installed wiring can lead to short circuits or ground faults, causing the ECU-B fuse to blow. It’s crucial to ensure that all wiring connections are secure, insulated, and properly grounded.
-
Incompatible Components:
- Using electrical components that are not compatible with your Toyota’s electrical system can lead to voltage spikes or current imbalances, causing the ECU-B fuse to blow. Always use components that are designed for your vehicle’s specifications.
-
Poor Grounding:
- Inadequate grounding can cause increased resistance in the electrical system, leading to heat buildup and blown fuses. Ensure that all electrical components are properly grounded to the vehicle’s chassis.
-
Overloaded Circuits:
- Connecting too many accessories to a single circuit can overload it, causing the ECU-B fuse to blow. Distribute the electrical load across multiple circuits to prevent overloading.
-
Faulty Installation:
- Poorly executed installations can damage wiring or create loose connections, leading to short circuits and blown fuses. Always follow installation instructions carefully or seek professional assistance.
-
Voltage Spikes:
- Some electrical upgrades can generate voltage spikes that exceed the fuse’s capacity, causing it to blow. Use voltage regulators or surge protectors to mitigate voltage spikes.
-
Aging Electrical System:
- Upgrading the electrical system in an older vehicle can expose weaknesses in the existing wiring and components. Consider inspecting and upgrading the entire electrical system to ensure compatibility and reliability.
10. What are Some Advanced Diagnostic Techniques for Intermittent ECU-B Fuse Problems?
Intermittent ECU-B fuse problems can be challenging to diagnose, as the issue may not be present during initial testing. Here are some advanced diagnostic techniques to help pinpoint the root cause:
-
Monitor Current Draw:
- Use a multimeter with a clamp-on ammeter to monitor the current draw on the ECU-B fuse circuit over time. Look for spikes or inconsistencies in the current draw that may indicate a problem.
-
Perform a Voltage Drop Test:
- Conduct a voltage drop test to identify areas of high resistance in the circuit. High resistance can cause increased current draw and blown fuses.
-
Use a Data Logger:
- Employ a data logger to record electrical parameters over an extended period. This can help capture intermittent events that may be causing the fuse to blow.
-
Check Wiring Harness Integrity:
- Thoroughly inspect the wiring harness for signs of damage, such as chafing, corrosion, or loose connections. Pay close attention to areas where the harness is routed near sharp edges or moving parts.
-
Test Individual Components:
- Isolate and test individual components connected to the ECU-B fuse circuit, such as sensors, actuators, and modules. Use a multimeter or oscilloscope to check for proper operation and signal integrity.
-
Simulate Driving Conditions:
- Recreate the conditions under which the fuse typically blows. This may involve driving the vehicle on bumpy roads, using electrical accessories, or running the engine at high RPMs.
-
Check Grounding Points:
- Verify that all grounding points for the ECU and other modules are clean, tight, and properly connected to the chassis. Poor grounding can cause intermittent electrical issues.
-
Perform a “Wiggle Test”:
- With the engine running, gently wiggle the wiring harness and connectors associated with the ECU-B fuse circuit. Look for changes in engine performance or electrical readings that may indicate a loose connection.
-
Use a Thermal Camera:
- Employ a thermal camera to identify areas of excessive heat in the electrical system. Overheating components or connections can indicate a problem.
-
Consult a Factory Service Manual:
- Refer to the factory service manual for detailed diagnostic procedures and troubleshooting tips specific to your Toyota model.
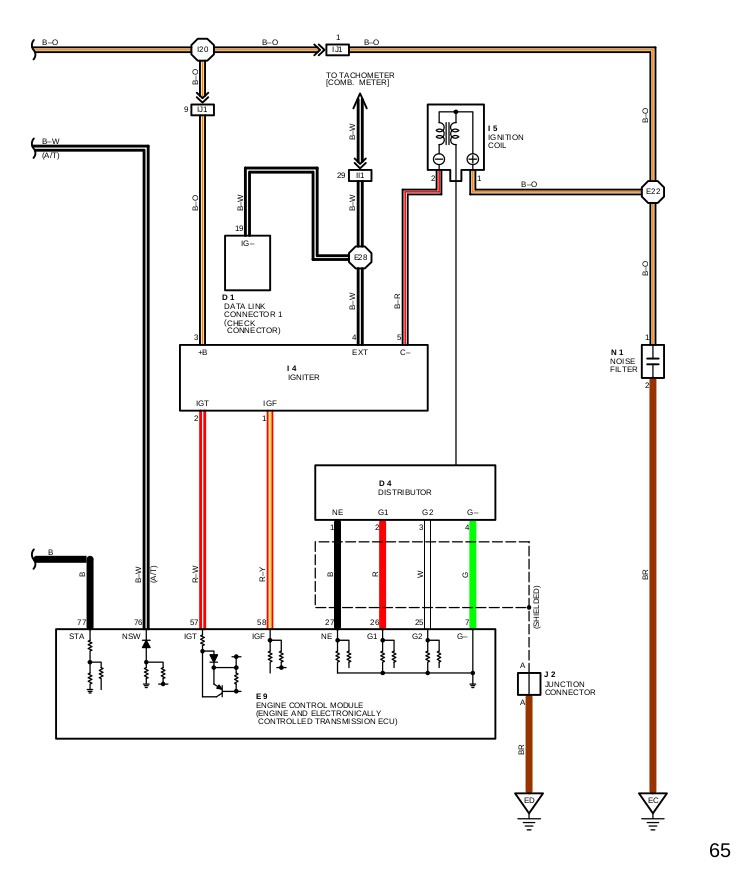
 Electrical Wiring Diagram for Automotive Systems
At CAR-DIAGNOSTIC-TOOL.EDU.VN, we are committed to supporting automotive technicians and shop owners with top-notch diagnostic tools, comprehensive repair guides, and expert technical support. Understanding the ECU-B fuse Toyota meaning, its symptoms, and diagnostic steps is essential for effectively addressing electrical issues in Toyota vehicles.
Ready to take your diagnostic skills to the next level? Contact us today via Whatsapp at +1 (641) 206-8880 or visit our website at CAR-DIAGNOSTIC-TOOL.EDU.VN. Our office is located at 1100 Congress Ave, Austin, TX 78701, United States. Let CAR-DIAGNOSTIC-TOOL.EDU.VN be your trusted partner in automotive diagnostics and repair!
FAQ Section: ECU-B Fuse Toyota Meaning
Q1: What is the ECU-B fuse Toyota meaning, and why is it important?
The ECU-B fuse in a Toyota provides backup power to various electronic control units (ECUs), ensuring they retain memory and settings. It’s crucial for maintaining engine performance, radio presets, and other electronic functions.
Q2: What are the common signs of a blown ECU-B fuse in a Toyota?
Common symptoms include difficulty starting the vehicle, loss of radio presets, loss of trip computer data, a check engine light, transmission issues, and idle problems.
Q3: What typically causes the ECU-B fuse to blow in a Toyota?
Causes include electrical overloads, short circuits, faulty wiring, moisture intrusion, bad ECUs, aftermarket accessories, and loose connections.
Q4: How can I diagnose a blown ECU-B fuse in my Toyota?
Diagnose by visually inspecting the fuse, replacing it to see if it blows again, checking for short circuits, inspecting wiring, and testing the ECU and other modules.
Q5: What tools do I need to diagnose and fix ECU-B fuse issues?
Essential tools include a multimeter, fuse puller, diagnostic scan tool, wiring diagram, socket set, wire strippers, and electrical contact cleaner.
Q6: What steps should I take to replace a blown ECU-B fuse?
Turn off the vehicle, locate the fuse box, identify the ECU-B fuse, remove the blown fuse, inspect it, install a new fuse with the same rating, and test the vehicle.
Q7: What precautions should I take when working with fuses in my Toyota?
Always turn off the ignition, use the correct fuse, avoid metal tools, check the fuse box diagram, and handle fuses with care.
Q8: How does upgrading my Toyota’s electrical system affect the ECU-B fuse?
Improperly installed upgrades can overload the circuit, cause short circuits, or introduce incompatible components, leading to blown fuses.
Q9: What advanced diagnostic techniques can help with intermittent ECU-B fuse problems?
Monitor current draw, perform voltage drop tests, use a data logger, check wiring harness integrity, and test individual components to pinpoint the cause.
Q10: Where can I get reliable diagnostic tools and support for ECU-B fuse issues in my Toyota?
CAR-DIAGNOSTIC-TOOL.EDU.VN offers top-notch diagnostic tools, comprehensive repair guides, expert technical support, and technician training programs to assist with ECU-B fuse and other automotive issues. Contact us via Whatsapp at +1 (641) 206-8880 or visit our website.