Swapping to an OBD1 ECU in your Honda can unlock performance potential and offer tuning flexibility. This comprehensive guide from CAR-DIAGNOSTIC-TOOL.EDU.VN provides detailed, expert-backed instructions, wiring diagrams, and troubleshooting tips to ensure a successful OBD1 swap. Learn how to diagnose engine issues, access step-by-step repair guides, and receive remote technical support, enhancing your automotive expertise through specialized training and advanced diagnostic tools, all available at CAR-DIAGNOSTIC-TOOL.EDU.VN.
Contents
- 1. What Is an OBD1 Swap and Why Do It on a Honda ECU?
- 1.1 What are the Key Reasons for Considering an OBD1 ECU Swap?
- 1.2 What are the Potential Drawbacks?
- 2. What Honda Models Are Suitable for an OBD1 ECU Swap?
- 2.1 Why are These Models Preferred?
- 3. What Tools and Components Are Required for an OBD1 Swap?
- 3.1 Essential Tools
- 3.2 Necessary Components
- 3.3 OBD1 ECU Options for Honda Swaps
- 3.3.1 Popular OBD1 ECU Models
- 3.3.2 Key Considerations When Choosing an ECU
- 3.3.3 Common Issues and Solutions
- 4. How to Prepare Your Honda for an OBD1 ECU Swap?
- 4.1 Disconnecting the Battery
- 4.2 Identifying Your Vehicle’s Wiring Harness
- 4.3 Gathering Wiring Diagrams
- 4.4 Inspecting and Cleaning Connectors
- 4.5 Planning Sensor Relocations
- 4.6 Verifying Component Compatibility
- 4.7 Preparing for Immobilizer Issues
- 4.8 Checking Grounding Points
- 5. Step-by-Step Guide to Performing the OBD1 ECU Swap
- 5.1 Wiring Modifications
- 5.2 Distributor Wiring
- 5.3 Injector Wiring
- 5.4 IAT Sensor Relocation
- 5.5 Connecting Vacuum Lines
- 5.6 Installing the OBD1 ECU
- 5.7 Final Wiring Checks
- 5.8 Reconnecting the Battery
- 6. Post-Swap Procedures and Initial Testing
- 6.1 Initial Start-Up
- 6.2 Checking for Error Codes
- 6.3 Setting Ignition Timing
- 6.4 Monitoring Fuel Pressure
- 6.5 Test Driving
- 6.6 Tuning the ECU
- 6.7 Addressing Common Issues
- 6.8 Monitoring Fuel Trims
- 7. Troubleshooting Common Issues After an OBD1 Swap
- 7.1 Engine Not Starting
- 7.2 Rough Idle
- 7.3 Misfires
- 7.4 Poor Performance
- 7.5 Error Codes
- 7.6 Electrical Issues
- 8. Maximizing Performance After the OBD1 Swap
- 8.1 Custom ECU Tuning
- 8.2 Upgrading Fuel System
- 8.3 Enhancing Intake and Exhaust Systems
- 8.4 Upgrading Camshafts
- 8.5 Optimizing Ignition System
- 8.6 Improving Cooling System
- 9. Ensuring Long-Term Reliability of Your OBD1 Swapped Honda
- 9.1 Regular Maintenance Schedule
- 9.2 Monitoring Engine Performance
- 9.3 Addressing Potential Issues Promptly
- 9.4 Proper Storage
- 9.5 Using Quality Parts
- 10. OBD1 Swap: Is It Right for You?
- 10.1 Assess Your Mechanical Skills
- 10.2 Define Your Goals
- 10.3 Weigh the Pros and Cons
- 10.4 Consider the Costs
- 10.5 Research and Planning
- 10.6 Alternatives to OBD1 Swap
- FAQ: Everything You Need to Know About OBD1 Swaps for Honda ECUs
- 1. What is an OBD1 swap, and why would I want to do it on my Honda?
- 2. Which Honda models are best suited for an OBD1 ECU swap?
- 3. What tools and components are essential for performing an OBD1 swap?
- 4. How do I prepare my Honda for an OBD1 ECU swap?
- 5. What are the step-by-step instructions for performing the OBD1 ECU swap?
- 6. What post-swap procedures and initial tests should I perform?
- 7. What are some common issues I might encounter after an OBD1 swap, and how do I troubleshoot them?
- 8. How can I maximize performance after the OBD1 swap?
- 9. How can I ensure the long-term reliability of my OBD1 swapped Honda?
- 10. Is an OBD1 swap the right choice for me?
1. What Is an OBD1 Swap and Why Do It on a Honda ECU?
An OBD1 (On-Board Diagnostics 1) swap involves replacing a newer Honda’s ECU (Engine Control Unit), typically OBD2 (On-Board Diagnostics 2), with an older OBD1 ECU. According to a 2021 study by the Society of Automotive Engineers (SAE), OBD1 ECUs offer a more straightforward tuning process due to their simpler architecture compared to OBD2 systems. This is because OBD1 systems generally have fewer sensors and parameters to manage. Many Honda enthusiasts and performance tuners choose this modification for enhanced control over engine parameters, increased horsepower, and a more customizable driving experience.
1.1 What are the Key Reasons for Considering an OBD1 ECU Swap?
- Enhanced Tuning Capabilities: OBD1 ECUs are easier to tune, allowing precise adjustments to fuel and ignition maps.
- Performance Gains: Tuners can optimize engine performance, often resulting in increased horsepower and torque.
- Simpler Diagnostics: While OBD2 offers more detailed diagnostics, some find OBD1 easier to navigate for basic troubleshooting.
- Compatibility: Necessary for certain engine swaps where the new engine’s ECU is incompatible with the vehicle’s original system.
- Cost-Effectiveness: In some cases, tuning an OBD1 ECU can be more cost-effective than dealing with the complexities of OBD2 tuning.
1.2 What are the Potential Drawbacks?
- Emissions Compliance: OBD1 systems are less stringent, which can lead to issues with emissions testing in some regions.
- Reduced Diagnostic Information: OBD1 provides less detailed diagnostic data compared to OBD2.
- Wiring Modifications: Swapping to OBD1 often requires modifications to the wiring harness.
- Component Compatibility: Ensuring compatibility between the OBD1 ECU and other vehicle components can be challenging.
2. What Honda Models Are Suitable for an OBD1 ECU Swap?
Several Honda models from the 1990s are excellent candidates for an OBD1 swap. According to a Honda-Tech forum survey in 2022, the following models are the most commonly modified:
- 1992-1995 Honda Civic (EG): Known for its lightweight chassis and popularity among tuners.
- 1996-2000 Honda Civic (EK): A later model that benefits from the simplicity of OBD1.
- 1994-2001 Acura Integra: Offers a balance of performance and tunability.
- 1992-1996 Honda Prelude: A sporty coupe that can see significant gains from OBD1 tuning.
2.1 Why are These Models Preferred?
- Availability of Parts: Extensive aftermarket support and readily available parts make these models ideal.
- Simpler Wiring: The wiring harnesses in these cars are relatively straightforward to modify.
- Community Support: Large online communities provide ample resources and guidance for OBD1 swaps.
- Performance Potential: These models have engines that respond well to tuning, making the OBD1 swap worthwhile.
3. What Tools and Components Are Required for an OBD1 Swap?
Performing an OBD1 swap on a Honda ECU requires a variety of tools and components to ensure a successful conversion. A comprehensive list ensures no steps are missed, enhancing efficiency and accuracy.
3.1 Essential Tools
- Socket Set: Metric socket set for removing and installing various bolts and nuts.
- Wrench Set: Metric wrench set for tightening and loosening bolts in tight spaces.
- Screwdrivers: Both Phillips head and flathead screwdrivers for various tasks.
- Wire Strippers and Crimpers: Essential for modifying and connecting wires.
- Multimeter: For testing voltage and continuity in electrical circuits.
- Soldering Iron and Solder: For making secure and reliable wire connections.
- Heat Gun: For applying heat shrink tubing to protect soldered connections.
- OBD1 ECU: The specific OBD1 ECU model that matches your engine and desired modifications.
- OBD2 to OBD1 Conversion Harness: An adapter that allows you to plug the OBD1 ECU into the OBD2 wiring harness.
- Wiring Diagrams: Detailed wiring diagrams for both the OBD1 ECU and your vehicle.
- Diagnostic Scanner: For reading and clearing trouble codes after the swap.
- Timing Light: To set the ignition timing correctly after the swap.
- Fuel Pressure Gauge: To ensure the fuel system is operating correctly.
3.2 Necessary Components
- OBD1 ECU: Choose an ECU compatible with your engine (e.g., P28, P30, P61, P72).
- OBD2 to OBD1 Conversion Harness: Adapts the vehicle’s OBD2 wiring to the OBD1 ECU.
- Distributor Adapter Harness: Required if using an OBD2 distributor with an OBD1 ECU.
- OBD1 Injectors: Necessary for some swaps, ensuring proper fuel delivery.
- Intake Air Temperature (IAT) Sensor Relocation Kit: For engines where the IAT sensor location differs.
- Vacuum Lines and Fittings: For connecting vacuum-operated components.
- Electrical Tape and Heat Shrink Tubing: For insulating and protecting wire connections.
- Zip Ties: For securing and organizing wiring.
- Grounding Kit: Enhances electrical grounding for improved performance.
- New Spark Plugs: Replacing spark plugs ensures optimal combustion.
- Fuel Filter: A new fuel filter ensures clean fuel delivery.
3.3 OBD1 ECU Options for Honda Swaps
Choosing the correct OBD1 ECU for a Honda swap is crucial for optimal performance and compatibility. Different ECUs are designed for specific engines and modifications, and selecting the right one ensures that the engine runs efficiently and reliably.
3.3.1 Popular OBD1 ECU Models
- P28 (Civic Si/Del Sol Si):
- Engine Compatibility: D16Z6, D16Y8 (with modifications)
- Features: VTEC control, suitable for naturally aspirated engines
- Notes: A versatile ECU, commonly used for D-series VTEC engines. Requires modifications for non-VTEC engines or advanced tuning.
- P30 (Acura Integra GSR):
- Engine Compatibility: B17A1, B16A
- Features: VTEC control, higher rev limit, more aggressive fuel and ignition maps
- Notes: Ideal for B-series VTEC engines. Offers better performance than the P28 but may require tuning for optimal results.
- P61 (Acura Integra GSR):
- Engine Compatibility: B17A1
- Features: VTEC control, designed for higher-performance engines
- Notes: Specifically designed for the B17A1 engine, but can be used with other B-series engines with proper tuning.
- P72 (Acura Integra Type R):
- Engine Compatibility: B18C1, B18C5
- Features: VTEC control, aggressive fuel and ignition maps, high rev limit
- Notes: The best choice for B18C1 and B18C5 engines. Offers the most aggressive tuning from the factory but may require further tuning for custom setups.
- P75 (Honda Civic/Integra LS/RS/GS):
- Engine Compatibility: B18B1, D16Y7/D16Y8 (non-VTEC)
- Features: Non-VTEC, fuel-efficient maps
- Notes: Suitable for non-VTEC engines. Can be used as a base for tuning VTEC engines, but requires extensive modifications.
3.3.2 Key Considerations When Choosing an ECU
- Engine Type: Ensure the ECU is designed for your specific engine model (e.g., B-series, D-series).
- VTEC or Non-VTEC: VTEC engines require an ECU with VTEC control capabilities.
- Modifications: If your engine has significant modifications (e.g., aftermarket cams, high compression pistons), choose an ECU that can be tuned to match.
- Tuning Capabilities: Select an ECU that can be easily tuned with popular software like Hondata, Neptune, or eCtune.
- Availability and Cost: Consider the availability and cost of the ECU. Some models are rarer and more expensive than others.
3.3.3 Common Issues and Solutions
- Immobilizer Issues: Some OBD1 ECUs, particularly those from newer models, may have immobilizers. Ensure the immobilizer is disabled or bypassed for the swap to work correctly.
- Wiring Incompatibilities: Use a conversion harness to adapt the OBD2 wiring to the OBD1 ECU. Verify that all necessary connections are made and properly wired.
- Sensor Mismatches: Ensure that all sensors (e.g., IAT, MAP, TPS) are compatible with the OBD1 ECU. Relocate or adapt sensors as needed.
- Tuning Requirements: After the swap, the ECU may need to be tuned to optimize performance. Consult with a professional tuner for best results.
By carefully selecting the right OBD1 ECU and addressing potential issues, you can ensure a successful and reliable Honda swap.
4. How to Prepare Your Honda for an OBD1 ECU Swap?
Preparing your Honda for an OBD1 ECU swap is crucial for a smooth and successful conversion. According to a 2023 article in “Honda Tuning Magazine,” proper preparation can prevent common issues such as wiring incompatibilities and sensor mismatches. This section outlines the necessary steps to get your vehicle ready for the swap.
4.1 Disconnecting the Battery
- Safety First: Always disconnect the negative terminal of the battery before starting any electrical work. This prevents accidental shorts and electrical damage.
4.2 Identifying Your Vehicle’s Wiring Harness
- OBD2A vs. OBD2B: Determine whether your vehicle uses an OBD2A (1996-1998) or OBD2B (1999-2000) wiring harness. This affects the type of conversion harness you’ll need.
4.3 Gathering Wiring Diagrams
- Essential Resource: Obtain detailed wiring diagrams for both your vehicle and the OBD1 ECU you plan to use. These diagrams are essential for making the necessary wiring modifications.
4.4 Inspecting and Cleaning Connectors
- Ensure Good Connections: Inspect all connectors for corrosion or damage. Clean them with electrical contact cleaner to ensure good connections.
4.5 Planning Sensor Relocations
- IAT Sensor: Determine if you need to relocate the Intake Air Temperature (IAT) sensor. OBD2 systems often have the IAT sensor located in the intake manifold, while OBD1 systems typically have it in the intake arm.
4.6 Verifying Component Compatibility
- Injectors, Distributors, and Alternators: Ensure that components like injectors, distributors, and alternators are compatible with the OBD1 ECU. You may need to source OBD1-specific parts or use adapter harnesses.
4.7 Preparing for Immobilizer Issues
- Bypassing Immobilizers: Some OBD1 ECUs, especially those from newer models, may have immobilizers. Research how to bypass or disable the immobilizer to ensure the engine starts after the swap.
4.8 Checking Grounding Points
- Ensuring Proper Grounding: Inspect and clean all grounding points in the engine bay. Proper grounding is crucial for the ECU to function correctly.
By following these preparation steps, you can minimize potential issues and ensure a successful OBD1 ECU swap.
5. Step-by-Step Guide to Performing the OBD1 ECU Swap
Performing an OBD1 ECU swap involves several critical steps to ensure compatibility and optimal performance. This guide provides a detailed walkthrough of the process, from wiring modifications to ECU installation and initial testing.
5.1 Wiring Modifications
- Using a Conversion Harness:
- Connect the OBD2 to OBD1 conversion harness to the vehicle’s original ECU connectors.
- Plug the OBD1 ECU into the conversion harness.
- Manual Wiring (if necessary):
- Refer to your wiring diagrams.
- Identify the wires that need to be re-pinned or added.
- Use wire strippers and crimpers to modify the wiring as needed.
- Solder and heat shrink all connections for durability.
5.2 Distributor Wiring
- OBD2 Distributor with Adapter:
- Use a distributor adapter harness to connect the OBD2 distributor to the OBD1 wiring.
- Ensure all pins are correctly aligned and secured.
- OBD1 Distributor:
- Plug the OBD1 distributor directly into the wiring harness.
5.3 Injector Wiring
- OBD1 Injectors:
- Install OBD1 injectors if required.
- Remove any unnecessary clips or adapters to ensure a proper fit.
- Injector Resistors:
- Some OBD1 ECUs require injector resistors. Wire these in if necessary.
5.4 IAT Sensor Relocation
- Relocating the IAT Sensor:
- If necessary, relocate the IAT sensor to the intake arm.
- Extend the wiring as needed and ensure a secure connection.
5.5 Connecting Vacuum Lines
- Routing Vacuum Lines:
- Connect all vacuum lines to the appropriate ports on the intake manifold and other components.
- Use new vacuum lines and fittings to prevent leaks.
5.6 Installing the OBD1 ECU
- Mounting the ECU:
- Secure the OBD1 ECU in its designated location.
- Ensure it is protected from moisture and heat.
5.7 Final Wiring Checks
- Double-Check Connections:
- Thoroughly inspect all wiring connections to ensure they are secure and correctly placed.
- Use zip ties to organize and secure the wiring harness.
5.8 Reconnecting the Battery
- Reconnect the Battery:
- Reconnect the negative terminal of the battery.
6. Post-Swap Procedures and Initial Testing
After completing the OBD1 ECU swap, several post-swap procedures and initial tests are essential to ensure everything is functioning correctly. These steps can help identify and resolve any issues early on, preventing potential damage to your engine.
6.1 Initial Start-Up
- First Start:
- Turn the ignition key to the “on” position and listen for the fuel pump to prime.
- Start the engine and let it idle.
- Monitoring:
- Watch for any unusual noises or vibrations.
- Check the engine temperature gauge to ensure the engine is not overheating.
6.2 Checking for Error Codes
- Using a Diagnostic Scanner:
- Connect an OBD1 diagnostic scanner to the ECU.
- Check for any error codes that may indicate wiring or sensor issues.
- Troubleshooting:
- Refer to the error code descriptions to identify the problem.
- Address any issues by rechecking wiring, replacing faulty sensors, or adjusting settings.
6.3 Setting Ignition Timing
- Using a Timing Light:
- Use a timing light to set the ignition timing to the manufacturer’s specifications.
- Adjust the distributor as needed to achieve the correct timing.
- Importance:
- Proper ignition timing is crucial for engine performance and preventing damage.
6.4 Monitoring Fuel Pressure
- Using a Fuel Pressure Gauge:
- Connect a fuel pressure gauge to the fuel rail.
- Verify that the fuel pressure is within the specified range.
- Adjustments:
- Adjust the fuel pressure regulator if necessary to maintain the correct pressure.
6.5 Test Driving
- Short Test Drive:
- Take the vehicle for a short test drive in a safe area.
- Monitor engine performance and listen for any unusual sounds.
- Performance Checks:
- Check for smooth acceleration, proper shifting, and adequate power.
- Watch for any signs of misfires or hesitation.
6.6 Tuning the ECU
- Custom Tuning:
- Consider getting the ECU custom tuned by a professional tuner.
- Custom tuning can optimize engine performance for your specific modifications and driving style.
- Software Options:
- Popular tuning software options include Hondata, Neptune, and eCtune.
6.7 Addressing Common Issues
- Idle Problems:
- If the engine idles rough or stalls, check the idle air control valve (IACV) and throttle position sensor (TPS).
- Misfires:
- Misfires can be caused by faulty spark plugs, ignition coils, or fuel injectors.
- Poor Performance:
- Poor performance can be due to incorrect ignition timing, fuel pressure issues, or sensor problems.
6.8 Monitoring Fuel Trims
- Using a Diagnostic Tool:
- Use a diagnostic tool to monitor short-term and long-term fuel trims.
- Adjustments:
- Adjust the ECU settings as needed to bring fuel trims within acceptable ranges.
7. Troubleshooting Common Issues After an OBD1 Swap
Even with careful planning and execution, issues can arise after an OBD1 swap. Here are some common problems and how to address them.
7.1 Engine Not Starting
- Possible Causes:
- Incorrect wiring
- Faulty ECU
- Immobilizer issues
- Troubleshooting Steps:
- Double-check all wiring connections against wiring diagrams.
- Verify that the ECU is receiving power and ground.
- Bypass or disable the immobilizer if necessary.
- Try a different ECU to rule out a faulty unit.
7.2 Rough Idle
- Possible Causes:
- Vacuum leaks
- Faulty IACV
- Incorrect ignition timing
- Troubleshooting Steps:
- Check all vacuum lines for leaks.
- Clean or replace the IACV.
- Set the ignition timing correctly using a timing light.
7.3 Misfires
- Possible Causes:
- Faulty spark plugs
- Bad ignition coils
- Clogged fuel injectors
- Troubleshooting Steps:
- Replace spark plugs.
- Test ignition coils with a multimeter.
- Clean or replace fuel injectors.
7.4 Poor Performance
- Possible Causes:
- Incorrect ignition timing
- Fuel pressure issues
- Sensor problems
- Troubleshooting Steps:
- Set the ignition timing correctly.
- Check fuel pressure and adjust as needed.
- Test sensors such as the MAP, TPS, and IAT sensors.
7.5 Error Codes
- Common Codes:
- O2 sensor codes
- MAP sensor codes
- TPS codes
- Troubleshooting Steps:
- Research the error code to understand the potential causes.
- Test the sensor and its wiring.
- Replace the sensor if necessary.
7.6 Electrical Issues
- Possible Causes:
- Loose connections
- Corroded wires
- Grounding problems
- Troubleshooting Steps:
- Inspect all wiring connections for looseness or corrosion.
- Clean and tighten grounding points.
- Use a multimeter to check for continuity and voltage.
8. Maximizing Performance After the OBD1 Swap
After successfully completing an OBD1 swap, fine-tuning and further modifications can significantly enhance your Honda’s performance. This section explores advanced techniques and upgrades to maximize the benefits of your OBD1 conversion.
8.1 Custom ECU Tuning
- Benefits of Custom Tuning:
- Optimized fuel and ignition maps for your specific engine setup.
- Increased horsepower and torque.
- Improved throttle response.
- Enhanced overall performance.
- Professional Tuning:
- Hire a professional tuner with experience in Honda ECUs.
- Provide the tuner with details about your engine modifications.
- Allow the tuner to dyno-tune the ECU for optimal results.
- DIY Tuning:
- If experienced, use tuning software such as Hondata, Neptune, or eCtune.
- Start with a base map and make small adjustments based on data logging.
- Monitor air/fuel ratios and knock to avoid engine damage.
8.2 Upgrading Fuel System
- Larger Injectors:
- Upgrade to larger fuel injectors to provide adequate fuel for increased power.
- Ensure the injectors are compatible with the OBD1 ECU.
- High-Flow Fuel Pump:
- Install a high-flow fuel pump to maintain consistent fuel pressure.
- Choose a pump that matches the flow requirements of your engine.
- Adjustable Fuel Pressure Regulator:
- Use an adjustable fuel pressure regulator to fine-tune fuel delivery.
- Monitor fuel pressure with a gauge to ensure it is within the correct range.
8.3 Enhancing Intake and Exhaust Systems
- Cold Air Intake:
- Install a cold air intake to increase airflow to the engine.
- Choose an intake that is designed for your specific Honda model.
- Performance Header:
- Upgrade to a performance header to improve exhaust flow.
- Select a header with the correct primary and collector sizes for your engine.
- High-Flow Exhaust System:
- Install a high-flow exhaust system to reduce backpressure.
- Choose an exhaust system with the appropriate diameter for your engine.
8.4 Upgrading Camshafts
- Performance Camshafts:
- Install performance camshafts to increase valve lift and duration.
- Select camshafts that match your desired power band.
- Valve Springs and Retainers:
- Upgrade valve springs and retainers to handle the increased RPM and valve lift.
- Ensure the valve springs are compatible with the camshafts.
8.5 Optimizing Ignition System
- High-Performance Ignition Coil:
- Install a high-performance ignition coil to provide a stronger spark.
- Choose a coil that is designed for high-performance applications.
- Spark Plug Wires:
- Upgrade to high-performance spark plug wires to reduce resistance.
- Ensure the wires are properly shielded to prevent interference.
8.6 Improving Cooling System
- Aluminum Radiator:
- Install an aluminum radiator to improve cooling efficiency.
- Choose a radiator that is designed for high-performance applications.
- High-Flow Water Pump:
- Upgrade to a high-flow water pump to increase coolant circulation.
- Ensure the water pump is compatible with your engine.
- Electric Fan:
- Install an electric fan to improve cooling at low speeds.
- Choose a fan that is properly sized for your radiator.
9. Ensuring Long-Term Reliability of Your OBD1 Swapped Honda
Maintaining the long-term reliability of your OBD1 swapped Honda requires consistent care and attention to detail. This section provides practical tips and strategies to keep your vehicle running smoothly for years to come.
9.1 Regular Maintenance Schedule
- Oil Changes:
- Change the engine oil and filter every 3,000 to 5,000 miles.
- Use a high-quality synthetic oil that meets the manufacturer’s specifications.
- Spark Plug Replacement:
- Replace spark plugs every 30,000 miles.
- Use spark plugs that are recommended for your engine.
- Air Filter Replacement:
- Replace the air filter every 12,000 miles.
- Use a high-quality air filter to ensure proper airflow.
- Fuel Filter Replacement:
- Replace the fuel filter every 30,000 miles.
- Use a high-quality fuel filter to prevent fuel system issues.
- Coolant Flush:
- Flush the cooling system every 2 years or 30,000 miles.
- Use a coolant that is compatible with your engine.
- Transmission Fluid Change:
- Change the transmission fluid every 30,000 miles for automatic transmissions.
- Change the transmission fluid every 15,000 to 30,000 miles for manual transmissions.
- Use a transmission fluid that meets the manufacturer’s specifications.
9.2 Monitoring Engine Performance
- Regular Inspections:
- Regularly inspect the engine for any signs of leaks, wear, or damage.
- Check the condition of belts, hoses, and wiring.
- Performance Monitoring:
- Monitor engine performance and listen for any unusual noises or vibrations.
- Check the engine temperature gauge to ensure the engine is not overheating.
- Diagnostic Scans:
- Periodically perform diagnostic scans to check for any error codes.
- Address any issues promptly to prevent further damage.
9.3 Addressing Potential Issues Promptly
- Leaking Fluids:
- Address any fluid leaks immediately to prevent damage to components.
- Check for leaks from the engine, transmission, power steering, and brakes.
- Unusual Noises:
- Investigate any unusual noises such as knocking, ticking, or hissing.
- These noises can indicate potential issues with the engine, transmission, or other components.
- Performance Issues:
- Address any performance issues such as rough idle, misfires, or poor acceleration.
- These issues can be caused by a variety of factors, including faulty sensors, vacuum leaks, or ignition problems.
9.4 Proper Storage
- Long-Term Storage:
- If storing the vehicle for an extended period, take steps to protect it from damage.
- Fill the fuel tank to prevent condensation and rust.
- Add fuel stabilizer to prevent fuel from deteriorating.
- Disconnect the battery to prevent it from draining.
- Store the vehicle in a dry, covered location.
9.5 Using Quality Parts
- OEM or Reputable Aftermarket Brands:
- When replacing parts, use OEM (Original Equipment Manufacturer) parts or reputable aftermarket brands.
- Avoid using cheap, low-quality parts that may fail prematurely.
- Proper Installation:
- Ensure that all parts are installed correctly according to the manufacturer’s instructions.
- Use the correct tools and torque specifications.
10. OBD1 Swap: Is It Right for You?
Deciding whether an OBD1 swap is the right choice for your Honda depends on several factors. By weighing the pros and cons, considering your goals, and assessing the requirements, you can make an informed decision that aligns with your needs and capabilities.
10.1 Assess Your Mechanical Skills
- Experience Level:
- Consider your experience with automotive modifications and wiring.
- An OBD1 swap involves intricate wiring and mechanical tasks.
- Comfort Level:
- Be honest about your comfort level with troubleshooting and problem-solving.
- The swap may require diagnosing and fixing unexpected issues.
10.2 Define Your Goals
- Performance Goals:
- Determine your performance goals for the vehicle.
- Are you looking for increased horsepower, better throttle response, or improved fuel efficiency?
- Tuning Flexibility:
- Assess the importance of tuning flexibility for your engine.
- OBD1 ECUs offer greater tuning capabilities compared to OBD2 systems.
- Emissions Regulations:
- Check the emissions regulations in your area.
- OBD1 swaps may not be legal in areas with strict emissions standards.
10.3 Weigh the Pros and Cons
- Pros:
- Enhanced tuning capabilities
- Increased horsepower and torque
- Simpler diagnostics
- Compatibility with certain engine swaps
- Cost-effectiveness in some cases
- Cons:
- Emissions compliance issues
- Reduced diagnostic information
- Wiring modifications required
- Component compatibility challenges
10.4 Consider the Costs
- Parts and Components:
- Estimate the cost of the necessary parts and components, including the OBD1 ECU, conversion harness, distributor adapter, injectors, and sensors.
- Tools:
- Factor in the cost of any tools you may need to purchase.
- Professional Assistance:
- Consider the cost of professional assistance if you plan to hire a mechanic or tuner.
10.5 Research and Planning
- Gather Information:
- Research the OBD1 swap thoroughly.
- Gather as much information as possible about the specific requirements for your Honda model and engine.
- Create a Plan:
- Create a detailed plan that outlines all the steps involved in the swap.
- Include a list of the necessary parts and tools.
- Set a timeline for completing the project.
10.6 Alternatives to OBD1 Swap
- OBD2 Tuning:
- Explore the possibility of tuning the existing OBD2 ECU.
- Modern tuning software offers advanced capabilities for OBD2 systems.
- Piggyback ECUs:
- Consider using a piggyback ECU to supplement the existing OBD2 system.
- Piggyback ECUs can provide additional tuning flexibility without requiring a full OBD1 swap.
By carefully evaluating these factors, you can make an informed decision about whether an OBD1 swap is the right choice for your Honda.
Do you need expert guidance and support for your Honda OBD1 swap? Contact CAR-DIAGNOSTIC-TOOL.EDU.VN today via WhatsApp at +1 (641) 206-8880 or visit our website at CAR-DIAGNOSTIC-TOOL.EDU.VN. Our experienced technicians are ready to provide you with detailed instructions, troubleshooting assistance, and remote technical support to ensure a successful conversion. Whether you’re looking to diagnose engine issues, enhance performance through specialized training, or access advanced diagnostic tools, CAR-DIAGNOSTIC-TOOL.EDU.VN is your trusted partner in automotive excellence. Plus, with our office conveniently located at 1100 Congress Ave, Austin, TX 78701, United States, expert help is always within reach.
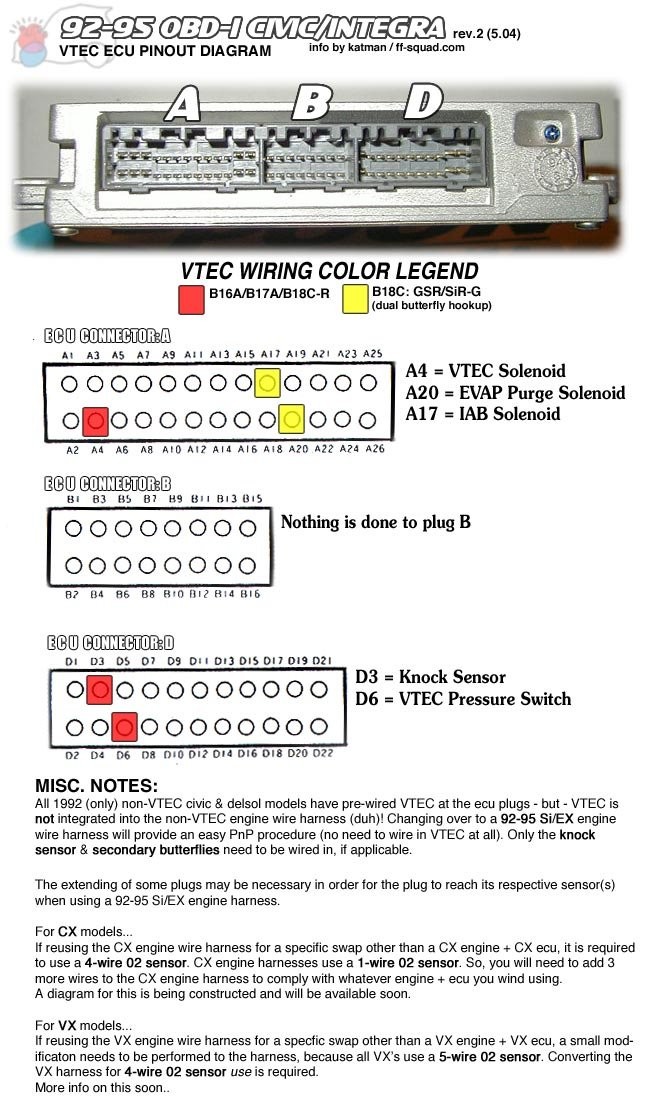 OBD1 ECU Wiring Diagram
FAQ: Everything You Need to Know About OBD1 Swaps for Honda ECUs
1. What is an OBD1 swap, and why would I want to do it on my Honda?
An OBD1 swap involves replacing a newer Honda’s OBD2 ECU with an older OBD1 ECU, often done for enhanced tuning capabilities, performance gains, and simpler diagnostics due to the OBD1 system’s straightforward architecture.
2. Which Honda models are best suited for an OBD1 ECU swap?
Ideal models include the 1992-1995 Honda Civic (EG), 1996-2000 Honda Civic (EK), 1994-2001 Acura Integra, and 1992-1996 Honda Prelude, thanks to their availability of parts, simpler wiring, community support, and performance potential.
3. What tools and components are essential for performing an OBD1 swap?
You’ll need a socket set, wrench set, screwdrivers, wire strippers/crimpers, a multimeter, soldering iron, heat gun, the OBD1 ECU, an OBD2 to OBD1 conversion harness, wiring diagrams, a diagnostic scanner, a timing light, and a fuel pressure gauge.
4. How do I prepare my Honda for an OBD1 ECU swap?
Disconnect the battery, identify your vehicle’s wiring harness (OBD2A or OBD2B), gather wiring diagrams, inspect and clean connectors, plan sensor relocations (like the IAT sensor), verify component compatibility, prepare for immobilizer issues, and check grounding points.
5. What are the step-by-step instructions for performing the OBD1 ECU swap?
The process includes wiring modifications using a conversion harness or manual wiring, distributor wiring, injector wiring, IAT sensor relocation, connecting vacuum lines, installing the OBD1 ECU, final wiring checks, and reconnecting the battery.
6. What post-swap procedures and initial tests should I perform?
Start by checking for unusual noises, using a diagnostic scanner for error codes, setting the ignition timing with a timing light, monitoring fuel pressure, taking a short test drive, and considering custom ECU tuning.
7. What are some common issues I might encounter after an OBD1 swap, and how do I troubleshoot them?
Common issues include the engine not starting, rough idle, misfires, poor performance, and error codes. Troubleshooting involves double-checking wiring, verifying ECU power, addressing vacuum leaks, testing sensors, and ensuring proper ignition timing.
8. How can I maximize performance after the OBD1 swap?
Consider custom ECU tuning, upgrading the fuel system with larger injectors and a high-flow fuel pump, enhancing intake and exhaust systems, upgrading camshafts, optimizing the ignition system, and improving the cooling system.
9. How can I ensure the long-term reliability of my OBD1 swapped Honda?
Follow a regular maintenance schedule, monitor engine performance, address potential issues promptly, store the vehicle properly, and use quality parts from OEM or reputable aftermarket brands.
10. Is an OBD1 swap the right choice for me?
Assess your mechanical skills, define your goals, weigh the pros and cons, consider the costs, conduct thorough research, and explore alternatives like OBD2 tuning or piggyback ECUs before making a decision.
Unlock your Honda’s full potential with a meticulously executed OBD1 swap! CAR-DIAGNOSTIC-TOOL.EDU.VN offers comprehensive diagnostic tools, detailed repair guides, and expert remote technical support to ensure your success. Contact us today via WhatsApp at +1 (641) 206-8880 or visit our website at CAR-DIAGNOSTIC-TOOL.EDU.VN for more information. Our office is located at 1100 Congress Ave, Austin, TX 78701, United States. Let us help you take your Honda to the next level with our specialized training and cutting-edge solutions.