Is your vehicle acting strangely, and you suspect a faulty Electronic Control Unit (ECU)? At CAR-DIAGNOSTIC-TOOL.EDU.VN, we offer expert insights and solutions to diagnose ECU problems accurately, ensuring your vehicle returns to peak performance with our diagnostic tools, detailed repair guides, and expert technical support. Benefit from our technician training and remote assistance to resolve even the most complex automotive issues quickly.
Contents
- 1. What is an ECU and Why is It Important?
- 1.1. Role of the ECU in Modern Vehicles
- 1.2. Potential Consequences of a Failing ECU
- 1.3. Why Accurate Diagnosis is Crucial
- 2. Common Symptoms of a Failing ECU
- 2.1. Check Engine Light (CEL) Issues
- 2.2. Engine Performance Problems
- 2.3. Starting Problems
- 2.4. Fuel Efficiency Reduction
- 2.5. Transmission Issues
- 2.6. Unusual Sensor Readings
- 2.7. Other Warning Signs
- 3. How to Diagnose a Bad ECU
- 3.1. Preliminary Checks
- 3.2. Using an OBD-II Scanner
- 3.3. Advanced Diagnostic Techniques
- 3.4. Seeking Professional Help
- 4. Common Causes of ECU Failure
- 4.1. Electrical Overload
- 4.2. Environmental Factors
- 4.3. Component Aging
- 4.4. Software and Programming Issues
- 4.5. Physical Damage
- 4.6. Preventive Measures
- 5. Step-by-Step Guide to Testing an ECU
- 5.1. Preparing for the Test
- 5.2. Visual Inspection
- 5.3. Preliminary Electrical Tests
- 5.4. OBD-II Scanner Diagnostics
- 5.5. Advanced Testing Techniques
- 5.6. Professional ECU Testing Services
- 5.7. Safety Precautions
- 6. When to Replace vs. Repair Your ECU
- 6.1. Factors to Consider
- 6.2. Scenarios Favoring Repair
- 6.3. Scenarios Favoring Replacement
- 6.4. ECU Replacement Options
- 6.5. Reprogramming and Matching
- 6.6. Professional Consultation
- 7. Tips for Maintaining Your ECU’s Health
- 7.1. Protect Against Electrical Surges
- 7.2. Shield from Environmental Factors
- 7.3. Regular Maintenance and Inspections
- 7.4. Avoid DIY Modifications
- 7.5. Proper Handling of the ECU
- 7.6. Routine Diagnostic Checks
- 8. The Role of CAR-DIAGNOSTIC-TOOL.EDU.VN in ECU Diagnostics and Solutions
- 8.1. Diagnostic Tools and Equipment
1. What is an ECU and Why is It Important?
The ECU, or Electronic Control Unit, is essentially the brain of your vehicle. Acting as a central command center, it monitors and adjusts a vast array of engine and vehicle functions to ensure optimal performance, fuel efficiency, and emissions control. When the ECU malfunctions, it can lead to a cascade of problems affecting nearly every aspect of your vehicle’s operation.
1.1. Role of the ECU in Modern Vehicles
Modern vehicles rely heavily on the ECU, which uses sensors throughout the car to gather data and make real-time adjustments. These sensors monitor everything from engine temperature and oxygen levels to throttle position and vehicle speed. According to a study by the University of Michigan’s Transportation Research Institute in 2022, the average car has between 70 and 100 sensors feeding information to the ECU. This constant stream of data enables the ECU to optimize engine performance, manage transmission shifts, control braking systems, and even regulate climate control, all in the interest of safety, efficiency, and driver comfort.
1.2. Potential Consequences of a Failing ECU
A malfunctioning ECU can trigger a host of symptoms that affect your vehicle’s drivability and reliability. These issues can range from subtle performance problems to complete engine failure. Common consequences include:
- Reduced Fuel Efficiency: The ECU optimizes the air-to-fuel ratio for efficient combustion. A faulty ECU may miscalculate this ratio, leading to excessive fuel consumption.
- Poor Engine Performance: Expect issues like rough idling, stalling, hesitation during acceleration, or a general lack of power.
- Emission Problems: Inaccurate fuel mixture can increase harmful emissions, causing your vehicle to fail emissions tests.
- Transmission Issues: The ECU also manages automatic transmission functions, so a failure can result in erratic shifting or complete transmission failure.
- Safety System Malfunctions: Modern vehicles rely on the ECU to manage safety systems like ABS and airbags. A faulty ECU can compromise these critical safety features.
1.3. Why Accurate Diagnosis is Crucial
Given the far-reaching effects of a failing ECU, accurate diagnosis is essential. A misdiagnosis can lead to unnecessary repairs, wasted time, and continued vehicle problems. With the right diagnostic tools and expertise from CAR-DIAGNOSTIC-TOOL.EDU.VN, you can pinpoint ECU issues efficiently and ensure the correct repairs are performed. Our comprehensive diagnostic services, supported by remote expert assistance, help you quickly resolve complex automotive problems.
2. Common Symptoms of a Failing ECU
Identifying a failing ECU can be challenging since its symptoms often overlap with other common automotive issues. However, some telltale signs can point directly to ECU trouble.
2.1. Check Engine Light (CEL) Issues
The Check Engine Light (CEL) is often the first indicator of a potential ECU problem. While the CEL can be triggered by numerous issues, certain patterns are indicative of ECU malfunction:
- Persistent CEL After Reset: If the CEL remains illuminated even after resetting the system, it may signal an issue with the ECU’s ability to process or store information.
- Inconsistent Diagnostic Trouble Codes (DTCs): The ECU generates DTCs to identify specific problems. If you encounter erratic or nonsensical DTCs, it could mean the ECU is misinterpreting sensor data.
According to a 2021 report by the National Institute for Automotive Service Excellence (ASE), about 30% of CEL issues that persist after a reset are related to ECU problems. The ASE also emphasizes the importance of using professional-grade diagnostic tools to accurately read and interpret DTCs.
2.2. Engine Performance Problems
A malfunctioning ECU can significantly affect engine performance. Look for these symptoms:
- Stalling or Rough Idling: The ECU regulates the engine’s idle speed and fuel mixture. When it fails, the engine may stall frequently or idle roughly.
- Hesitation or Stuttering During Acceleration: The ECU controls the fuel injectors and ignition timing. If it’s failing, acceleration may be hesitant or accompanied by stuttering.
- Loss of Power: A failing ECU can result in a general loss of engine power, particularly during demanding situations like climbing hills or towing.
2.3. Starting Problems
The ECU plays a crucial role in the starting process. Issues such as:
- No-Start Condition: A completely failed ECU may prevent the engine from starting altogether.
- Intermittent Starting Issues: The car may start sometimes but fail to start at other times, pointing to an inconsistent ECU malfunction.
2.4. Fuel Efficiency Reduction
Fuel efficiency relies heavily on the ECU’s ability to optimize the air-to-fuel ratio. A failing ECU can disrupt this balance, leading to:
- Significant Drop in MPG: If you notice a sudden and unexplained decrease in your car’s miles per gallon (MPG), it could be a sign of ECU trouble.
- Rich or Lean Fuel Mixtures: A faulty ECU may cause the engine to run rich (too much fuel) or lean (not enough fuel), both of which negatively impact fuel economy and emissions.
2.5. Transmission Issues
In vehicles with automatic transmissions, the ECU controls gear shifting. Look for:
- Erratic Shifting: The transmission may shift roughly, at the wrong times, or not shift at all.
- Transmission Slipping: You may notice the engine revving without a corresponding increase in speed.
2.6. Unusual Sensor Readings
Erratic readings from various sensors can indicate ECU problems. Examples include:
- Inaccurate Temperature Readings: The temperature gauge may fluctuate wildly or display incorrect temperatures.
- Oxygen Sensor Errors: Faulty readings from the oxygen sensor can lead to incorrect fuel mixture calculations.
2.7. Other Warning Signs
Be alert for less common but still significant signs:
- Burning Smell: An overheating ECU may produce a burning smell.
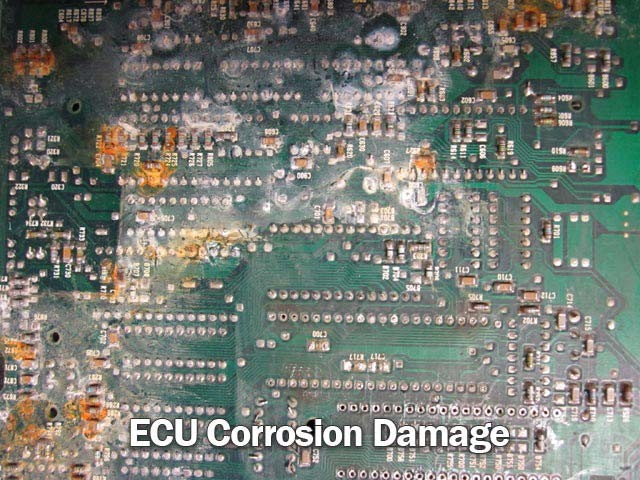
- Visible Damage: Physical damage like corrosion, water damage, or burnt components can often be seen upon visual inspection of the ECU.
- ECU Location and Vulnerability: The ECU is typically located inside the cabin or under the hood. It is crucial to ensure this area is free from moisture and physical stress to prevent potential damage, as highlighted in studies by the Society of Automotive Engineers (SAE).
Understanding these symptoms can help you identify potential ECU issues early, leading to prompt diagnosis and repair. With CAR-DIAGNOSTIC-TOOL.EDU.VN, you gain access to expert diagnostic services and the tools necessary to resolve ECU problems efficiently.
3. How to Diagnose a Bad ECU
Diagnosing a faulty ECU requires a systematic approach, combining visual inspections, diagnostic tools, and professional expertise. Here’s a step-by-step guide to help you through the process.
3.1. Preliminary Checks
Before diving into complex diagnostics, perform these simple checks:
- Visual Inspection:
- Check the ECU for Physical Damage: Look for signs of corrosion, water damage, or burnt components.
- Inspect Wiring and Connectors: Ensure all wiring is intact and connectors are securely attached.
- Battery Check:
- Verify Battery Voltage: A weak battery can cause erratic ECU behavior. Ensure the battery voltage is within the specified range (typically 12.6V when the engine is off).
- Check Battery Terminals: Clean any corrosion on the battery terminals.
- Fuse Check:
- Inspect ECU-Related Fuses: Check all fuses related to the ECU to ensure they are not blown.
- Replace Blown Fuses: If a fuse is blown, replace it and monitor if it blows again, indicating a more significant issue.
3.2. Using an OBD-II Scanner
An OBD-II (On-Board Diagnostics II) scanner is an indispensable tool for diagnosing ECU problems.
- Connect the Scanner:
- Plug the OBD-II scanner into the diagnostic port, usually located under the dashboard.
- Turn the ignition key to the “ON” position without starting the engine.
- Read Diagnostic Trouble Codes (DTCs):
- Use the scanner to read any stored DTCs.
- Record all codes and their descriptions.
- Interpret the Codes:
- Research each code to understand its potential meaning.
- Pay attention to codes related to the ECU, sensors, or engine performance.
- Clear the Codes (Optional):
- If desired, clear the codes to see if they reappear after a test drive.
- Live Data Analysis:
- Use the scanner to monitor live data from various sensors, such as:
- Engine Temperature: Check for normal operating temperatures.
- Oxygen Sensor Readings: Look for proper switching between rich and lean.
- Fuel Trims: Monitor short-term and long-term fuel trims for abnormalities.
- Use the scanner to monitor live data from various sensors, such as:
According to Bosch Automotive Handbook, analyzing live data is essential for identifying intermittent issues or sensor failures that may not trigger a specific DTC immediately.
3.3. Advanced Diagnostic Techniques
If the initial checks and OBD-II scan do not provide a definitive answer, consider these advanced techniques:
- Multimeter Testing:
- Check ECU Power and Ground: Use a multimeter to verify the ECU is receiving proper power and ground.
- Test Sensor Signals: Measure the voltage or resistance of sensor signals to ensure they are within the specified range.
- Oscilloscope Analysis:
- Analyze Sensor Waveforms: Use an oscilloscope to analyze the waveforms of sensor signals, identifying irregularities that a multimeter might miss.
- ECU Pinout Testing:
- Consult Wiring Diagrams: Obtain the wiring diagrams for your vehicle’s ECU.
- Test Continuity: Use a multimeter to test the continuity between the ECU connector pins and the corresponding sensors or components.
- Professional Diagnostic Tools:
- Use Advanced Scanners: Professional-grade scanners can perform more in-depth diagnostics, including ECU programming and adaptation.
- Consult a Specialist: If you are unsure about any of these steps, seek assistance from a qualified automotive technician.
3.4. Seeking Professional Help
Diagnosing ECU problems can be complex, and sometimes it’s best to seek professional help.
- When to Consult a Professional:
- If you lack experience with automotive diagnostics.
- If you are unable to interpret the diagnostic codes.
- If advanced diagnostic tools are required.
- Benefits of Professional Diagnosis:
- Accurate Identification: Professionals can accurately identify ECU issues, preventing unnecessary repairs.
- Access to Advanced Tools: They have access to advanced diagnostic tools and equipment.
- Expertise: They possess the knowledge and experience to diagnose complex problems.
CAR-DIAGNOSTIC-TOOL.EDU.VN provides expert diagnostic services and support to help you identify and resolve ECU problems efficiently. With our technician training and remote assistance, you can confidently tackle even the most challenging automotive issues. We offer solutions that help streamline the diagnostic process, ensuring accurate results and effective repairs.
4. Common Causes of ECU Failure
Understanding the common causes of ECU failure can help you prevent issues and extend the life of your vehicle’s electronic control unit.
4.1. Electrical Overload
An electrical overload is a frequent culprit behind ECU failures.
- Jump Starting Issues:
- Reverse Polarity: Incorrectly connecting jumper cables can send a surge of electricity through the system, damaging the ECU.
- Voltage Spikes: Voltage spikes during jump-starting can also harm sensitive electronic components within the ECU.
- Short Circuits:
- Wiring Problems: Damaged or frayed wiring can cause short circuits, leading to ECU damage.
- Component Failure: A short circuit in a connected component, such as a sensor, can send excessive current to the ECU.
- Overcharging:
- Faulty Alternator: A malfunctioning alternator can overcharge the battery, leading to voltage spikes that damage the ECU.
- Regulator Issues: Problems with the voltage regulator can also cause overcharging.
4.2. Environmental Factors
Environmental factors can significantly impact the ECU’s lifespan.
- Moisture and Corrosion:
- Water Intrusion: Water entering the ECU housing can cause corrosion and short circuits.
- Humidity: High humidity levels can also accelerate corrosion, particularly in areas with exposed electrical connections.
- Heat:
- Engine Compartment Heat: The high temperatures in the engine compartment can cause the ECU to overheat, leading to component failure.
- Direct Sunlight: Direct sunlight exposure can also contribute to overheating.
- Vibration:
- Road Vibration: Constant vibration from driving can weaken solder joints and other connections within the ECU.
- Mounting Issues: Loose or damaged ECU mounting can exacerbate vibration-related problems.
4.3. Component Aging
Like any electronic device, ECUs are subject to component aging.
- Capacitor Failure:
- Drying Out: Electrolytic capacitors can dry out over time, losing their ability to store electrical charge effectively.
- Leakage: Capacitors can also leak, causing short circuits and other issues.
- Resistor Drift:
- Value Changes: Resistors can drift in value over time, affecting the accuracy of sensor readings and other calculations.
- Integrated Circuit (IC) Degradation:
- Performance Decline: Integrated circuits can degrade over time, leading to performance decline and eventual failure.
4.4. Software and Programming Issues
Software glitches and programming errors can also cause ECU problems.
- Corrupted Firmware:
- Data Loss: Firmware corruption can result in data loss, leading to erratic ECU behavior.
- Failed Updates: Interruptions or errors during firmware updates can corrupt the ECU’s programming.
- Programming Errors:
- Incorrect Code: Incorrect programming can cause the ECU to misinterpret sensor data or make incorrect calculations.
- Compatibility Issues: Compatibility issues with aftermarket tuning or performance modifications can also lead to ECU problems.
4.5. Physical Damage
Physical damage can occur from accidents or improper handling.
- Impact Damage:
- Collision: A collision can cause physical damage to the ECU, leading to component failure.
- Rough Handling: Dropping or mishandling the ECU during removal or installation can also cause damage.
- Pin Damage:
- Bent Pins: Bent or broken connector pins can disrupt electrical connections, leading to ECU malfunction.
- Corrosion: Corrosion on connector pins can also cause connection problems.
4.6. Preventive Measures
Taking preventive measures can help extend the life of your vehicle’s ECU.
- Protect from Electrical Overload:
- Proper Jump-Starting: Always follow proper jump-starting procedures to avoid reverse polarity and voltage spikes.
- Regular Battery Maintenance: Maintain a healthy battery to prevent voltage irregularities.
- Shield from Environmental Factors:
- Keep ECU Dry: Ensure the ECU housing is sealed and free from water intrusion.
- Ventilation: Improve ventilation around the ECU to reduce heat buildup.
- Regular Maintenance:
- Inspect Wiring: Regularly inspect wiring for damage and corrosion.
- Component Check: Periodically check connected components, such as sensors and alternators, for proper function.
Understanding these common causes of ECU failure empowers you to take proactive steps to protect your vehicle’s electronic control unit. CAR-DIAGNOSTIC-TOOL.EDU.VN offers diagnostic tools, repair guides, and expert technical support to help you maintain your ECU and address any issues promptly. With our technician training and remote assistance, you can ensure your vehicle remains in top condition.
 Corroded ECU
5. Step-by-Step Guide to Testing an ECU
Testing an ECU involves a systematic approach to pinpoint whether the unit is functioning correctly. Here’s a detailed, step-by-step guide to help you through the process.
5.1. Preparing for the Test
Before starting the test, gather necessary tools and information.
- Gather Tools and Equipment:
- OBD-II Scanner: To read diagnostic trouble codes (DTCs) and monitor live data.
- Multimeter: To check voltage, continuity, and resistance.
- Wiring Diagrams: To understand the ECU’s pinout and circuit layout.
- Socket Set/Wrench Set: To remove any covers or panels necessary to access the ECU.
- Personal Protective Equipment (PPE): Gloves and safety glasses.
- Review Vehicle Information:
- Vehicle Year, Make, and Model: Essential for accessing accurate wiring diagrams and diagnostic procedures.
- ECU Location: Determine the ECU’s location in the vehicle (usually under the dashboard, under a seat, or in the engine compartment).
5.2. Visual Inspection
Perform a thorough visual inspection of the ECU and its surroundings.
- Locate the ECU:
- Refer to your vehicle’s service manual to find the ECU’s exact location.
- Inspect for Physical Damage:
- Check the ECU Casing: Look for cracks, dents, or other signs of physical damage.
- Inspect Connectors: Ensure the connectors are securely attached and free from corrosion.
- Check Wiring: Look for frayed, cut, or damaged wires.
- Look for Signs of Environmental Damage:
- Water Damage: Check for water stains or corrosion inside the ECU housing.
- Burn Marks: Look for burn marks or melted components, indicating electrical overload.
5.3. Preliminary Electrical Tests
Use a multimeter to perform basic electrical tests.
- Check Power Supply:
- Locate Power Pins: Refer to the wiring diagram to identify the ECU’s power supply pins.
- Measure Voltage: With the ignition ON, use the multimeter to measure the voltage at the power pins. Ensure it matches the specified voltage (usually 12V).
- Check Ground Connections:
- Locate Ground Pins: Identify the ECU’s ground pins using the wiring diagram.
- Test Continuity: Use the multimeter to test the continuity between the ground pins and the vehicle chassis. You should have a low resistance reading (close to 0 ohms).
- Check Signal Wires:
- Identify Signal Wires: Locate the signal wires for critical sensors (e.g., crankshaft position sensor, MAP sensor).
- Measure Voltage: With the ignition ON, measure the voltage on the signal wires. Compare your readings to the expected values in the service manual.
5.4. OBD-II Scanner Diagnostics
Use an OBD-II scanner to read and interpret diagnostic trouble codes.
- Connect the Scanner:
- Plug the OBD-II scanner into the diagnostic port (usually under the dashboard).
- Turn Ignition ON:
- Turn the ignition key to the “ON” position without starting the engine.
- Read Diagnostic Trouble Codes (DTCs):
- Use the scanner to read any stored DTCs.
- Record all codes and their descriptions.
- Interpret the Codes:
- Research each code to understand its potential meaning.
- Pay attention to codes related to the ECU, sensors, or engine performance.
- Clear the Codes (Optional):
- If desired, clear the codes to see if they reappear after a test drive.
- Live Data Analysis:
- Use the scanner to monitor live data from various sensors.
- Check for normal operating values and compare them to the specifications.
5.5. Advanced Testing Techniques
For more in-depth analysis, consider these advanced techniques.
- Oscilloscope Analysis:
- Connect the Oscilloscope: Connect the oscilloscope to the signal wires of critical sensors.
- Analyze Waveforms: Analyze the waveforms for irregularities, such as signal dropouts, noise, or incorrect patterns.
- ECU Pinout Testing:
- Consult Wiring Diagrams: Obtain detailed wiring diagrams for your vehicle’s ECU.
- Test Continuity: Use a multimeter to test the continuity between the ECU connector pins and the corresponding sensors or components.
- Check Resistance: Measure the resistance of sensor circuits to ensure they are within the specified range.
- Load Testing:
- Apply Load: Use a load tester to apply a load to the ECU power supply circuit.
- Monitor Voltage Drop: Monitor the voltage drop under load. Excessive voltage drop indicates a wiring or connection problem.
5.6. Professional ECU Testing Services
If you’re unsure about performing these tests or need more advanced diagnostics, consider using a professional ECU testing service.
- Benefits of Professional Testing:
- Accurate Diagnosis: Professionals can accurately identify ECU issues using specialized equipment.
- Advanced Tools: They have access to advanced diagnostic tools and software.
- Expertise: They possess the knowledge and experience to diagnose complex problems.
- ECU Repair and Refurbishing:
- Component Replacement: If the ECU is faulty, professionals can replace damaged components.
- Software Reprogramming: They can also reprogram the ECU with the latest software.
5.7. Safety Precautions
Always follow safety precautions when testing an ECU.
- Disconnect Battery:
- Disconnect the negative battery terminal before working on the ECU to prevent electrical shock.
- Use Proper Tools:
- Use insulated tools to avoid short circuits.
- Follow Wiring Diagrams:
- Always refer to wiring diagrams to ensure you are testing the correct pins and wires.
- Work in a Safe Environment:
- Work in a well-lit and ventilated area.
- Wear PPE:
- Wear safety glasses and gloves to protect yourself from electrical hazards and chemicals.
By following this step-by-step guide, you can effectively test your vehicle’s ECU and identify potential issues. CAR-DIAGNOSTIC-TOOL.EDU.VN provides diagnostic tools, repair guides, and expert technical support to assist you in maintaining and troubleshooting your ECU. With our technician training and remote assistance, you can confidently address any automotive issue.
 Broken ECU Pins
6. When to Replace vs. Repair Your ECU
Deciding whether to replace or repair your ECU depends on several factors, including the extent of the damage, the cost of repair versus replacement, and the availability of suitable repair services.
6.1. Factors to Consider
- Extent of the Damage:
- Minor Damage: If the ECU has minor issues, such as corroded connectors, damaged wiring, or a few failed components, repair may be a viable option.
- Severe Damage: If the ECU has extensive damage, such as water intrusion, fire damage, or significant component failure, replacement is often the better choice.
- Cost of Repair vs. Replacement:
- Repair Costs: Obtain estimates for repairing the ECU. This should include the cost of parts and labor.
- Replacement Costs: Get quotes for a new or refurbished ECU, including installation.
- Compare Costs: Compare the total costs of repair and replacement to determine the most economical option.
- Availability of Repair Services:
- Local Repair Shops: Check if there are reputable local repair shops that specialize in ECU repair.
- Specialized Services: Consider sending the ECU to a specialized ECU repair service, which may offer more comprehensive repair options.
- Vehicle Age and Value:
- Older Vehicles: For older vehicles with lower market values, repairing the ECU may be more cost-effective than replacement.
- Newer Vehicles: For newer, high-value vehicles, replacing the ECU with a new unit may be a better long-term investment.
- Warranty:
- Check Warranty Coverage: Check if your vehicle’s warranty covers ECU replacement or repair.
- Aftermarket Warranties: Review any aftermarket warranties you may have.
- Future Reliability:
- Repair Uncertainty: Consider the potential for future issues if you choose to repair the ECU. Repaired ECUs may be more prone to failure compared to new units.
- Replacement Assurance: A new ECU offers greater assurance of reliability and performance.
6.2. Scenarios Favoring Repair
- Minor Component Failures:
- Example: If the ECU has a failed capacitor, resistor, or other minor component, replacing the component may be a cost-effective repair.
- Procedure: A skilled technician can identify and replace the failed component, restoring the ECU to proper function.
- Connector or Wiring Issues:
- Example: If the ECU has corroded connectors or damaged wiring, cleaning the connectors or repairing the wiring may resolve the issue.
- Procedure: Clean the connectors with a specialized cleaner and repair or replace damaged wiring.
- Software Glitches:
- Example: If the ECU is experiencing software glitches, reprogramming or reflashing the ECU may resolve the issue.
- Procedure: Use a professional diagnostic tool to reflash the ECU with the latest software or a known-good software version.
6.3. Scenarios Favoring Replacement
- Severe Physical Damage:
- Example: If the ECU has been submerged in water, damaged by fire, or sustained significant impact damage, replacement is usually necessary.
- Rationale: Severe damage can compromise the ECU’s internal components, making repair unreliable.
- Extensive Component Failure:
- Example: If multiple components within the ECU have failed, the cost of replacing all the failed components may exceed the cost of a new ECU.
- Rationale: Repairing multiple components can be time-consuming and may not guarantee long-term reliability.
- Unrepairable Damage:
- Example: If critical components within the ECU are no longer available or cannot be repaired, replacement is the only option.
- Rationale: Some ECU components are proprietary and may not be available for individual replacement.
6.4. ECU Replacement Options
- New ECU:
- Pros: Guaranteed reliability, latest software, and full warranty.
- Cons: Higher cost.
- Refurbished ECU:
- Pros: Lower cost than a new ECU, tested and repaired to ensure proper function.
- Cons: May have a shorter lifespan compared to a new ECU, limited warranty.
- Used ECU:
- Pros: Lowest cost option.
- Cons: Uncertain reliability, no warranty, and may require reprogramming to match your vehicle.
6.5. Reprogramming and Matching
- Importance of Reprogramming:
- Vehicle-Specific Data: ECUs contain vehicle-specific data, such as the vehicle identification number (VIN) and immobilizer codes.
- Compatibility: A replacement ECU must be programmed to match your vehicle’s specifications.
- Reprogramming Procedures:
- Dealer Programming: Some ECUs can only be programmed by a dealership using specialized software.
- Aftermarket Programming: Other ECUs can be programmed using aftermarket diagnostic tools.
- Matching the ECU:
- VIN Matching: Ensure the replacement ECU is matched to your vehicle’s VIN.
- Immobilizer Codes: Transfer the immobilizer codes from the old ECU to the new ECU to ensure the vehicle starts.
6.6. Professional Consultation
- Seek Expert Advice:
- Consult a Technician: Consult a qualified automotive technician to assess the damage and recommend the best course of action.
- Obtain Multiple Opinions: Get multiple opinions and quotes to make an informed decision.
- Benefits of Professional Advice:
- Accurate Assessment: Technicians can accurately assess the extent of the damage and provide a reliable recommendation.
- Proper Installation: They can ensure the replacement ECU is properly installed and programmed.
Deciding whether to replace or repair your ECU requires careful consideration of various factors. CAR-DIAGNOSTIC-TOOL.EDU.VN offers expert diagnostic services, repair guides, and technical support to help you make the right decision. With our technician training and remote assistance, you can confidently address any ECU issue, ensuring your vehicle operates reliably.
7. Tips for Maintaining Your ECU’s Health
Maintaining your ECU’s health is crucial for ensuring the long-term reliability and performance of your vehicle. Here are some practical tips to help you protect your ECU and prevent common issues.
7.1. Protect Against Electrical Surges
- Proper Jump-Starting Procedures:
- Avoid Reverse Polarity: When jump-starting your vehicle, always double-check the polarity of the jumper cables. Connecting the cables in reverse can send a damaging surge of electricity through the ECU.
- Follow the Correct Sequence: Connect the positive (+) cable to the positive terminal of the good battery, then connect the other end to the positive terminal of the dead battery. Connect the negative (-) cable to the negative terminal of the good battery, and finally, connect the other end to a grounded metal part of the disabled vehicle (away from the battery).
- Battery Maintenance:
- Regularly Check Battery Voltage: Ensure your battery maintains a proper charge. A weak battery can cause voltage irregularities that can harm the ECU.
- Clean Battery Terminals: Keep the battery terminals clean and free from corrosion. Corrosion can impede the flow of electricity and cause voltage fluctuations.
- Avoid Overcharging:
- Monitor Charging System: Regularly monitor your vehicle’s charging system to ensure it is functioning correctly. A faulty alternator or voltage regulator can overcharge the battery, leading to voltage spikes that can damage the ECU.
7.2. Shield from Environmental Factors
- Keep the ECU Dry:
- Check for Water Leaks: Inspect the ECU housing and surrounding areas for signs of water leaks. Address any leaks promptly to prevent water from entering the ECU.
- Seal ECU Housing: Ensure the ECU housing is properly sealed to prevent moisture intrusion. Replace any damaged seals or gaskets.
- Protect Against Extreme Temperatures:
- Improve Ventilation: Ensure adequate ventilation around the ECU to prevent overheating.
- Avoid Direct Sunlight: Park your vehicle in the shade or use a sunshade to protect the dashboard from direct sunlight, which can cause the ECU to overheat.
- Minimize Vibration:
- Secure ECU Mounting: Ensure the ECU is securely mounted to the vehicle. Loose or damaged mounting can exacerbate vibration-related problems.
- Check for Loose Components: Periodically check for loose components or wiring that could cause excessive vibration.
7.3. Regular Maintenance and Inspections
- Inspect Wiring:
- Check for Damage: Regularly inspect the wiring harness for signs of damage, such as frayed wires, cracked insulation, or corroded connectors.
- Repair Damaged Wires: Repair or replace any damaged wires to prevent short circuits and other electrical issues.
- Monitor Sensor Performance:
- Use an OBD-II Scanner: Use an OBD-II scanner to monitor sensor performance and identify any abnormalities.
- Address Sensor Issues: Address any sensor issues promptly to prevent them from affecting the ECU’s performance.
- Software Updates:
- Check for Updates: Check for software updates for your vehicle’s ECU. Manufacturers often release updates to improve performance and address known issues.
- Professional Installation: Have software updates installed by a qualified technician to ensure they are installed correctly.
7.4. Avoid DIY Modifications
- Exercise Caution with Aftermarket Parts:
- Research Compatibility: Before installing any aftermarket parts, research their compatibility with your vehicle’s ECU.
- Professional Installation: Have aftermarket parts installed by a qualified technician to ensure they are installed correctly and do not cause damage to the ECU.
- Avoid Tuning Without Expertise:
- Understand the Risks: Tuning your vehicle’s ECU without proper expertise can cause serious damage.
- Seek Professional Tuning Services: If you want to tune your vehicle, seek professional tuning services from a reputable tuner.
7.5. Proper Handling of the ECU
- Handle with Care:
- Avoid Dropping: When removing or installing the ECU, handle it with care and avoid dropping it.
- Use Proper Tools: Use proper tools to disconnect and reconnect the ECU connectors.
- Static Electricity Precautions:
- Ground Yourself: Before touching the ECU, ground yourself to discharge any static electricity. Static electricity can damage sensitive electronic components.
- Use Anti-Static Materials: Use anti-static mats and wrist straps when handling the ECU.
7.6. Routine Diagnostic Checks
- Regular OBD-II Scans:
- Check for Codes: Periodically perform an OBD-II scan to check for any stored diagnostic trouble codes (DTCs).
- Address Issues Promptly: Address any issues promptly to prevent them from escalating and causing damage to the ECU.
- Professional Inspections:
- Schedule Regular Inspections: Schedule regular inspections with a qualified technician to check the overall health of your vehicle’s electrical system, including the ECU.
- Follow Maintenance Schedule: Follow your vehicle’s recommended maintenance schedule to ensure all components are functioning correctly.
By following these tips, you can help maintain your ECU’s health and prevent common issues. CAR-DIAGNOSTIC-TOOL.EDU.VN offers diagnostic tools, repair guides, and expert technical support to help you keep your vehicle running smoothly. Our technician training and remote assistance ensure you have the knowledge and resources to address any ECU-related issues promptly.
8. The Role of CAR-DIAGNOSTIC-TOOL.EDU.VN in ECU Diagnostics and Solutions
CAR-DIAGNOSTIC-TOOL.EDU.VN plays a pivotal role in providing comprehensive ECU diagnostic services and solutions. We offer a range of tools, training, and support to help technicians and vehicle owners accurately diagnose and resolve ECU-related issues.
8.1. Diagnostic Tools and Equipment
- Advanced OBD-II Scanners:
- Comprehensive Diagnostics: We offer advanced OBD-II scanners that provide comprehensive diagnostics, including reading and clearing DTCs, monitoring live data, and performing advanced system tests.
- User-Friendly Interface: Our scanners feature user-friendly interfaces and intuitive navigation, making them easy to use for both experienced technicians and DIY enthusiasts.
- Multimeters and Oscilloscopes:
- Precise Measurements: We provide high-quality multimeters and oscilloscopes that enable precise measurements of voltage, current, and resistance, essential for diagnosing electrical issues.
- Waveform Analysis: Our oscilloscopes allow for detailed waveform analysis, helping technicians identify signal irregularities and component failures.
- ECU Programmers and Reflashers:
- **Software Updates
