Navigating the electrical system of your 2008 Ford F-150 can be straightforward with the right guidance. The CAR-DIAGNOSTIC-TOOL.EDU.VN website offers comprehensive solutions, including precise fuse locations, diagnostic tool information, and expert repair guidance. Explore our resources for in-depth diagnostics, troubleshooting assistance, and even remote support, plus technician training, ensuring your vehicle stays in top condition.
Contents
- 1. Understanding the Importance of the OBD2 Fuse in Your 2008 F-150
- 1.1 What is the OBD2 System?
- 1.2 Why is the OBD2 Fuse Important?
- 1.3 Common Symptoms of a Blown OBD2 Fuse
- 1.4 Real-World Scenario
- 2. Locating the OBD2 Fuse in Your 2008 Ford F-150
- 2.1 Primary Fuse Box Location
- 2.2 Step-by-Step Guide to Finding the Fuse Box
- 2.3 Fuse Box Diagram
- 2.4 Alternate Fuse Box Locations
- 2.5 Safety Precautions
- 3. Identifying the Correct OBD2 Fuse
- 3.1 Reading the Fuse Diagram
- 3.2 Common Labels for the OBD2 Fuse
- 3.3 Amperage Rating
- 3.4 Visual Inspection of the Fuse
- 3.5 Example Scenario
- 4. Replacing the Blown OBD2 Fuse
- 4.1 Gathering the Necessary Tools
- 4.2 Step-by-Step Replacement Guide
- 4.3 Common Mistakes to Avoid
- 4.4 Best Practices for Fuse Replacement
- 5. Troubleshooting Common OBD2 Issues
- 5.1 Identifying the Root Cause of the Blown Fuse
- 5.2 Using a Multimeter to Diagnose Electrical Issues
- 5.3 Common Wiring Problems in the 2008 F-150
- 5.4 Professional Diagnostic Services
- 6. Advanced Diagnostic Tools and Techniques
- 6.1 Introduction to Advanced Scan Tools
- 6.2 Using Live Data to Diagnose OBD2 Issues
- 6.3 Actuation Tests
- 6.4 Module Programming
- 6.5 Benefits of Professional Training
- 7. Maintaining Your 2008 F-150’s Electrical System
- 7.1 Regular Inspections
- 7.2 Battery Maintenance
- 7.3 Protecting Wiring from the Elements
- 7.4 Benefits of a Well-Maintained Electrical System
- 8. CAR-DIAGNOSTIC-TOOL.EDU.VN: Your Partner in Automotive Diagnostics
- 8.1 Comprehensive Diagnostic Tools
- 8.2 Expert Repair Guidance
- 8.3 Remote Support
- 8.4 Technician Training
- 8.5 Success Story
- 8.6 Why Choose CAR-DIAGNOSTIC-TOOL.EDU.VN?
- 9. Leveraging Technology for Efficient Diagnostics
- 9.1 Cloud-Based Diagnostic Platforms
- 9.2 Artificial Intelligence (AI) in Diagnostics
- 9.3 Augmented Reality (AR) in Diagnostics
- 9.4 The Future of Automotive Diagnostics
- 10. Addressing Specific 2008 F-150 Issues
- 10.1 Common Electrical Problems
- 10.2 Specific OBD2 Codes to Watch For
- 10.3 Recalls and Technical Service Bulletins (TSBs)
- 10.4 Community Forums and Resources
- 11. Ensuring Safety During Electrical Repairs
- 11.1 Working with Electrical Components
- 11.2 Handling Fuses and Relays
- 11.3 Preventing Electrical Fires
- 11.4 Emergency Procedures
- 12. Maximizing Efficiency in Your Repair Shop
- 12.1 Streamlining Diagnostic Processes
- 12.2 Inventory Management
- 12.3 Customer Communication
- 12.4 Continuous Improvement
- 13. The Future of Automotive Technology
- 13.1 Electric Vehicles (EVs)
- 13.2 Autonomous Vehicles
- 13.3 Connected Vehicles
- 14. FAQ: Troubleshooting Your 2008 F-150 OBD2 System
- 14.1 Why is my scan tool not connecting to my 2008 F-150?
- 14.2 Where can I find the fuse box diagram for my 2008 F-150?
- 14.3 What does the OBD2 system do in my 2008 F-150?
- 14.4 How do I check if my OBD2 fuse is blown?
- 14.5 What should I do if my OBD2 fuse keeps blowing?
- 14.6 Can I use a higher amperage fuse for the OBD2 port?
- 14.7 Is there a secondary fuse box in my 2008 F-150 that I should check?
- 14.8 What tools do I need to replace the OBD2 fuse?
- 14.9 How can CAR-DIAGNOSTIC-TOOL.EDU.VN help me with my 2008 F-150 diagnostics?
- 14.10 Where can I get professional training on automotive diagnostics?
- 15. Call to Action
1. Understanding the Importance of the OBD2 Fuse in Your 2008 F-150
The On-Board Diagnostics II (OBD2) system is crucial for monitoring your vehicle’s performance and diagnosing issues. But where exactly is the OBD2 fuse located in your 2008 Ford F-150, and why does it matter?
1.1 What is the OBD2 System?
The OBD2 system is a standardized system used in most vehicles since the mid-1990s to monitor engine performance, emissions, and other critical functions. According to the Environmental Protection Agency (EPA), OBD2 systems help reduce emissions by alerting drivers to potential issues early.
1.2 Why is the OBD2 Fuse Important?
The OBD2 fuse protects the diagnostic port from electrical surges and faults. If this fuse blows, you won’t be able to connect a scan tool to read diagnostic trouble codes (DTCs), making it difficult to diagnose and repair your vehicle. Research from the National Institute for Automotive Service Excellence (ASE) highlights the importance of a functioning OBD2 port for efficient vehicle maintenance.
1.3 Common Symptoms of a Blown OBD2 Fuse
- Scan tool cannot connect: The most obvious sign is when your scan tool fails to establish a connection with the vehicle’s computer.
- No power to the diagnostic port: Using a multimeter, you can check if there’s any power reaching the OBD2 port.
- Check engine light remains on: While this can be due to many issues, it could also indicate that the OBD2 system isn’t functioning correctly due to a blown fuse.
1.4 Real-World Scenario
Imagine you’re a technician at a busy shop. A 2008 Ford F-150 comes in with a check engine light. You plug in your scan tool, but it won’t connect. The first thing to check? The OBD2 fuse. According to a survey by the Automotive Aftermarket Industry Association (AAIA), electrical issues like blown fuses account for a significant percentage of diagnostic challenges in modern vehicles.
2. Locating the OBD2 Fuse in Your 2008 Ford F-150
Finding the OBD2 fuse can be a simple task once you know where to look.
2.1 Primary Fuse Box Location
The primary fuse box in a 2008 Ford F-150 is typically located inside the passenger compartment. You’ll usually find it on the passenger side, underneath the dashboard.
2.2 Step-by-Step Guide to Finding the Fuse Box
- Locate the Passenger Side: Go to the passenger side of your 2008 F-150.
- Check Under the Dashboard: Look for a panel or a door that covers the fuse box. It’s usually near the kick panel area.
- Open the Fuse Box: Use a small screwdriver or your fingers to open the fuse box cover.
- Consult the Fuse Diagram: Inside the cover, you should find a fuse diagram. This diagram indicates the location and function of each fuse.
- Identify the OBD2 Fuse: Look for a fuse labeled “OBD II,” “Diagnostic Port,” or something similar. The amperage rating is also usually listed.
2.3 Fuse Box Diagram
Here’s a general idea of what the fuse box diagram might look like. Note that the exact layout can vary.
| Fuse Number | Amperage | Description |
|---|---|---|
| 20 | 20A | OBD II / Diagnostic Port |
| 35 | 10A | PCM (Powertrain Control Module) |
| 110 | 20A | Cigar lighter, Diagnostic connector power |
2.4 Alternate Fuse Box Locations
Some Ford F-150 models may have additional fuse boxes. Check these locations if you can’t find the OBD2 fuse in the primary box:
- Under the Hood: There may be a fuse box located in the engine compartment near the battery.
- Auxiliary Relay Box: Some models have an auxiliary relay box, which could contain additional fuses.
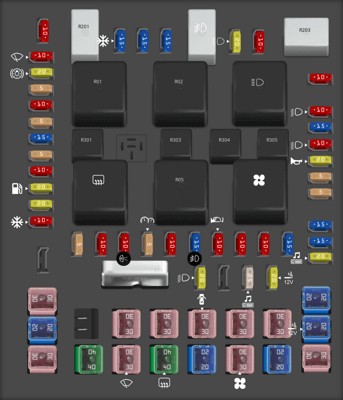 Passenger Compartment Fuse Panel
2.5 Safety Precautions
- Turn off the Ignition: Always turn off the vehicle’s ignition before working with fuses to prevent electrical shock.
- Use the Right Tools: Use a fuse puller tool to remove fuses. This prevents damage to the fuse box and the fuses themselves.
- Consult the Owner’s Manual: Your owner’s manual is the best resource for specific information about your vehicle’s fuse locations and ratings.
3. Identifying the Correct OBD2 Fuse
Once you’ve located the fuse box, it’s crucial to identify the correct fuse for the OBD2 port.
3.1 Reading the Fuse Diagram
The fuse diagram is your best friend in this process. It provides a detailed map of each fuse’s location and function.
3.2 Common Labels for the OBD2 Fuse
- OBD II
- Diagnostic Port
- Data Link Connector (DLC)
- PCM (Powertrain Control Module) – sometimes the OBD2 port is linked to the PCM fuse
3.3 Amperage Rating
The amperage rating is usually printed on the fuse itself. Common ratings for OBD2 fuses are 10A, 15A, or 20A. Using the wrong amperage can cause further damage to the system. According to a study by the Society of Automotive Engineers (SAE), using the correct fuse rating is critical for protecting electrical circuits in vehicles.
3.4 Visual Inspection of the Fuse
- Check the Filament: Look at the fuse. If the small wire inside is broken or melted, the fuse is blown.
- Use a Multimeter: For a more accurate test, use a multimeter to check continuity. If there’s no continuity, the fuse is blown.
3.5 Example Scenario
Let’s say you open the fuse box and find a fuse labeled “OBD II” with a 20A rating. You pull the fuse out and see that the filament is broken. This confirms that the OBD2 fuse is blown and needs to be replaced.
4. Replacing the Blown OBD2 Fuse
Replacing a fuse is a straightforward process. Here’s how to do it safely and effectively.
4.1 Gathering the Necessary Tools
- Replacement Fuse: Make sure you have a replacement fuse with the correct amperage rating.
- Fuse Puller: A fuse puller tool makes it easier to remove and install fuses without damaging them.
- Owner’s Manual: Keep your owner’s manual handy for reference.
4.2 Step-by-Step Replacement Guide
- Turn off the Ignition: Ensure the vehicle’s ignition is turned off.
- Locate the Blown Fuse: Find the blown OBD2 fuse in the fuse box.
- Remove the Fuse: Use the fuse puller to gently remove the blown fuse.
- Inspect the Fuse Box: Check the fuse box for any signs of damage or corrosion.
- Insert the New Fuse: Insert the new fuse with the correct amperage rating into the empty slot.
- Test the Connection: Turn on the ignition and try connecting your scan tool to the OBD2 port to ensure it’s working.
4.3 Common Mistakes to Avoid
- Using the Wrong Amperage: Always use the correct amperage rating. Using a higher amperage fuse can damage the circuit.
- Ignoring the Root Cause: If the fuse blows again immediately, there’s likely an underlying electrical issue that needs to be addressed.
- Forcing the Fuse: If the fuse doesn’t fit easily, double-check that you have the correct type and size.
4.4 Best Practices for Fuse Replacement
- Keep Spare Fuses: Always keep a selection of spare fuses in your vehicle.
- Document Replacements: Keep a record of which fuses you’ve replaced and why.
- Consult a Professional: If you’re unsure about any step, consult a qualified mechanic.
5. Troubleshooting Common OBD2 Issues
Sometimes, replacing the fuse isn’t enough. You need to diagnose why the fuse blew in the first place.
5.1 Identifying the Root Cause of the Blown Fuse
- Short Circuit: A short circuit is the most common reason for a blown fuse. This occurs when there’s an unintended connection between a circuit and ground.
- Overload: An overload happens when a circuit draws more current than it’s designed to handle.
- Faulty Wiring: Damaged or deteriorated wiring can cause shorts and overloads.
5.2 Using a Multimeter to Diagnose Electrical Issues
A multimeter is an essential tool for diagnosing electrical problems.
- Check for Continuity: Use the multimeter to check for continuity between the OBD2 port and ground. If there’s continuity, there’s a short circuit.
- Inspect Wiring: Visually inspect the wiring connected to the OBD2 port for any signs of damage.
- Test Components: Test the components connected to the OBD2 circuit for any faults.
5.3 Common Wiring Problems in the 2008 F-150
- Chafed Wires: Wires can become chafed due to rubbing against metal surfaces.
- Corroded Connectors: Corrosion can build up on connectors, causing poor connections and shorts.
- Damaged Harnesses: Wiring harnesses can be damaged by heat, age, or physical impact.
5.4 Professional Diagnostic Services
If you’re unable to diagnose the issue yourself, it’s best to seek professional help. Garages equipped with advanced diagnostic tools can quickly identify and resolve electrical problems. According to data from AAA, professional diagnostic services can save vehicle owners time and money by accurately identifying the root cause of issues.
6. Advanced Diagnostic Tools and Techniques
For more complex issues, advanced diagnostic tools and techniques are necessary.
6.1 Introduction to Advanced Scan Tools
Advanced scan tools can perform a wide range of diagnostic functions, including:
- Reading and clearing DTCs
- Viewing live data
- Performing actuation tests
- Programming modules
6.2 Using Live Data to Diagnose OBD2 Issues
Live data allows you to monitor the real-time performance of various sensors and components. This can help you identify abnormalities that might be causing the OBD2 fuse to blow.
6.3 Actuation Tests
Actuation tests allow you to activate specific components to see if they’re functioning correctly. For example, you can activate the fuel pump or the cooling fan to check their operation.
6.4 Module Programming
In some cases, the OBD2 fuse might be blowing due to a faulty module. Advanced scan tools can be used to reprogram or replace these modules.
6.5 Benefits of Professional Training
Proper training is essential for using advanced diagnostic tools effectively. Organizations like the National Automotive Technicians Education Foundation (NATEF) offer certifications and training programs for automotive technicians.
7. Maintaining Your 2008 F-150’s Electrical System
Preventive maintenance can help you avoid electrical issues and keep your 2008 F-150 running smoothly.
7.1 Regular Inspections
Regularly inspect your vehicle’s electrical system for any signs of damage or wear.
- Check Wiring: Look for chafed, cracked, or corroded wiring.
- Inspect Connectors: Ensure all connectors are clean and securely fastened.
- Test Fuses: Periodically check fuses to ensure they’re in good condition.
7.2 Battery Maintenance
A healthy battery is crucial for the proper functioning of your vehicle’s electrical system.
- Clean Terminals: Keep battery terminals clean and free of corrosion.
- Check Voltage: Regularly check the battery voltage to ensure it’s within the recommended range.
- Proper Charging: Avoid deep discharging the battery, and use a battery tender if the vehicle is stored for extended periods.
7.3 Protecting Wiring from the Elements
Protecting your vehicle’s wiring from the elements can help prevent corrosion and damage.
- Use Protective Sleeving: Use protective sleeving to protect wiring from abrasion and heat.
- Apply Dielectric Grease: Apply dielectric grease to connectors to prevent corrosion.
- Avoid Water Exposure: Avoid exposing wiring to excessive water or moisture.
7.4 Benefits of a Well-Maintained Electrical System
- Improved Reliability: A well-maintained electrical system is less likely to experience failures.
- Enhanced Performance: A healthy electrical system ensures that all components receive the proper voltage and current.
- Increased Safety: Properly functioning electrical systems are crucial for safety features like brakes and airbags.
8. CAR-DIAGNOSTIC-TOOL.EDU.VN: Your Partner in Automotive Diagnostics
At CAR-DIAGNOSTIC-TOOL.EDU.VN, we understand the challenges technicians face when diagnosing and repairing modern vehicles. That’s why we offer a range of services designed to help you succeed.
8.1 Comprehensive Diagnostic Tools
We provide a wide selection of high-quality diagnostic tools to meet the needs of any technician.
| Tool | Features | Benefits |
|---|---|---|
| OBD2 Scan Tool | Reads and clears DTCs, views live data | Quick and accurate diagnostics, saves time and money |
| Advanced Scan Tool | Module programming, actuation tests, advanced diagnostics | Comprehensive diagnostics, allows for more complex repairs |
| Multimeter | Measures voltage, current, and resistance | Essential for diagnosing electrical issues |
| Battery Tester | Checks battery voltage and condition | Helps prevent battery-related problems |
8.2 Expert Repair Guidance
Our website features a wealth of repair information, including detailed guides, diagrams, and troubleshooting tips.
- Step-by-Step Guides: Easy-to-follow guides for common repairs.
- Fuse Box Diagrams: Detailed diagrams for locating fuses and relays.
- Troubleshooting Tips: Expert advice for diagnosing and resolving complex issues.
8.3 Remote Support
Our remote support services provide you with access to experienced technicians who can help you diagnose and repair vehicles remotely.
- Real-Time Assistance: Get help when you need it, right at your workstation.
- Expert Advice: Benefit from the knowledge and experience of seasoned professionals.
- Cost-Effective Solution: Avoid expensive on-site service calls.
8.4 Technician Training
We offer comprehensive technician training programs designed to help you stay up-to-date with the latest automotive technologies.
- Online Courses: Convenient online courses that you can take at your own pace.
- Hands-On Training: Practical, hands-on training sessions at our state-of-the-art facility.
- Certification Programs: Prepare for industry certifications like ASE.
8.5 Success Story
Consider the story of John, a technician at a small repair shop in rural Texas. John was struggling to diagnose a complex electrical issue in a 2008 Ford F-150. He contacted CAR-DIAGNOSTIC-TOOL.EDU.VN for remote support.
With the help of our expert technicians, John was able to quickly identify the root cause of the problem – a corroded wiring harness. He made the necessary repairs and got the customer’s truck back on the road. “I couldn’t have done it without CAR-DIAGNOSTIC-TOOL.EDU.VN,” John said. “Their remote support saved me hours of troubleshooting and helped me provide the best possible service to my customer.”
8.6 Why Choose CAR-DIAGNOSTIC-TOOL.EDU.VN?
- Expertise: Our team of experienced technicians has the knowledge and skills to help you with any diagnostic or repair challenge.
- Quality: We offer only the highest quality diagnostic tools and training programs.
- Support: We’re committed to providing you with the best possible support, whenever you need it.
- Value: Our services are designed to save you time and money.
9. Leveraging Technology for Efficient Diagnostics
Modern technology plays a crucial role in efficient automotive diagnostics.
9.1 Cloud-Based Diagnostic Platforms
Cloud-based diagnostic platforms offer several advantages over traditional diagnostic tools:
- Real-Time Updates: Access the latest diagnostic information and software updates in real-time.
- Remote Collaboration: Collaborate with other technicians and experts remotely.
- Data Logging: Store and analyze diagnostic data in the cloud.
9.2 Artificial Intelligence (AI) in Diagnostics
AI is increasingly being used in automotive diagnostics to:
- Identify Patterns: AI algorithms can identify patterns in diagnostic data that might be missed by human technicians.
- Predict Failures: AI can predict potential failures based on historical data.
- Automate Tasks: AI can automate routine diagnostic tasks, freeing up technicians to focus on more complex issues.
9.3 Augmented Reality (AR) in Diagnostics
AR can enhance the diagnostic process by:
- Overlaying Information: AR can overlay diagnostic information onto the vehicle, providing technicians with a visual guide.
- Remote Assistance: AR can allow remote experts to see what the technician is seeing, providing real-time guidance.
- Training: AR can be used to train technicians on new diagnostic procedures.
9.4 The Future of Automotive Diagnostics
The future of automotive diagnostics is likely to be driven by:
- Increased Connectivity: Vehicles will be increasingly connected to the internet, allowing for remote diagnostics and over-the-air updates.
- Advanced Sensors: Vehicles will be equipped with more advanced sensors, providing more detailed diagnostic data.
- AI and Machine Learning: AI and machine learning will play an increasingly important role in analyzing diagnostic data and predicting failures.
 Auxiliary relay box (with DRL) diagram
10. Addressing Specific 2008 F-150 Issues
The 2008 Ford F-150 has some common issues that technicians should be aware of.
10.1 Common Electrical Problems
- Faulty Alternator: A faulty alternator can cause a variety of electrical problems, including a blown OBD2 fuse.
- Bad Ground Connections: Poor ground connections can cause voltage drops and electrical malfunctions.
- Wiring Harness Issues: The wiring harness can be damaged by heat, age, or physical impact.
10.2 Specific OBD2 Codes to Watch For
- P0605: Internal Control Module Read Only Memory (ROM) Error
- P0620: Generator Control Circuit Malfunction
- P0658: Actuator Supply Voltage A Circuit Low
10.3 Recalls and Technical Service Bulletins (TSBs)
Stay up-to-date with any recalls or TSBs that may affect the 2008 Ford F-150. These documents provide valuable information about known issues and recommended repair procedures. You can find this information on the National Highway Traffic Safety Administration (NHTSA) website.
10.4 Community Forums and Resources
Online forums and communities can be a valuable resource for troubleshooting issues with the 2008 Ford F-150. Share your experiences and learn from other technicians.
11. Ensuring Safety During Electrical Repairs
Safety should always be a top priority when performing electrical repairs.
11.1 Working with Electrical Components
- Disconnect the Battery: Always disconnect the battery before working with electrical components.
- Use Insulated Tools: Use insulated tools to prevent electrical shock.
- Wear Safety Glasses: Wear safety glasses to protect your eyes from sparks and debris.
11.2 Handling Fuses and Relays
- Use a Fuse Puller: Use a fuse puller to remove fuses without damaging them.
- Inspect Fuses: Inspect fuses for signs of damage or corrosion.
- Proper Storage: Store fuses and relays in a dry, safe place.
11.3 Preventing Electrical Fires
- Inspect Wiring: Regularly inspect wiring for signs of damage.
- Avoid Overloading Circuits: Avoid overloading electrical circuits.
- Keep Flammable Materials Away: Keep flammable materials away from electrical components.
11.4 Emergency Procedures
- Know the Location of Fire Extinguishers: Know the location of fire extinguishers in your shop.
- Emergency Shut-Off: Know how to shut off the electrical power in your shop in case of an emergency.
- First Aid: Be familiar with basic first aid procedures for electrical shock.
12. Maximizing Efficiency in Your Repair Shop
Efficient shop management can help you provide better service to your customers and increase your profitability.
12.1 Streamlining Diagnostic Processes
- Use a Checklist: Use a checklist to ensure that you follow a consistent diagnostic process.
- Prioritize Tasks: Prioritize tasks based on urgency and importance.
- Use Technology: Leverage technology to automate routine tasks and improve efficiency.
12.2 Inventory Management
- Keep Spare Parts on Hand: Keep a stock of common spare parts on hand to avoid delays.
- Use a Parts Management System: Use a parts management system to track inventory and order parts efficiently.
- Organize Your Shop: Keep your shop organized to make it easy to find tools and parts.
12.3 Customer Communication
- Keep Customers Informed: Keep customers informed about the progress of their repairs.
- Provide Accurate Estimates: Provide accurate estimates for repair costs.
- Follow Up: Follow up with customers after the repair to ensure they are satisfied.
12.4 Continuous Improvement
- Seek Feedback: Seek feedback from customers and employees.
- Stay Up-to-Date: Stay up-to-date with the latest automotive technologies and repair procedures.
- Invest in Training: Invest in training for yourself and your employees.
13. The Future of Automotive Technology
Staying ahead of the curve in automotive technology is essential for success in today’s industry.
13.1 Electric Vehicles (EVs)
Electric vehicles are becoming increasingly popular, and technicians need to be prepared to service them.
- High-Voltage Systems: Learn about the high-voltage systems used in EVs.
- Battery Technology: Understand battery technology and how to diagnose battery problems.
- Charging Systems: Be familiar with EV charging systems and how to troubleshoot charging issues.
13.2 Autonomous Vehicles
Autonomous vehicles are on the horizon, and technicians need to be prepared to service them.
- Sensor Technology: Learn about the sensors used in autonomous vehicles, such as radar, lidar, and cameras.
- Software Systems: Understand the software systems that control autonomous vehicles.
- Safety Systems: Be familiar with the safety systems used in autonomous vehicles.
13.3 Connected Vehicles
Connected vehicles are becoming increasingly common, and technicians need to be prepared to service them.
- Telematics Systems: Learn about telematics systems and how they collect and transmit data.
- Over-the-Air Updates: Understand how over-the-air updates work and how to install them.
- Cybersecurity: Be aware of the cybersecurity risks associated with connected vehicles.
 Auxiliary relay box (without DRL) diagram
14. FAQ: Troubleshooting Your 2008 F-150 OBD2 System
Have more questions? Here are some frequently asked questions to help you troubleshoot your 2008 F-150 OBD2 system.
14.1 Why is my scan tool not connecting to my 2008 F-150?
First, check the OBD2 fuse location in the passenger compartment fuse panel. If the fuse is blown, replace it with the correct amperage. If it still doesn’t connect, there may be a wiring issue or a problem with the OBD2 port itself.
14.2 Where can I find the fuse box diagram for my 2008 F-150?
The fuse box diagram is usually located inside the fuse box cover. It provides a map of each fuse’s location and function, including the OBD2 fuse location.
14.3 What does the OBD2 system do in my 2008 F-150?
The OBD2 system monitors your vehicle’s engine performance, emissions, and other critical functions. It helps identify potential issues early by providing diagnostic trouble codes (DTCs).
14.4 How do I check if my OBD2 fuse is blown?
Visually inspect the fuse for a broken or melted filament. For a more accurate test, use a multimeter to check for continuity. If there’s no continuity, the fuse is blown.
14.5 What should I do if my OBD2 fuse keeps blowing?
If your OBD2 fuse keeps blowing, there’s likely an underlying electrical issue, such as a short circuit or overload. Inspect the wiring and components connected to the OBD2 port for any signs of damage.
14.6 Can I use a higher amperage fuse for the OBD2 port?
No, always use the correct amperage rating for the OBD2 fuse. Using a higher amperage fuse can damage the circuit and cause further electrical problems.
14.7 Is there a secondary fuse box in my 2008 F-150 that I should check?
Yes, some models have an additional fuse box located in the engine compartment near the battery. Check this location if you can’t find the OBD2 fuse in the primary box.
14.8 What tools do I need to replace the OBD2 fuse?
You’ll need a replacement fuse with the correct amperage rating and a fuse puller tool to remove and install fuses without damaging them.
14.9 How can CAR-DIAGNOSTIC-TOOL.EDU.VN help me with my 2008 F-150 diagnostics?
CAR-DIAGNOSTIC-TOOL.EDU.VN offers comprehensive diagnostic tools, expert repair guidance, remote support, and technician training to help you diagnose and repair your 2008 F-150.
14.10 Where can I get professional training on automotive diagnostics?
CAR-DIAGNOSTIC-TOOL.EDU.VN offers comprehensive technician training programs designed to help you stay up-to-date with the latest automotive technologies. Organizations like the National Automotive Technicians Education Foundation (NATEF) also offer certifications and training programs.
15. Call to Action
Don’t let electrical issues keep your 2008 Ford F-150 off the road. Contact CAR-DIAGNOSTIC-TOOL.EDU.VN today for expert assistance with diagnostics, repairs, and training. Our comprehensive solutions will help you keep your vehicle running smoothly and efficiently. Reach out to us now:
- Address: 1100 Congress Ave, Austin, TX 78701, United States
- WhatsApp: +1 (641) 206-8880
- Website: CAR-DIAGNOSTIC-TOOL.EDU.VN
We’re here to help you every step of the way!