Are you struggling to locate and effectively use the OBD2 port on your 2002 Toyota Corolla? At CAR-DIAGNOSTIC-TOOL.EDU.VN, we provide comprehensive solutions, including detailed diagnostics guides, repair procedures, and expert technical support, to help you resolve your car issues efficiently. Master your vehicle’s diagnostics with our resources and explore opportunities for technician training and remote assistance.
Contents
- 1. What is the OBD2 Port on a 2002 Toyota Corolla?
- 1.1 Why is the OBD2 Port Important?
- 1.2 Where Can You Find the OBD2 Port in a 2002 Toyota Corolla?
- 2. Step-by-Step Guide to Locating the OBD2 Port
- 2.1 Prepare for the Search
- 2.2 Check Under the Dashboard
- 2.3 Look Near the Steering Column
- 2.4 Inspect the Fuse Box Area
- 2.5 Refer to Your Owner’s Manual
- 3. How to Use the OBD2 Port on Your 2002 Toyota Corolla
- 3.1 Get an OBD2 Scanner
- 3.2 Plug in the Scanner
- 3.3 Turn On the Ignition
- 3.4 Read the Diagnostic Trouble Codes (DTCs)
- 3.5 Interpret the Codes
- 3.6 Take Action Based on the Codes
- 4. Common Issues Diagnosed via the OBD2 Port
- 4.1 Engine Problems
- 4.2 Transmission Problems
- 4.3 Emissions Problems
- 4.4 ABS and Brake Problems
- 5. Understanding Diagnostic Trouble Codes (DTCs)
- 5.1 Generic vs. Manufacturer-Specific Codes
- 5.2 Decoding DTCs
- 5.3 Resources for Looking Up DTCs
- 6. Choosing the Right OBD2 Scanner
- 6.1 Basic vs. Advanced Scanners
- 6.2 Compatibility
- 6.3 Features and Functions
- 6.4 Brand and Reviews
- 7. Common OBD2 Scanner Brands and Models
- 8. Clearing Diagnostic Trouble Codes (DTCs)
- 8.1 Verify the Repair
- 8.2 Use the OBD2 Scanner
- 8.3 Verify the Clearance
- 8.4 Monitor for Recurrence
- 9. Advanced Diagnostics with OBD2
- 9.1 Live Data Streaming
- 9.2 Freeze Frame Data
- 9.3 Bidirectional Control
- 9.4 Graphing and Data Logging
- 10. OBD2 and Vehicle Inspections
- 10.1 Readiness Monitors
- 10.2 Common Reasons for Failing Inspection
- 10.3 Tips for Passing Inspection
- 11. Using OBD2 for Preventative Maintenance
- 11.1 Monitoring Key Parameters
- 11.2 Checking for Pending Codes
- 11.3 Performance Tuning
- 12. Safety Precautions When Using the OBD2 Port
- 12.1 Avoid Distractions
- 12.2 Use Reliable Equipment
- 12.3 Follow Instructions
- 12.4 Disconnect Properly
- 13. Addressing Common OBD2 Issues
- 13.1 Scanner Won’t Connect
- 13.2 Inaccurate Readings
- 13.3 Code Won’t Clear
- 14. Resources for Further Learning
- 14.1 Online Forums and Communities
- 14.2 Technical Manuals
- 14.3 Training Courses
- 14.4 CAR-DIAGNOSTIC-TOOL.EDU.VN
- 15. The Future of OBD2 Technology
- 15.1 Enhanced Diagnostics
- 15.2 Integration with Mobile Apps
- 15.3 Cybersecurity
- 16. How CAR-DIAGNOSTIC-TOOL.EDU.VN Can Help
- 16.1 Diagnostic Tools and Equipment
- 16.2 Repair Guides and Procedures
- 16.3 Technical Support
- 16.4 Training Programs
- 17. Understanding OBD2 Readiness Monitors
- 17.1 What are Readiness Monitors?
- 17.2 Types of OBD2 Readiness Monitors
- 17.3 Why Readiness Monitors Are Important for Emissions Testing
- 17.4 How to Check OBD2 Readiness Monitors
- 17.5 What Causes Readiness Monitors to Be Not Ready?
- 17.6 How to Set OBD2 Readiness Monitors
- 17.7 Tips for Completing Readiness Monitors
- 17.8 How CAR-DIAGNOSTIC-TOOL.EDU.VN Can Assist with Readiness Monitors
- 18. What is the J1850 PWM and VPW Protocol for OBD2?
- 18.1 Overview of J1850 PWM and VPW
- 18.2 Key Features of J1850 Protocols
- 18.3 How J1850 PWM and VPW Work
- 18.4 Identifying J1850 Protocols in OBD2 Systems
- 18.5 Transition to CAN Protocol
- 18.6 Diagnostic Tools for J1850 PWM and VPW
- 18.7 Benefits of Understanding J1850 Protocols
- 18.8 Challenges with J1850 Protocols
- 18.9 How CAR-DIAGNOSTIC-TOOL.EDU.VN Can Help
- 19. What are the CAN, KWP2000, and ISO 9141-2 Protocols for OBD2?
- 19.1 Overview of CAN, KWP2000, and ISO 9141-2
- 19.2 Key Features of CAN, KWP2000, and ISO 9141-2
1. What is the OBD2 Port on a 2002 Toyota Corolla?
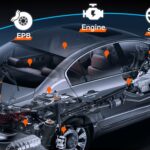
The OBD2 (On-Board Diagnostics II) port in a 2002 Toyota Corolla is a crucial interface that allows you to access your vehicle’s computer system for diagnostics. It’s typically a 16-pin connector, and finding it can unlock a wealth of information about your car’s health.
1.1 Why is the OBD2 Port Important?
The OBD2 port is essential because it provides access to the vehicle’s computer, enabling you to read diagnostic trouble codes (DTCs), monitor engine performance, and verify system readiness. According to a study by the National Institute for Automotive Service Excellence (ASE), proper use of the OBD2 port can reduce diagnostic time by up to 40%, enhancing efficiency in auto repair shops.
1.2 Where Can You Find the OBD2 Port in a 2002 Toyota Corolla?
In a 2002 Toyota Corolla, the OBD2 port is typically located under the dashboard on the driver’s side. Specifically, it’s often found near the steering column or in the vicinity of the fuse box. It’s designed to be easily accessible for mechanics and car owners alike.
2. Step-by-Step Guide to Locating the OBD2 Port
Finding the OBD2 port in your 2002 Toyota Corolla is straightforward. Here’s a step-by-step guide to help you locate it quickly:
2.1 Prepare for the Search
Before you start, ensure your vehicle is parked safely and the ignition is turned off. Have a flashlight handy, as the area under the dashboard can be dimly lit.
2.2 Check Under the Dashboard
Get down at eye level with the pedals. Look for a 16-pin connector, which is usually black or gray.
2.3 Look Near the Steering Column
The OBD2 port may be located to the left or right of the steering column. Use your flashlight to get a better view of the area.
2.4 Inspect the Fuse Box Area
Sometimes, the OBD2 port is located near the fuse box. Check this area carefully if you haven’t found it near the steering column.
2.5 Refer to Your Owner’s Manual
If you’re having trouble locating the port, consult your 2002 Toyota Corolla owner’s manual. It should provide a diagram showing the exact location of the OBD2 port.
3. How to Use the OBD2 Port on Your 2002 Toyota Corolla
Once you’ve located the OBD2 port, you can use it to diagnose issues with your vehicle. Here’s how:
3.1 Get an OBD2 Scanner
Purchase an OBD2 scanner. These scanners range from basic models that read and clear codes to more advanced versions with features like live data streaming and graphing. You can find suitable scanners at CAR-DIAGNOSTIC-TOOL.EDU.VN.
3.2 Plug in the Scanner
With your vehicle’s ignition turned off, plug the OBD2 scanner into the port. Ensure it is securely connected.
3.3 Turn On the Ignition
Turn the ignition to the “ON” position without starting the engine. This provides power to the scanner and the vehicle’s computer.
3.4 Read the Diagnostic Trouble Codes (DTCs)
Follow the scanner’s instructions to read the DTCs. The scanner will display a code (e.g., P0420) that corresponds to a specific issue.
3.5 Interpret the Codes
Use the scanner’s manual or a reliable online resource to interpret the DTCs. Resources like those available at CAR-DIAGNOSTIC-TOOL.EDU.VN can be invaluable.
3.6 Take Action Based on the Codes
Based on the DTCs, you can take appropriate action. This might involve repairing or replacing a faulty component. If you’re unsure, consult a professional mechanic.
Figure 1: A mechanic points to the OBD2 port, clearly visible beneath the steering wheel of a Toyota Corolla, illustrating its accessibility for diagnostic checks.
4. Common Issues Diagnosed via the OBD2 Port
The OBD2 port can help diagnose a wide range of issues. Here are some common problems you might encounter with your 2002 Toyota Corolla:
4.1 Engine Problems
Engine-related issues are frequently diagnosed via the OBD2 port. Common DTCs include:
- P0300: Random/Multiple Cylinder Misfire Detected
- P0301-P0304: Cylinder Misfire Detected (specific cylinder number)
- P0171: System Too Lean (Bank 1)
- P0172: System Too Rich (Bank 1)
4.2 Transmission Problems
Transmission issues can also be identified using the OBD2 port. Common codes include:
- P0700: Transmission Control System Malfunction
- P0715: Input/Turbine Speed Sensor Circuit Malfunction
- P0741: Torque Converter Clutch Circuit Performance or Stuck Off
4.3 Emissions Problems
Emissions-related problems are a significant concern for many car owners. Common codes include:
- P0420: Catalyst System Efficiency Below Threshold (Bank 1)
- P0440: Evaporative Emission Control System Malfunction
- P0455: Evaporative Emission Control System Leak Detected (Gross Leak)
4.4 ABS and Brake Problems
While less common, ABS and brake issues can sometimes be diagnosed via the OBD2 port, especially in newer vehicles with advanced systems.
- C0040: Front Right Wheel Speed Sensor Circuit Malfunction
- C0041: Front Right Wheel Speed Sensor Range/Performance
5. Understanding Diagnostic Trouble Codes (DTCs)
DTCs are standardized codes that provide information about potential issues within your vehicle. Understanding these codes is the first step in diagnosing and resolving problems.
5.1 Generic vs. Manufacturer-Specific Codes
DTCs are divided into generic and manufacturer-specific codes. Generic codes (e.g., P0300) are the same across all vehicles, while manufacturer-specific codes (e.g., P1135 for Toyota) provide more detailed information specific to the vehicle make and model.
5.2 Decoding DTCs
Each DTC consists of five characters: a letter followed by four numbers. The letter indicates the system:
- P: Powertrain (engine and transmission)
- B: Body (e.g., airbags, power windows)
- C: Chassis (e.g., ABS, suspension)
- U: Network (communication systems)
The first number indicates whether the code is generic (0) or manufacturer-specific (1). The remaining three numbers provide specific information about the fault.
5.3 Resources for Looking Up DTCs
Numerous online resources and databases can help you look up DTCs. Websites like CAR-DIAGNOSTIC-TOOL.EDU.VN offer extensive databases and expert support to assist you in interpreting codes accurately.
6. Choosing the Right OBD2 Scanner
Selecting the right OBD2 scanner is crucial for effective diagnostics. Here are some factors to consider:
6.1 Basic vs. Advanced Scanners
- Basic Scanners: These are inexpensive and read/clear DTCs. They are suitable for simple diagnostics.
- Advanced Scanners: These offer additional features like live data streaming, graphing, and manufacturer-specific code reading. They are ideal for more complex diagnostics.
6.2 Compatibility
Ensure the scanner is compatible with your 2002 Toyota Corolla. Most scanners support OBD2 protocols, but it’s always best to verify compatibility before purchasing.
6.3 Features and Functions
Consider the features and functions you need. If you only need to read and clear codes, a basic scanner will suffice. If you need advanced capabilities like live data or bidirectional control, opt for a more advanced model.
6.4 Brand and Reviews
Choose a reputable brand with positive reviews. Brands like Autel, Launch, and Bosch are known for producing high-quality OBD2 scanners.
7. Common OBD2 Scanner Brands and Models
Here are some popular OBD2 scanner brands and models:
| Brand | Model | Features | Price Range |
|---|---|---|---|
| Autel | MaxiCOM MK808 | Full system diagnostics, bidirectional control, service functions | $500-800 |
| Launch | X431 V+ | Full system diagnostics, coding, adaptations, key programming | $1000+ |
| Bosch | ADS 625 | Full system diagnostics, repair information, cloud-based updates | $1500+ |
| Innova | 3100i | Reads/clears codes, ABS/SRS diagnostics, battery/alternator check | $100-200 |
| BlueDriver | Bluetooth Professional OBDII Scan Tool | Wireless connectivity, code definitions, repair reports | $100-150 |
| Foxwell | NT510 Elite | Full system diagnostics, service functions, manufacturer-specific diagnostics | $200-300 |
| ScanTool | OBDLink MX+ | Reads/clears codes, live data, advanced diagnostics | $100-200 |
| Actron | CP9600 | Reads/clears codes, ABS/SRS diagnostics, live data | $150-250 |
| Craftsman | 9-11071 | Reads/clears codes, live data, freeze frame data | $50-100 |
| Veepeak | Mini Bluetooth OBD2 Scanner | Reads/clears codes, live data (via smartphone app) | $20-50 |
8. Clearing Diagnostic Trouble Codes (DTCs)
Once you’ve addressed the underlying issue, you’ll want to clear the DTCs. Here’s how to do it:
8.1 Verify the Repair
Before clearing the codes, ensure the repair has been successful. If the problem persists, the code will reappear.
8.2 Use the OBD2 Scanner
With the ignition turned on (engine off), use the OBD2 scanner to clear the DTCs. Follow the scanner’s instructions.
8.3 Verify the Clearance
After clearing the codes, start the engine and let it run for a few minutes. Then, use the scanner to recheck for DTCs. If no codes are present, the clearance was successful.
8.4 Monitor for Recurrence
Even after clearing the codes, monitor your vehicle for any recurrence of the issue. If the code reappears, further diagnosis and repair may be necessary.
9. Advanced Diagnostics with OBD2
For more experienced users, the OBD2 port offers advanced diagnostic capabilities:
9.1 Live Data Streaming
Live data streaming allows you to monitor various engine parameters in real-time. This can help identify intermittent issues or performance problems.
9.2 Freeze Frame Data
Freeze frame data captures a snapshot of engine parameters at the moment a DTC was triggered. This can provide valuable clues about the conditions that led to the fault.
9.3 Bidirectional Control
Some advanced scanners offer bidirectional control, which allows you to command certain vehicle components to activate or deactivate. This can be useful for testing and troubleshooting.
9.4 Graphing and Data Logging
Graphing and data logging capabilities allow you to visualize and record engine parameters over time. This can help identify trends and patterns that might not be apparent from static data.
10. OBD2 and Vehicle Inspections
In many areas, vehicles are required to pass emissions inspections to ensure they meet environmental standards. The OBD2 port plays a crucial role in these inspections.
10.1 Readiness Monitors
Readiness monitors are internal tests performed by the vehicle’s computer to verify the functionality of various emissions-related systems. These monitors must be complete for the vehicle to pass inspection.
10.2 Common Reasons for Failing Inspection
Common reasons for failing an OBD2-based emissions inspection include:
- Incomplete Readiness Monitors: If the readiness monitors have not been completed, the vehicle will fail the inspection.
- Active DTCs: The presence of active DTCs will also cause the vehicle to fail.
- Tampered or Modified Systems: Any tampering or modification of emissions-related systems can result in a failed inspection.
10.3 Tips for Passing Inspection
To ensure your 2002 Toyota Corolla passes inspection:
- Complete Necessary Repairs: Address any identified issues and clear DTCs.
- Drive the Vehicle: Drive the vehicle under various conditions to allow the readiness monitors to complete.
- Avoid Tampering: Do not tamper with or modify any emissions-related systems.
11. Using OBD2 for Preventative Maintenance
The OBD2 port isn’t just for diagnosing problems; it can also be used for preventative maintenance.
11.1 Monitoring Key Parameters
Regularly monitoring key engine parameters can help identify potential issues before they become major problems.
11.2 Checking for Pending Codes
Pending codes are DTCs that haven’t yet triggered the check engine light but indicate a potential issue. Addressing these codes early can prevent more serious problems.
11.3 Performance Tuning
Some advanced OBD2 tools can be used for performance tuning, allowing you to optimize your vehicle’s performance and fuel efficiency.
12. Safety Precautions When Using the OBD2 Port
While using the OBD2 port is generally safe, it’s essential to take certain precautions:
12.1 Avoid Distractions
Avoid using the OBD2 scanner while driving, as this can be distracting and dangerous.
12.2 Use Reliable Equipment
Use high-quality OBD2 scanners from reputable brands to avoid damaging your vehicle’s computer.
12.3 Follow Instructions
Always follow the scanner’s instructions carefully to avoid errors or damage.
12.4 Disconnect Properly
When disconnecting the scanner, turn off the ignition and allow the scanner to power down before unplugging it.
13. Addressing Common OBD2 Issues
Even with the best equipment, you might encounter issues when using the OBD2 port. Here are some common problems and how to address them:
13.1 Scanner Won’t Connect
If the scanner won’t connect, check the following:
- Connection: Ensure the scanner is securely plugged into the OBD2 port.
- Power: Verify that the ignition is turned on (engine off).
- Compatibility: Confirm that the scanner is compatible with your vehicle.
13.2 Inaccurate Readings
If you suspect inaccurate readings, try the following:
- Update Software: Ensure the scanner’s software is up to date.
- Try Another Scanner: Use a different scanner to see if the readings are consistent.
- Consult a Professional: If the issue persists, consult a professional mechanic.
13.3 Code Won’t Clear
If a code won’t clear, ensure the underlying issue has been resolved. Some codes require multiple drive cycles to clear.
14. Resources for Further Learning
To deepen your understanding of OBD2 diagnostics, consider the following resources:
14.1 Online Forums and Communities
Engage with online forums and communities dedicated to automotive diagnostics. These platforms offer a wealth of information and support from experienced users.
14.2 Technical Manuals
Refer to technical manuals and repair guides specific to your 2002 Toyota Corolla. These manuals provide detailed information about the vehicle’s systems and components.
14.3 Training Courses
Consider enrolling in training courses on automotive diagnostics. These courses provide hands-on experience and expert instruction.
14.4 CAR-DIAGNOSTIC-TOOL.EDU.VN
Leverage the resources available at CAR-DIAGNOSTIC-TOOL.EDU.VN, including diagnostic guides, repair procedures, and expert technical support.
15. The Future of OBD2 Technology
OBD2 technology is constantly evolving to meet the demands of modern vehicles.
15.1 Enhanced Diagnostics
Future OBD systems will offer even more advanced diagnostic capabilities, including predictive maintenance and remote diagnostics.
15.2 Integration with Mobile Apps
OBD2 scanners are increasingly integrating with mobile apps, providing users with real-time data and advanced features on their smartphones.
15.3 Cybersecurity
As vehicles become more connected, cybersecurity is a growing concern. Future OBD systems will incorporate enhanced security measures to protect against hacking and data breaches.
16. How CAR-DIAGNOSTIC-TOOL.EDU.VN Can Help
At CAR-DIAGNOSTIC-TOOL.EDU.VN, we are committed to providing comprehensive solutions for all your automotive diagnostic needs.
16.1 Diagnostic Tools and Equipment
We offer a wide range of high-quality diagnostic tools and equipment, including OBD2 scanners, multimeters, and other essential tools.
16.2 Repair Guides and Procedures
Our extensive library of repair guides and procedures provides step-by-step instructions for diagnosing and repairing various automotive issues.
16.3 Technical Support
Our team of experienced technicians is available to provide expert technical support and assistance. Whether you need help interpreting DTCs or troubleshooting a complex issue, we’re here to help.
16.4 Training Programs
We offer comprehensive training programs for automotive technicians of all skill levels. Our programs cover a wide range of topics, including OBD2 diagnostics, engine management, and electrical systems.
Figure 2: A skilled technician utilizes an OBD2 scanner connected to a car, effectively diagnosing vehicle issues with real-time data.
17. Understanding OBD2 Readiness Monitors
OBD2 readiness monitors are diagnostic routines that a vehicle’s computer performs to ensure that various emission control systems are functioning correctly. These monitors must be in a “ready” state for a vehicle to pass an emissions test. Here’s a detailed look at these monitors:
17.1 What are Readiness Monitors?
Readiness monitors, also known as “emission monitors” or “OBD monitors,” are self-tests performed by the vehicle’s onboard computer (ECU or PCM). They check the functionality and performance of various emission control systems, such as the catalytic converter, oxygen sensors, evaporative emission control system (EVAP), and more.
According to the EPA (Environmental Protection Agency), readiness monitors are a critical component of OBD2 systems to ensure vehicles meet emission standards throughout their lifespan.
17.2 Types of OBD2 Readiness Monitors
There are several types of readiness monitors, each responsible for evaluating a specific system. Here are some common ones:
- Catalyst Monitor: Tests the efficiency of the catalytic converter.
- Oxygen Sensor Monitor: Checks the performance and response time of the oxygen sensors.
- Evaporative System (EVAP) Monitor: Tests the integrity of the evaporative emission control system for leaks.
- Secondary Air System Monitor: Evaluates the functionality of the secondary air injection system (if equipped).
- Heated Catalyst Monitor: Checks the performance of the heated catalyst system (if equipped).
- EGR System Monitor: Tests the functionality of the exhaust gas recirculation (EGR) system.
- Oxygen Sensor Heater Monitor: Evaluates the functionality of the oxygen sensor heaters.
- Misfire Monitor: Detects engine misfires that could damage the catalytic converter.
- Fuel System Monitor: Checks the fuel delivery system for proper operation.
- Comprehensive Components Monitor (CCM): Monitors various other components and systems not covered by the specific monitors.
17.3 Why Readiness Monitors Are Important for Emissions Testing
Readiness monitors are crucial for emissions testing because they verify that the vehicle’s emission control systems are functioning correctly. If any of the required monitors are not in a “ready” state, the vehicle will likely fail the emissions test.
Reasons for Importance:
- Environmental Compliance: Ensures the vehicle meets emission standards, reducing air pollution.
- Legal Requirements: Many states and countries require vehicles to pass emissions tests to be legally driven on public roads.
- Vehicle Performance: Properly functioning emission control systems also contribute to optimal engine performance and fuel efficiency.
17.4 How to Check OBD2 Readiness Monitors
You can check the status of OBD2 readiness monitors using an OBD2 scanner. Here’s how:
Steps:
- Connect the OBD2 Scanner: Plug the scanner into the OBD2 port.
- Turn on Ignition: Turn the ignition to the “ON” position without starting the engine.
- Access Readiness Monitors: Navigate to the “Readiness Monitors” or “I/M Readiness” section in the scanner’s menu.
- View Monitor Status: The scanner will display the status of each monitor (ready or not ready).
Example Display:
| Monitor | Status |
|---|---|
| Catalyst Monitor | Ready |
| Oxygen Sensor Monitor | Ready |
| EVAP System Monitor | Not Ready |
| EGR System Monitor | Ready |
| Misfire Monitor | Ready |
| Fuel System Monitor | Ready |
| Comprehensive Components | Ready |
17.5 What Causes Readiness Monitors to Be Not Ready?
Several factors can cause readiness monitors to be “not ready”:
- Recent Erasing of Trouble Codes: Clearing DTCs resets the readiness monitors.
- Battery Disconnection: Disconnecting the vehicle’s battery can reset the monitors.
- Recent Repairs: Certain repairs may require the monitors to be reset.
- Driving Conditions: Specific driving conditions are necessary to complete certain monitors.
- Faulty Components: Problems with emission control components can prevent monitors from completing.
17.6 How to Set OBD2 Readiness Monitors
Setting OBD2 readiness monitors involves driving the vehicle under specific conditions that allow each monitor to run and complete its self-test. Here are general steps and specific driving patterns:
General Steps:
- Ensure No DTCs Are Present: Clear any existing DTCs with an OBD2 scanner.
- Check for Pending Codes: Address any pending codes, as they can prevent monitors from setting.
- Follow Driving Cycle: Perform the appropriate driving cycle for your vehicle.
Specific Driving Patterns (General Examples):
-
Catalyst Monitor:
- Drive at a steady speed of 40-55 mph for 15 minutes.
- Allow the vehicle to idle for a few minutes.
-
Oxygen Sensor Monitor:
- Drive at highway speeds (55-65 mph) for at least 20 minutes.
- Include periods of deceleration and acceleration.
-
EVAP Monitor:
- Start with a cold start (engine temperature below 70°F).
- Allow the vehicle to idle for a few minutes.
- Drive at moderate speeds (30-45 mph) for 10-15 minutes.
-
EGR Monitor:
- Drive at steady highway speeds (50-60 mph) for 10-15 minutes.
- Include periods of acceleration and deceleration.
Toyota Specific Driving Cycle (Example – May Vary by Model):
- Cold Start: Ensure the engine is cold (left overnight).
- Idle: Start the engine and let it idle for 2-3 minutes.
- Acceleration: Accelerate to 55 mph at moderate throttle.
- Cruise: Maintain a steady speed of 55 mph for 3 minutes.
- Deceleration: Decelerate to 20 mph without using the brake.
- Acceleration: Accelerate back to 55 mph.
- Cruise: Maintain 55 mph for another 5 minutes.
- Repeat: Repeat steps 5-7 several times.
- Idle: Allow the vehicle to idle for 5 minutes.
- Check Monitors: Use an OBD2 scanner to check the status of the monitors.
17.7 Tips for Completing Readiness Monitors
- Consult Vehicle-Specific Information: Refer to your vehicle’s service manual for the exact driving cycle needed.
- Avoid Aggressive Driving: Drive smoothly and avoid sudden acceleration or braking.
- Monitor Engine Temperature: Ensure the engine reaches operating temperature.
- Use a Quality OBD2 Scanner: A good scanner will provide accurate and real-time monitor status.
- Be Patient: Some monitors may take multiple driving cycles to complete.
17.8 How CAR-DIAGNOSTIC-TOOL.EDU.VN Can Assist with Readiness Monitors
At CAR-DIAGNOSTIC-TOOL.EDU.VN, we provide tools, resources, and expertise to help you effectively manage OBD2 readiness monitors:
- Advanced OBD2 Scanners: We offer scanners that provide detailed monitor status and diagnostic information.
- Vehicle-Specific Guides: We furnish guides on the specific driving cycles required for various makes and models.
- Technical Support: Our expert technicians can assist with troubleshooting monitor issues and provide guidance on setting monitors.
- Training Resources: Access training materials and courses to deepen your understanding of OBD2 systems and emission controls.
By understanding and effectively managing OBD2 readiness monitors, you can ensure your vehicle meets emission standards, reduce air pollution, and maintain optimal engine performance.
18. What is the J1850 PWM and VPW Protocol for OBD2?
J1850 PWM (Pulse Width Modulation) and J1850 VPW (Variable Pulse Width) are older communication protocols used in early OBD2 (On-Board Diagnostics II) systems, primarily in vehicles manufactured by General Motors (GM) and Ford. These protocols allowed diagnostic tools to communicate with the vehicle’s computer to retrieve information about engine performance, emissions, and other system data.
18.1 Overview of J1850 PWM and VPW
- J1850 PWM (Pulse Width Modulation):
- Used By: Primarily Ford vehicles.
- Description: This protocol uses a variable-width pulse to represent data bits. The length of the pulse determines whether it represents a 0 or a 1.
- Voltage Level: Typically operates at 5 volts.
- Data Rate: Around 41.6 kbps (kilobits per second).
- J1850 VPW (Variable Pulse Width):
- Used By: Primarily General Motors (GM) vehicles.
- Description: Similar to PWM, VPW also uses variable pulse widths to represent data bits. However, it differs in the way the pulse widths are interpreted and in voltage levels.
- Voltage Level: Can operate at either 7.5 volts or 0 volts.
- Data Rate: Around 10.4 kbps (kilobits per second).
18.2 Key Features of J1850 Protocols
- Single-Wire Communication: Both PWM and VPW protocols use a single wire for communication between the diagnostic tool and the vehicle’s computer.
- Message Structure: Data is transmitted in the form of messages, which include headers, data bytes, and checksums for error detection.
- Error Detection: Checksums are used to verify the integrity of the transmitted data, ensuring that the received data is accurate.
- Real-Time Data: Supports real-time data retrieval, allowing technicians to monitor engine parameters and other system data while the vehicle is running.
18.3 How J1850 PWM and VPW Work
J1850 PWM (Pulse Width Modulation):
- Initialization: The diagnostic tool sends a request signal to the vehicle’s computer.
- Data Transmission: The vehicle’s computer responds by sending data in the form of pulses. The width of each pulse represents a data bit (0 or 1).
- Decoding: The diagnostic tool measures the width of each pulse and decodes it into binary data.
- Error Checking: The diagnostic tool calculates the checksum of the received data and compares it with the checksum included in the message. If the checksums match, the data is considered valid.
J1850 VPW (Variable Pulse Width):
- Initialization: Similar to PWM, the diagnostic tool sends a request signal to the vehicle’s computer.
- Data Transmission: The vehicle’s computer transmits data using variable-width pulses. The interpretation of the pulse widths differs from PWM.
- Decoding: The diagnostic tool decodes the pulses into binary data.
- Error Checking: The diagnostic tool verifies the integrity of the data using checksums.
18.4 Identifying J1850 Protocols in OBD2 Systems
- Vehicle Year: Vehicles manufactured before 2003 often use J1850 protocols.
- Vehicle Make: Primarily GM and Ford vehicles.
- OBD2 Connector Pinout: The J1850 protocols use specific pins on the OBD2 connector:
- Pin 2: J1850 Bus Positive (VPW)
- Pin 16: Battery Voltage
- Diagnostic Tool Compatibility: Ensure that your diagnostic tool supports J1850 PWM and VPW protocols.
18.5 Transition to CAN Protocol
The Controller Area Network (CAN) protocol has largely replaced J1850 PWM and VPW in modern vehicles. CAN offers several advantages, including higher data rates, improved reliability, and better error handling. As of 2008, all vehicles sold in the United States are required to use the CAN protocol for OBD2 communications.
18.6 Diagnostic Tools for J1850 PWM and VPW
When working on older vehicles that use J1850 protocols, it’s essential to use a diagnostic tool that supports these protocols. Some tools that support J1850 PWM and VPW include:
- Snap-on MT2500 Red Brick Scanner: An older but reliable tool.
- Actron CP9145: Compatible with a wide range of OBD2 protocols.
- Autel MaxiSys MS906: A more modern tool that supports older protocols.
- Launch X431 V+: Another advanced tool with broad protocol support.
18.7 Benefits of Understanding J1850 Protocols
- Effective Diagnostics: Allows technicians to accurately diagnose issues in older vehicles.
- Proper Tool Selection: Helps in choosing the correct diagnostic tools and equipment.
- Historical Knowledge: Provides a foundational understanding of automotive communication protocols.
- Vehicle Maintenance: Enables mechanics to maintain and repair older GM and Ford vehicles properly.
18.8 Challenges with J1850 Protocols
- Slower Data Rates: Compared to CAN, J1850 protocols have slower data rates, which can limit real-time data analysis.
- Compatibility Issues: Newer diagnostic tools may not fully support J1850 protocols, requiring specialized equipment.
- Complexity: Diagnosing issues with J1850 can be more complex due to the protocol’s limitations and age.
- Limited Features: J1850 does not support some of the advanced features found in CAN-based systems.
18.9 How CAR-DIAGNOSTIC-TOOL.EDU.VN Can Help
At CAR-DIAGNOSTIC-TOOL.EDU.VN, we provide comprehensive resources for understanding and working with various OBD2 protocols, including J1850 PWM and VPW:
- Educational Resources: In-depth articles and guides on automotive communication protocols.
- Diagnostic Tool Recommendations: Expert recommendations on diagnostic tools that support J1850 PWM and VPW.
- Technical Support: Assistance from experienced technicians for diagnosing issues in older vehicles.
- Training Programs: Courses and training materials on OBD2 systems and diagnostic techniques.
By providing the necessary knowledge, tools, and support, CAR-DIAGNOSTIC-TOOL.EDU.VN empowers automotive technicians to effectively diagnose and repair vehicles of all makes and models, regardless of the communication protocols they use.
19. What are the CAN, KWP2000, and ISO 9141-2 Protocols for OBD2?
Modern OBD2 (On-Board Diagnostics II) systems rely on several communication protocols to facilitate data exchange between diagnostic tools and vehicle ECUs (Electronic Control Units). The most common of these protocols are CAN (Controller Area Network), KWP2000 (Keyword Protocol 2000), and ISO 9141-2. Understanding these protocols is essential for effective automotive diagnostics.
19.1 Overview of CAN, KWP2000, and ISO 9141-2
-
CAN (Controller Area Network):
- Description: A robust, high-speed communication protocol widely used in modern vehicles. CAN allows different ECUs within a vehicle to communicate with each other without a central host computer.
- Key Features:
- High Speed: Supports data rates up to 1 Mbps.
- Fault Tolerance: Designed to operate reliably in noisy electrical environments.
- Multi-Master: Allows multiple ECUs to initiate communication.
- Message-Based: Transmits data in the form of messages with priorities.
- Usage: Required in all vehicles sold in the US since 2008; used extensively in automotive, industrial, and aerospace applications.
-
KWP2000 (Keyword Protocol 2000):
- Description: A communication protocol used in OBD2 systems for diagnostic communication. It is more advanced than ISO 9141-2 but predates the widespread adoption of CAN.
- Key Features:
- Diagnostic-Oriented: Specifically designed for diagnostic purposes.
- Keyword-Based: Uses keywords to initiate diagnostic services.
- Error Handling: Includes mechanisms for error detection and correction.
- Usage: Common in European vehicles manufactured before the widespread adoption of CAN.
-
ISO 9141-2:
- Description: An older communication protocol used in OBD2 systems, primarily in Chrysler, European, and Asian vehicles.
- Key Features:
- Asynchronous Serial Communication: Uses a single wire for data transmission.
- K-Line and L-Line: Employs a K-line for communication and an optional L-line for initialization.
- Low Speed: Supports data rates up to 10.4 kbps.
- Usage: Common in vehicles manufactured before 2003.
19.2 Key Features of CAN, KWP2000, and ISO 9141-2
| Feature | CAN (Controller Area Network) | KWP2000 (Keyword Protocol 2000) | ISO 9141-2 |
|---|---|---|---|
| Speed | Up to 1 Mbps | Up to 1. |