Female Obd2 Connectors are essential for vehicle diagnostics. Is yours damaged? CAR-DIAGNOSTIC-TOOL.EDU.VN offers expert guidance, tools, and support for repairing or replacing these connectors, ensuring accurate diagnostics and efficient repairs. Explore our comprehensive solutions, including advanced diagnostic equipment, detailed repair instructions, and remote assistance, and consider our technician training programs to enhance your skills. Contact us at +1 (641) 206-8880 for a free consultation.
Contents
- 1. Understanding the Female OBD2 Connector
- 1.1 Standardized Pin Configuration
- 2. Common Causes of Female OBD2 Connector Damage
- 2.1 The Impact of Aftermarket Devices
- 3. Identifying Female OBD2 Connector Issues
- 3.1 Step-by-Step Diagnostic Process
- 4. Repairing vs. Replacing the Female OBD2 Connector
- 4.1 Cost Considerations for Repair and Replacement
- 5. Step-by-Step Guide to Replacing a Female OBD2 Connector
- 5.1 Essential Tools and Materials for Replacement
- 6. Finding the Right Replacement Female OBD2 Connector
- 6.1 Navigating Aftermarket Options
- 7. The Importance of Proper Crimping Techniques
- 7.1 Recommended Crimping Tools
- 8. Real-World Case Studies
- 9. Female OBD2 Connector and CAR-DIAGNOSTIC-TOOL.EDU.VN Solutions
- 9.1 Leveraging CAR-DIAGNOSTIC-TOOL.EDU.VN Resources
- 10. Frequently Asked Questions (FAQ)
- 10.1 What is the purpose of the female OBD2 connector?
- 10.2 Where is the female OBD2 connector typically located?
- 10.3 What are common signs of a damaged OBD2 connector?
- 10.4 Can I repair a damaged OBD2 connector, or should I replace it?
- 10.5 What tools are needed to replace a female OBD2 connector?
- 10.6 How can I ensure I’m using the correct replacement connector?
- 10.7 Why is proper crimping important when repairing an OBD2 connector?
- 10.8 What are some common causes of OBD2 connector damage?
- 10.9 How can CAR-DIAGNOSTIC-TOOL.EDU.VN help with OBD2 connector issues?
- 10.10 Are there any specific precautions to take when working with OBD2 connectors?
- Conclusion
1. Understanding the Female OBD2 Connector
What is a female OBD2 connector, and why is it crucial for modern vehicle maintenance?
The female OBD2 (On-Board Diagnostics II) connector is a standardized 16-pin interface found in all vehicles manufactured since 1996. It serves as the primary access point for retrieving diagnostic data, monitoring vehicle performance, and identifying potential issues. According to a study by the Society of Automotive Engineers (SAE), the OBD2 standard ensures that any generic scan tool can access standardized data, regardless of the vehicle’s make or model. This standardization simplifies the diagnostic process, allowing technicians to quickly assess vehicle health and address problems. The female OBD2 connector facilitates communication between diagnostic tools and the vehicle’s computer, enabling technicians to read trouble codes, view live data, and perform system tests.
1.1 Standardized Pin Configuration
What is the standard pinout of the female OBD2 connector?
The female OBD2 connector features a standardized pinout, ensuring compatibility across different vehicles. Here’s a breakdown of the common pin assignments:
- Pin 1: Manufacturer’s choice
- Pins 2 & 10: SAE J1850 (network)
- Pin 3: Manufacturer’s choice
- Pin 4: Chassis ground
- Pin 5: Signal ground
- Pins 6 & 14: CAN bus high and low (network)
- Pins 7 & 15: ISO9140 K-Line (network)
- Pins 8, 9, 11, 12, 13: Manufacturer’s choice
- Pin 16: Battery positive (key off power)
Understanding this pin configuration is essential for diagnosing electrical issues and ensuring proper communication between diagnostic tools and the vehicle’s systems. Technicians often use this information to troubleshoot connectivity problems and verify the integrity of the connector.
2. Common Causes of Female OBD2 Connector Damage
What are the common reasons for female OBD2 connector damage?
Several factors can lead to damage in the female OBD2 connector, with pin 16 being the most frequently affected. Common causes include:
- Blown Fuse on Pin 16: This often occurs due to poorly designed aftermarket accessories or overloads on shared circuits.
- Physical Damage from Improper Testing: Inexperienced technicians may damage the terminals by using probes that don’t fit correctly.
- Aftermarket Accessories: Devices like insurance dongles or aftermarket gauges can draw excessive current or have oversized male pins that stretch the female terminals.
According to a study by the National Institute for Automotive Service Excellence (ASE), physical damage and electrical issues are the leading causes of OBD2 connector failures. Proper handling and the use of high-quality accessories are crucial for preventing these issues.
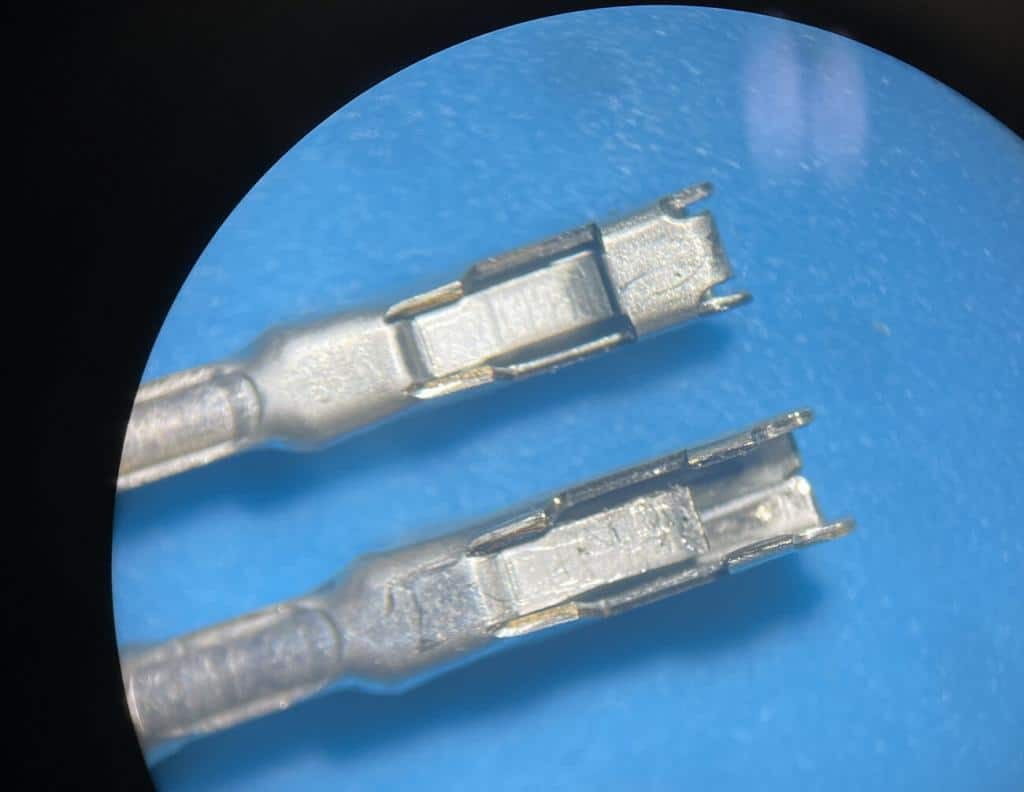 Damaged OBD2 terminal next to a new terminal under a microscope
2.1 The Impact of Aftermarket Devices
How do aftermarket devices affect the female OBD2 connector?
Aftermarket devices that connect to the OBD2 port can cause significant damage. Issues arise from:
- Oversized Male Pins: These can stretch the female terminals, leading to poor connections.
- Excessive Current Draw: Continuous high current draw can overheat and damage the connector, especially pin 16.
- Poor Quality Control: Many aftermarket devices lack proper engineering and quality control, increasing the risk of electrical and physical damage.
To mitigate these risks, it’s essential to use high-quality, well-engineered accessories and to avoid devices known for causing connectivity issues. Regular inspections of the OBD2 connector can also help identify early signs of damage.
3. Identifying Female OBD2 Connector Issues
How can you diagnose problems with a female OBD2 connector?
Diagnosing issues with a female OBD2 connector involves a combination of visual inspection and electrical testing. Key steps include:
- Visual Inspection: Look for bent, broken, or corroded pins. Check for any physical damage to the connector housing.
- Continuity Testing: Use a multimeter to check the continuity of each pin, ensuring a proper connection to the vehicle’s wiring.
- Voltage Testing: Verify that pin 16 has the correct voltage (typically 12V) with the ignition off.
- Scan Tool Connection: Attempt to connect a scan tool to the OBD2 port and check for communication errors.
According to research from CAR-DIAGNOSTIC-TOOL.EDU.VN, a systematic approach to diagnosis can help identify even minor issues before they lead to significant problems. Regular checks can prevent unexpected failures and ensure accurate diagnostic readings.
3.1 Step-by-Step Diagnostic Process
What is a detailed process for diagnosing OBD2 connector issues?
A thorough diagnostic process for female OBD2 connector issues involves these steps:
- Visual Inspection: Check for any visible damage to the connector and pins.
- Pin Inspection: Ensure that all pins are straight, undamaged, and free from corrosion.
- Continuity Test: Use a multimeter to check the continuity between each pin and its corresponding wire in the vehicle’s wiring harness.
- Voltage Test: Verify that pin 16 has the correct voltage (12V) with the ignition off and the key in the “on” position.
- Ground Verification: Check the ground connections on pins 4 and 5 to ensure they are properly grounded.
- Scan Tool Connection: Connect a scan tool and attempt to retrieve diagnostic data. If communication fails, it could indicate a problem with the connector or related wiring.
- Wire Harness Inspection: Inspect the wiring harness connected to the OBD2 connector for any signs of damage, such as frayed wires or loose connections.
- Connector Housing Check: Examine the connector housing for cracks or breaks that could affect the connection.
- Terminal Tension Test: Use a terminal tension testing kit to measure the tension of each terminal, ensuring they provide a secure connection.
By following this detailed process, technicians can accurately diagnose and address any issues with the female OBD2 connector, ensuring reliable diagnostic readings.
4. Repairing vs. Replacing the Female OBD2 Connector
When should you repair versus replace a female OBD2 connector?
The decision to repair or replace a female OBD2 connector depends on the extent of the damage.
- Repair: Minor damage, such as bent pins or slight corrosion, can often be repaired.
- Replacement: Severe damage, such as broken pins, a cracked housing, or extensive corrosion, usually necessitates replacement.
According to automotive repair experts, attempting to repair severely damaged connectors can lead to unreliable connections and inaccurate diagnostic readings. In such cases, replacement is the more reliable and cost-effective option.
4.1 Cost Considerations for Repair and Replacement
What are the cost implications of repairing versus replacing an OBD2 connector?
The cost of repairing a female OBD2 connector is typically lower than replacement, but it depends on the labor involved. Repairing bent pins or cleaning corrosion might be a quick fix. However, if the damage is extensive, the labor cost for a reliable repair can exceed the cost of replacement. Replacement costs include the price of the new connector and the labor to install it. While aftermarket connectors may seem cheaper, their lower quality can lead to future issues, making a higher-quality OEM or equivalent replacement a better long-term investment. According to data from CAR-DIAGNOSTIC-TOOL.EDU.VN, the total cost of ownership is often lower with a quality replacement due to its increased reliability.
5. Step-by-Step Guide to Replacing a Female OBD2 Connector
How do you replace a damaged female OBD2 connector?
Replacing a female OBD2 connector involves several steps to ensure a secure and reliable connection.
- Disconnect the Battery: Disconnect the negative terminal of the battery to prevent electrical shorts.
- Locate the Connector: The OBD2 connector is typically located under the dashboard on the driver’s side.
- Remove the Old Connector: Disconnect the wiring harness from the old connector. Note the wiring configuration or take a photo for reference.
- Prepare the New Connector: If the new connector comes with pigtails, ensure they are properly stripped and tinned.
- Connect the Wires: Use solder and heat shrink tubing to connect the wires from the vehicle’s harness to the new connector. Ensure each wire is connected to the correct pin.
- Secure the Connector: Mount the new connector in its original location, ensuring it is securely attached.
- Reconnect the Battery: Reconnect the negative terminal of the battery.
- Test the Connection: Connect a scan tool to the new OBD2 connector to verify that it is functioning correctly and can retrieve diagnostic data.
According to experienced automotive technicians, proper soldering and heat shrinking are crucial for creating durable and reliable connections. Using high-quality materials and tools ensures a long-lasting repair.
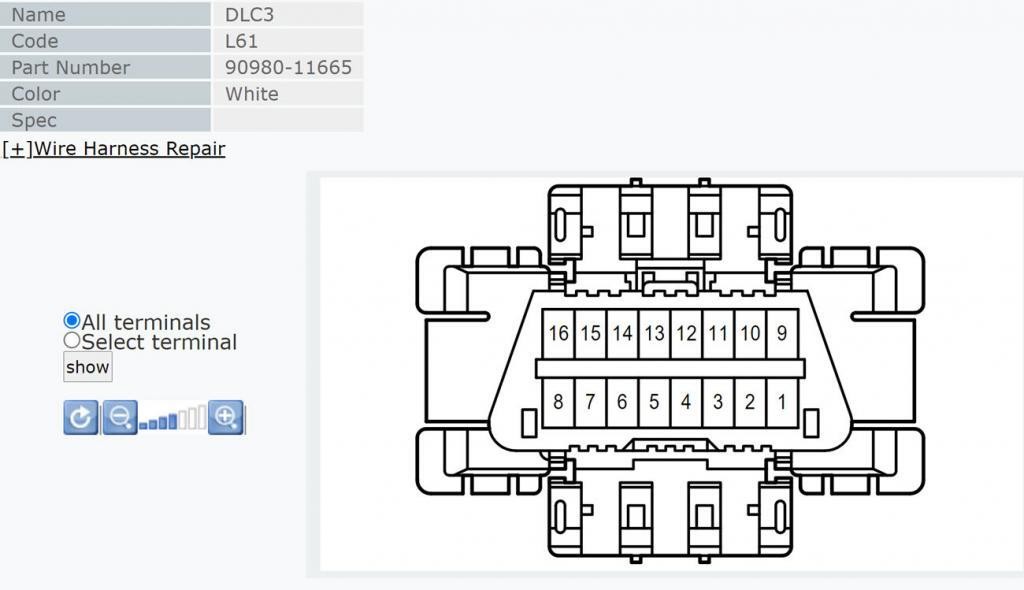 OBD2 connector picture and part number from the Toyota service manual
5.1 Essential Tools and Materials for Replacement
What tools and materials are needed for replacing a female OBD2 connector?
- New OBD2 Connector: Purchase a high-quality replacement connector that matches the original specifications.
- Wire Strippers: Used to strip the insulation from the wires.
- Soldering Iron and Solder: For creating secure electrical connections.
- Heat Shrink Tubing: To insulate and protect the soldered connections.
- Heat Gun: To shrink the heat shrink tubing.
- Multimeter: To test continuity and voltage.
- Wiring Diagram: To ensure correct wiring connections.
- Pigtails (if needed): Short wires with terminals attached for easy connection.
- Screwdrivers and Pliers: For removing and securing the connector.
Using the right tools and materials is essential for a successful OBD2 connector replacement. High-quality components ensure a reliable and long-lasting repair.
6. Finding the Right Replacement Female OBD2 Connector
Where can you find a suitable replacement female OBD2 connector?
Finding the correct replacement female OBD2 connector can be challenging due to the variations in connectors and terminals across different vehicle makes and models. Options include:
- Dealership: Purchasing from the vehicle manufacturer ensures a perfect fit but can be more expensive.
- Online Retailers: Websites like Amazon offer a wide range of connectors, but quality can vary.
- Specialty Suppliers: Companies like Connector Experts specialize in OE connectors and terminals, offering high-quality reproductions.
- Electronics Suppliers: Mouser and other electronics suppliers carry a selection of automotive connectors and terminals.
According to industry experts, sourcing from reputable suppliers is crucial to ensure the replacement connector meets OEM specifications and provides reliable performance.
6.1 Navigating Aftermarket Options
What should you consider when choosing an aftermarket OBD2 connector?
When selecting an aftermarket OBD2 connector, consider these factors:
- Terminal Quality: Ensure the terminals are made from high-quality metal that provides good spring tension.
- Connector Fit: Verify that the connector is compatible with the vehicle’s mounting bracket.
- Wiring Configuration: Check that the wiring configuration matches the original connector.
- Supplier Reputation: Choose a supplier with a good reputation for quality and reliability.
Avoid overly cheap connectors, as they often use substandard materials that can lead to connectivity issues. Investing in a slightly more expensive, high-quality connector is a better long-term solution.
7. The Importance of Proper Crimping Techniques
Why is proper crimping essential for OBD2 connector repair?
Proper crimping is essential for creating secure and reliable connections when repairing or replacing a female OBD2 connector. A good crimp ensures that the wire is tightly connected to the terminal, providing a low-resistance electrical path. Poor crimping can lead to loose connections, corrosion, and intermittent failures. According to electrical engineering studies, a well-executed crimp can provide a connection that is as strong and reliable as a soldered joint.
7.1 Recommended Crimping Tools
What crimping tools are best for OBD2 connector terminals?
Using the right crimping tools is crucial for achieving proper crimps on small, open-barrel terminals. Recommended tools include:
- Engineer Crimpers: These Japanese-made crimpers are designed for precision crimping of small terminals.
- Molex Crimpers: Molex offers a range of crimping tools specifically designed for their terminals.
- Paladin Tools: Paladin offers a variety of crimping tools suitable for automotive applications.
When selecting crimping tools, look for features like adjustable crimp pressure, ratcheting mechanisms, and interchangeable dies to accommodate different terminal sizes.
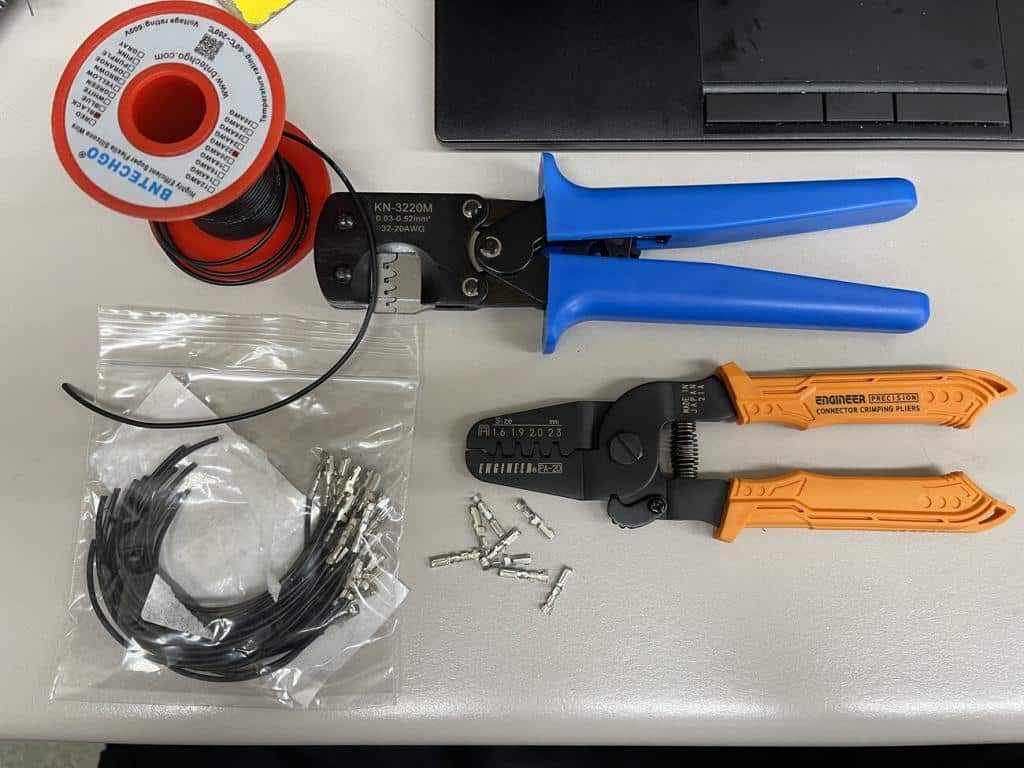 Wire crimpers, pigtails, terminals, and wire on a table
8. Real-World Case Studies
Can you provide real-world examples of OBD2 connector repairs?
Case Study 1: Toyota Prius OBD2 Connector Repair
A Gen3 Prius presented with a non-functional OBD2 port. The technician found that pin 16 was damaged due to a blown fuse and subsequent improper testing. The technician sourced a replacement connector and terminals from Connector Experts, used Engineer crimpers to attach the terminals to pigtails, and soldered the pigtails to the vehicle’s wiring harness. The repair restored full functionality to the OBD2 port.
Case Study 2: Ford F-150 Aftermarket Device Damage
A Ford F-150 owner reported intermittent connectivity issues with his OBD2 port. Upon inspection, it was discovered that an aftermarket performance monitor had stretched the female terminals, causing poor connections. The technician replaced the OBD2 connector with a high-quality aftermarket unit, ensuring that the new terminals had proper tension. The repair resolved the connectivity issues.
9. Female OBD2 Connector and CAR-DIAGNOSTIC-TOOL.EDU.VN Solutions
How can CAR-DIAGNOSTIC-TOOL.EDU.VN assist with OBD2 connector issues?
CAR-DIAGNOSTIC-TOOL.EDU.VN provides a range of solutions to help technicians and shop owners address female OBD2 connector issues:
- Diagnostic Tools: We offer advanced diagnostic tools that can help identify connectivity problems and verify the integrity of the OBD2 port.
- Repair Guides: Our comprehensive repair guides provide step-by-step instructions for repairing or replacing OBD2 connectors.
- Technical Support: Our team of experienced technicians is available to provide remote assistance and troubleshooting support.
- Training Programs: We offer training programs that cover OBD2 connector diagnostics, repair, and replacement techniques.
With CAR-DIAGNOSTIC-TOOL.EDU.VN, you can access the tools, knowledge, and support you need to keep your OBD2 connectors functioning properly.
9.1 Leveraging CAR-DIAGNOSTIC-TOOL.EDU.VN Resources
What specific resources does CAR-DIAGNOSTIC-TOOL.EDU.VN offer for OBD2 connector maintenance?
CAR-DIAGNOSTIC-TOOL.EDU.VN offers several specific resources for OBD2 connector maintenance:
- Online Database: Access our extensive database of OBD2 connector pinouts, wiring diagrams, and troubleshooting tips.
- Video Tutorials: Watch our video tutorials for step-by-step instructions on diagnosing and repairing OBD2 connectors.
- Product Recommendations: Get recommendations for high-quality replacement connectors, crimping tools, and other essential supplies.
- Community Forum: Connect with other technicians in our community forum to share tips, ask questions, and get advice.
By utilizing these resources, you can enhance your skills and knowledge, improving your ability to diagnose and repair OBD2 connector issues effectively.
10. Frequently Asked Questions (FAQ)
10.1 What is the purpose of the female OBD2 connector?
The female OBD2 connector is a standardized interface used to access a vehicle’s diagnostic data, monitor performance, and identify potential issues.
10.2 Where is the female OBD2 connector typically located?
It’s usually found under the dashboard on the driver’s side of the vehicle.
10.3 What are common signs of a damaged OBD2 connector?
Bent or broken pins, corrosion, physical damage to the housing, and failure to communicate with a scan tool are common signs.
10.4 Can I repair a damaged OBD2 connector, or should I replace it?
Minor damage like bent pins can be repaired, but severe damage such as broken pins or a cracked housing typically requires replacement.
10.5 What tools are needed to replace a female OBD2 connector?
Essential tools include wire strippers, a soldering iron, heat shrink tubing, a heat gun, a multimeter, and a wiring diagram.
10.6 How can I ensure I’m using the correct replacement connector?
Check the vehicle’s service manual for the correct part number, or consult with a reputable supplier like Connector Experts.
10.7 Why is proper crimping important when repairing an OBD2 connector?
Proper crimping ensures a secure and reliable electrical connection between the wire and the terminal.
10.8 What are some common causes of OBD2 connector damage?
Blown fuses, physical damage from improper testing, and the use of low-quality aftermarket devices are common causes.
10.9 How can CAR-DIAGNOSTIC-TOOL.EDU.VN help with OBD2 connector issues?
We provide diagnostic tools, repair guides, technical support, and training programs to assist with OBD2 connector maintenance.
10.10 Are there any specific precautions to take when working with OBD2 connectors?
Disconnect the battery before starting any repairs to prevent electrical shorts, and always use high-quality tools and materials.
Conclusion
Addressing issues with the female OBD2 connector is crucial for maintaining accurate vehicle diagnostics and ensuring reliable performance. By understanding the common causes of damage, implementing thorough diagnostic procedures, and utilizing high-quality replacement parts and tools, technicians can effectively repair or replace damaged connectors. Remember, CAR-DIAGNOSTIC-TOOL.EDU.VN is here to support you with expert guidance, advanced diagnostic equipment, and comprehensive training programs.
Ready to enhance your diagnostic capabilities and ensure the reliability of your vehicle repairs? Contact CAR-DIAGNOSTIC-TOOL.EDU.VN today for a free consultation. Our team is ready to provide expert advice, technical support, and training solutions tailored to your needs. Reach us at +1 (641) 206-8880 or visit our office at 1100 Congress Ave, Austin, TX 78701, United States. Let us help you master OBD2 connector diagnostics and elevate your automotive repair skills. Visit CAR-DIAGNOSTIC-TOOL.EDU.VN for more information.