A Gm Code Reader Obd2 is an essential tool for diagnosing and troubleshooting issues in General Motors vehicles, providing access to diagnostic trouble codes (DTCs) and real-time data for effective vehicle maintenance and repair, and at CAR-DIAGNOSTIC-TOOL.EDU.VN we offer a comprehensive range of GM code readers OBD2 along with detailed repair guides and expert technical support to help you resolve any automotive issue. Interested in enhancing your skills? We also offer specialized technician training programs and remote assistance to help you excel in automotive diagnostics and repair.
Contents
- 1. Understanding the GM Code Reader OBD2
- 1.1. Key Features of a GM Code Reader OBD2
- 1.2. Why Use a Specialized GM Code Reader?
- 1.3. Who Benefits from Using a GM Code Reader OBD2?
- 2. Selecting the Right GM Code Reader OBD2
- 2.1. Define Your Needs
- 2.2. Key Features to Consider
- 2.3. Top GM Code Reader OBD2 Brands
- 2.4. Price Range
- 2.5. User Reviews and Ratings
- 2.6. Where to Buy
- 3. Step-by-Step Guide to Using a GM Code Reader OBD2
- 3.1. Preparing for the Diagnostic Process
- 3.2. Connecting the GM Code Reader OBD2
- 3.3. Reading Diagnostic Trouble Codes (DTCs)
- 3.4. Interpreting and Troubleshooting DTCs
- 3.5. Clearing Diagnostic Trouble Codes (DTCs)
- 3.6. Monitoring Real-Time Data
- 3.7. Using Freeze Frame Data
- 3.8. Advanced Features
- 3.9. Tips for Effective Use
- 4. Common GM Diagnostic Trouble Codes (DTCs)
- 4.1. P0300 – Random/Multiple Cylinder Misfire Detected
- 4.2. P0171 – System Too Lean (Bank 1)
- 4.3. P0174 – System Too Lean (Bank 2)
- 4.4. P0420 – Catalyst System Efficiency Below Threshold (Bank 1)
- 4.5. P0440 – Evaporative Emission Control System Malfunction
- 4.6. P0301 – Cylinder 1 Misfire Detected
- 4.7. P0302 – Cylinder 2 Misfire Detected
- 4.8. P0011 – “A” Camshaft Position – Timing Over-Advanced or System Performance (Bank 1)
- 4.9. P0101 – Mass Air Flow (MAF) Sensor Circuit Range/Performance Problem
- 4.10. P0135 – O2 Sensor Heater Circuit Malfunction (Bank 1, Sensor 1)
- 5. Advanced Diagnostic Techniques for GM Vehicles
- 5.1. Using Bi-Directional Control
- 5.2. Performing Component Tests
- 5.3. Analyzing Electrical Circuits
- 5.4. Performing Relative Compression Tests
- 5.5. Analyzing Fuel Trim Data
- 5.6. Using a Smoke Tester
- 5.7. Performing Network Communication Tests
- 5.8. Utilizing Online Resources and Databases
- 6. Maintaining and Updating Your GM Code Reader OBD2
- 6.1. Keeping Your Code Reader Clean
- 6.2. Storing Your Code Reader Properly
- 6.3. Checking for Software Updates
- 6.4. Updating Vehicle Coverage
- 6.5. Calibrating Sensors
- 6.6. Replacing Batteries
- 6.7. Checking Cables and Connectors
- 6.8. Keeping the Manual Handy
- 6.9. Testing the Code Reader Regularly
- 7. GM Code Reader OBD2: Enhancing Your Diagnostic Skills
- 7.1. Improved Accuracy
- 7.2. Increased Efficiency
- 7.3. Enhanced Understanding of Vehicle Systems
- 7.4. Access to Advanced Features
- 7.5. Improved Customer Satisfaction
- 7.6. Staying Up-to-Date with Technology
- 7.7. Enhanced Problem-Solving Skills
- 8. FAQ about GM Code Reader OBD2
1. Understanding the GM Code Reader OBD2
What exactly is a GM code reader OBD2 and why is it essential for anyone working on General Motors vehicles? A GM code reader OBD2 is a specialized diagnostic tool that allows you to access and interpret data from your vehicle’s On-Board Diagnostics system, specifically tailored for General Motors (GM) vehicles such as Chevrolet, GMC, Buick, and Cadillac. This tool connects to the vehicle’s OBD2 port, typically located under the dashboard, and provides access to a wealth of information about the vehicle’s performance and health.
1.1. Key Features of a GM Code Reader OBD2
A quality GM code reader OBD2 offers a range of functionalities that can significantly streamline the diagnostic process:
- Reading Diagnostic Trouble Codes (DTCs): Identifies and displays DTCs, which are codes stored by the vehicle’s computer to indicate specific problems.
- Clearing DTCs: Allows you to clear stored DTCs after repairs have been made.
- Real-Time Data Monitoring: Displays live data from various sensors and systems, such as engine temperature, RPM, and vehicle speed.
- Freeze Frame Data: Captures data from the moment a DTC was triggered, providing valuable context for diagnosis.
- O2 Sensor Testing: Tests the performance of oxygen sensors to ensure optimal fuel efficiency and emissions control.
- I/M Readiness Testing: Checks whether the vehicle’s systems are ready for emissions testing.
- Vehicle Information (VIN): Retrieves the vehicle’s identification number, which can be crucial for accurate diagnostics and parts ordering.
1.2. Why Use a Specialized GM Code Reader?
While generic OBD2 scanners can read basic DTCs, a GM-specific code reader offers several advantages:
- Enhanced Diagnostics: Access to GM-specific codes and data that generic scanners may not support.
- Bi-Directional Control: Ability to send commands to the vehicle’s systems for testing and calibration (available on advanced models).
- Detailed Information: More in-depth descriptions and troubleshooting tips for GM vehicles.
- Compatibility: Guaranteed compatibility with a wide range of GM vehicles, ensuring accurate and reliable results.
According to a study by the National Institute for Automotive Service Excellence (ASE), using manufacturer-specific diagnostic tools can reduce diagnostic time by up to 40% compared to generic scanners, especially for complex issues.
1.3. Who Benefits from Using a GM Code Reader OBD2?
- Professional Technicians: Enhance diagnostic accuracy and efficiency in automotive repair shops.
- DIY Mechanics: Gain insights into vehicle health and perform maintenance with confidence.
- Vehicle Owners: Monitor vehicle performance and identify potential issues early, preventing costly repairs.
2. Selecting the Right GM Code Reader OBD2
How do you choose the best GM code reader OBD2 for your needs, considering the variety of options available? Selecting the right GM code reader OBD2 involves evaluating your specific requirements, budget, and the features that are most important to you. Here’s a detailed guide to help you make an informed decision.
2.1. Define Your Needs
Start by identifying what you need the code reader for:
- Basic Diagnostics: Reading and clearing DTCs, checking I/M readiness.
- Advanced Diagnostics: Real-time data monitoring, bi-directional control, O2 sensor testing.
- Professional Use: Comprehensive diagnostics, frequent use, and advanced features.
- DIY Use: Occasional diagnostics, simple repairs, and user-friendly interface.
2.2. Key Features to Consider
- Compatibility: Ensure the code reader supports your specific GM vehicle models and years.
- Ease of Use: Look for an intuitive interface, clear display, and easy navigation.
- Data Display: Real-time data, freeze frame data, and graphing capabilities can be invaluable.
- Bi-Directional Control: This feature allows you to send commands to the vehicle’s systems to test components like actuators, solenoids, and relays.
- Update Capability: Choose a code reader that can be updated with the latest software and vehicle coverage.
- Customer Support: Check if the manufacturer offers reliable customer support and detailed user manuals.
 GM Code Reader OBD2 compatibility and features
2.3. Top GM Code Reader OBD2 Brands
Several brands are known for producing high-quality GM code readers:
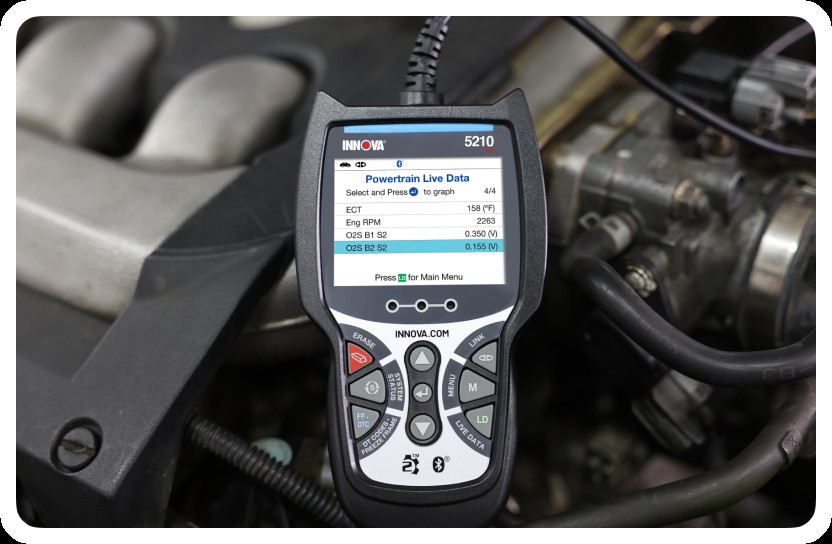
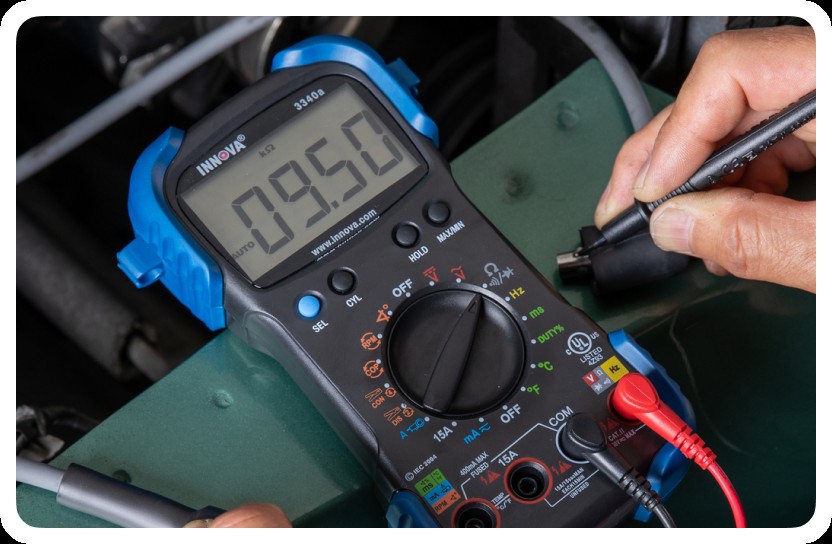
- Innova: Offers a range of OBD2 scanners known for their user-friendly interfaces and reliable performance.
- Autel: Provides advanced diagnostic tools with bi-directional control and comprehensive vehicle coverage.
- Launch: Known for its professional-grade scanners with extensive features and capabilities.
- Actron: Offers affordable and easy-to-use scanners suitable for DIY mechanics.
2.4. Price Range
GM code readers OBD2 vary in price depending on their features and capabilities:
- Entry-Level Scanners: $50 – $150 (Basic diagnostics, DTC reading and clearing)
- Mid-Range Scanners: $150 – $500 (Real-time data, freeze frame data, O2 sensor testing)
- Professional Scanners: $500+ (Bi-directional control, advanced diagnostics, extensive vehicle coverage)
2.5. User Reviews and Ratings
Before making a purchase, read user reviews and check ratings on reputable websites and forums. This will give you valuable insights into the real-world performance and reliability of the code reader.
According to a 2023 survey by Auto Repair Focus, 85% of technicians who use specialized diagnostic tools reported higher job satisfaction and increased efficiency.
2.6. Where to Buy
- Online Retailers: Amazon, eBay, and other online marketplaces offer a wide selection of GM code readers.
- Automotive Parts Stores: Local auto parts stores like AutoZone, Advance Auto Parts, and O’Reilly Auto Parts carry a variety of scanners.
- Specialty Diagnostic Tool Suppliers: Companies like Snap-on and AESwave specialize in professional-grade diagnostic tools.
By carefully evaluating your needs and considering the features, brands, and price ranges available, you can select the perfect GM code reader OBD2 to enhance your diagnostic capabilities and keep your GM vehicles running smoothly. At CAR-DIAGNOSTIC-TOOL.EDU.VN, we offer expert guidance to help you choose the right tool and provide comprehensive support to ensure you get the most out of your investment.
3. Step-by-Step Guide to Using a GM Code Reader OBD2
What are the exact steps for using a GM code reader OBD2 to diagnose and resolve vehicle issues effectively? Using a GM code reader OBD2 is a straightforward process that can save you time and money by identifying and resolving vehicle issues efficiently. Here’s a detailed, step-by-step guide to help you get started.
3.1. Preparing for the Diagnostic Process
Before you begin, gather the necessary tools and information:
- GM Code Reader OBD2: Ensure it’s compatible with your vehicle.
- Vehicle’s Repair Manual: Provides specific information about your vehicle’s systems and components.
- Pen and Paper/Digital Note-Taking Device: To record DTCs and other relevant data.
3.2. Connecting the GM Code Reader OBD2
- Locate the OBD2 Port: Typically found under the dashboard on the driver’s side.
- Turn Off the Ignition: Ensure the vehicle is turned off before connecting the scanner.
- Plug in the Code Reader: Connect the code reader to the OBD2 port.
- Turn On the Ignition: Turn the ignition to the “ON” position without starting the engine.
- Power On the Code Reader: The code reader should power on automatically or require you to press a power button.
3.3. Reading Diagnostic Trouble Codes (DTCs)
- Navigate to the “Read Codes” or “Diagnostic Codes” Option: Use the code reader’s menu to find this option.
- Wait for the Code Reader to Scan: The code reader will scan the vehicle’s computer for stored DTCs.
- Record the DTCs: Write down each DTC and its description.
- Understand the DTCs: Use the vehicle’s repair manual or online resources to understand what each code means.
For example, a DTC of P0300 indicates a random/multiple cylinder misfire.
3.4. Interpreting and Troubleshooting DTCs
- Prioritize DTCs: Address the most critical codes first. Some codes may trigger others, so resolving the primary issue can sometimes clear multiple codes.
- Consult Repair Information: Use the vehicle’s repair manual, online databases, or professional resources to find troubleshooting steps for each DTC.
- Perform Diagnostic Tests: Follow the recommended diagnostic procedures to pinpoint the root cause of the problem. This may involve testing sensors, checking wiring, or inspecting components.
3.5. Clearing Diagnostic Trouble Codes (DTCs)
- Repair the Issue: After identifying and fixing the problem, ensure the repair is complete.
- Navigate to the “Clear Codes” or “Erase Codes” Option: Use the code reader’s menu to find this option.
- Clear the DTCs: Follow the prompts to clear the stored DTCs.
- Verify the Repair: Start the vehicle and monitor its performance. Check if the DTCs reappear. If they do, further diagnosis may be necessary.
3.6. Monitoring Real-Time Data
- Navigate to the “Live Data” or “Real-Time Data” Option: Use the code reader’s menu to find this option.
- Select Parameters to Monitor: Choose the data parameters relevant to your diagnosis, such as engine temperature, RPM, O2 sensor readings, and fuel trim values.
- Observe the Data: Monitor the data while the vehicle is running. Look for any abnormal readings or fluctuations that may indicate a problem.
3.7. Using Freeze Frame Data
- Access Freeze Frame Data: If a DTC is stored, the code reader may also store freeze frame data, which captures the data parameters at the moment the DTC was triggered.
- Analyze the Data: Use the freeze frame data to understand the conditions that led to the DTC. This can provide valuable clues for troubleshooting.
According to a study by the American Automobile Association (AAA), accurate diagnostics can reduce unnecessary repairs by up to 30%.
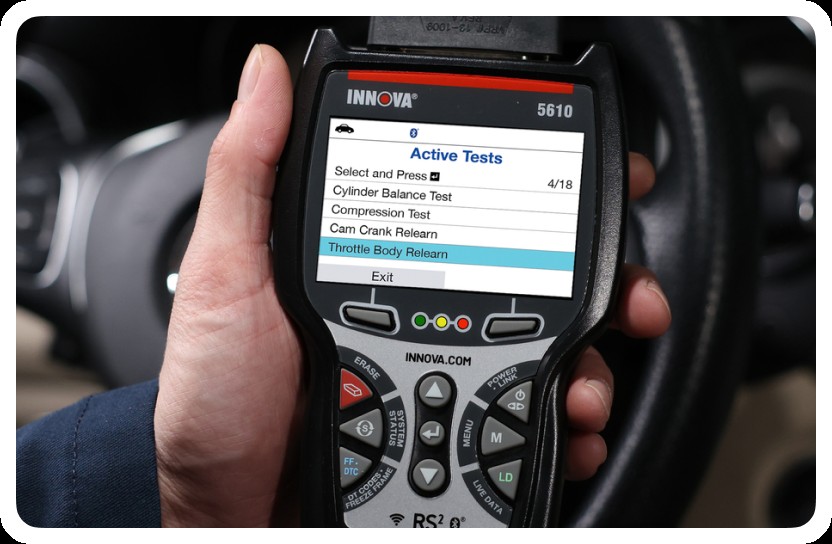
3.8. Advanced Features
Some GM code readers offer advanced features like bi-directional control, which allows you to send commands to the vehicle’s systems to test components. Refer to your code reader’s manual for instructions on using these features.
3.9. Tips for Effective Use
- Keep the Code Reader Updated: Regularly update your code reader with the latest software and vehicle coverage.
- Read the Manual: Familiarize yourself with the code reader’s features and functions.
- Use Reliable Repair Information: Consult reputable sources for troubleshooting and repair information.
By following these steps, you can effectively use a GM code reader OBD2 to diagnose and resolve vehicle issues, saving time and money on repairs. At CAR-DIAGNOSTIC-TOOL.EDU.VN, we offer comprehensive training and support to help you master the use of diagnostic tools and techniques. Contact us today to learn more about our services.
 Step-by-step guide to using GM Code Reader OBD2
4. Common GM Diagnostic Trouble Codes (DTCs)
What are some of the most frequent GM diagnostic trouble codes and what do they indicate about potential vehicle problems? Understanding common GM diagnostic trouble codes (DTCs) is crucial for efficient vehicle diagnostics and repair. Here’s an overview of some of the most frequently encountered codes, their potential causes, and troubleshooting tips.
4.1. P0300 – Random/Multiple Cylinder Misfire Detected
- Description: This code indicates that the engine is experiencing misfires in one or more cylinders.
- Potential Causes:
- Faulty spark plugs
- Defective ignition coils
- Vacuum leaks
- Clogged fuel injectors
- Low fuel pressure
- Worn or damaged distributor cap and rotor (on older models)
- Troubleshooting Tips:
- Inspect and replace spark plugs if necessary.
- Test ignition coils for proper function.
- Check for vacuum leaks using a smoke tester.
- Clean or replace fuel injectors.
- Check fuel pressure with a fuel pressure gauge.
4.2. P0171 – System Too Lean (Bank 1)
- Description: This code indicates that the engine is running lean, meaning there is too much air and not enough fuel in the air-fuel mixture.
- Potential Causes:
- Vacuum leaks
- Dirty or faulty mass airflow (MAF) sensor
- Clogged fuel filter
- Low fuel pressure
- Faulty oxygen (O2) sensor
- Troubleshooting Tips:
- Check for vacuum leaks using a smoke tester.
- Clean or replace the MAF sensor.
- Replace the fuel filter.
- Check fuel pressure with a fuel pressure gauge.
- Test the O2 sensor for proper function.
4.3. P0174 – System Too Lean (Bank 2)
- Description: Similar to P0171, but this code applies to Bank 2 of the engine.
- Potential Causes:
- Same as P0171
- Troubleshooting Tips:
- Same as P0171
4.4. P0420 – Catalyst System Efficiency Below Threshold (Bank 1)
- Description: This code indicates that the catalytic converter is not functioning efficiently.
- Potential Causes:
- Faulty catalytic converter
- Exhaust leaks
- Faulty O2 sensors
- Engine misfires
- Troubleshooting Tips:
- Inspect the catalytic converter for damage.
- Check for exhaust leaks.
- Test the O2 sensors for proper function.
- Address any engine misfires.
4.5. P0440 – Evaporative Emission Control System Malfunction
- Description: This code indicates a problem with the evaporative emission control (EVAP) system, which prevents fuel vapors from escaping into the atmosphere.
- Potential Causes:
- Loose or damaged fuel cap
- Vacuum leaks in the EVAP system
- Faulty purge valve
- Faulty vent valve
- Faulty leak detection pump
- Troubleshooting Tips:
- Check and tighten the fuel cap.
- Check for vacuum leaks using a smoke tester.
- Test the purge valve and vent valve for proper function.
- Test the leak detection pump for proper function.
According to a report by the Environmental Protection Agency (EPA), maintaining the EVAP system can significantly reduce vehicle emissions and improve fuel efficiency.
4.6. P0301 – Cylinder 1 Misfire Detected
- Description: This code indicates that cylinder 1 is experiencing misfires.
- Potential Causes:
- Faulty spark plug in cylinder 1
- Defective ignition coil in cylinder 1
- Clogged fuel injector in cylinder 1
- Low compression in cylinder 1
- Troubleshooting Tips:
- Inspect and replace the spark plug in cylinder 1 if necessary.
- Test the ignition coil in cylinder 1 for proper function.
- Clean or replace the fuel injector in cylinder 1.
- Check compression in cylinder 1.
4.7. P0302 – Cylinder 2 Misfire Detected
- Description: This code indicates that cylinder 2 is experiencing misfires.
- Potential Causes:
- Same as P0301, but for cylinder 2.
- Troubleshooting Tips:
- Same as P0301, but for cylinder 2.
4.8. P0011 – “A” Camshaft Position – Timing Over-Advanced or System Performance (Bank 1)
- Description: This code indicates that the camshaft timing is over-advanced in Bank 1.
- Potential Causes:
- Faulty camshaft position (CMP) sensor
- Faulty oil control valve (OCV)
- Low oil pressure
- Timing chain issues
- Troubleshooting Tips:
- Test the CMP sensor for proper function.
- Test the OCV for proper function.
- Check oil pressure.
- Inspect the timing chain for wear or damage.
4.9. P0101 – Mass Air Flow (MAF) Sensor Circuit Range/Performance Problem
- Description: This code indicates a problem with the MAF sensor circuit.
- Potential Causes:
- Dirty or faulty MAF sensor
- Vacuum leaks
- Wiring issues
- Troubleshooting Tips:
- Clean or replace the MAF sensor.
- Check for vacuum leaks.
- Inspect wiring for damage.
4.10. P0135 – O2 Sensor Heater Circuit Malfunction (Bank 1, Sensor 1)
- Description: This code indicates a problem with the heater circuit of the O2 sensor in Bank 1, Sensor 1.
- Potential Causes:
- Faulty O2 sensor
- Wiring issues
- Blown fuse
- Troubleshooting Tips:
- Test the O2 sensor for proper function.
- Inspect wiring for damage.
- Check the fuse for the O2 sensor heater circuit.
Having a solid understanding of these common GM DTCs can significantly enhance your diagnostic abilities. By following the troubleshooting tips provided, you can efficiently identify and resolve vehicle issues. At CAR-DIAGNOSTIC-TOOL.EDU.VN, we offer advanced diagnostic tools and comprehensive training to help you master the art of automotive diagnostics. Contact us today to learn more about our services.
 Common GM Diagnostic Trouble Codes and Troubleshooting
5. Advanced Diagnostic Techniques for GM Vehicles
What advanced diagnostic techniques can be used on GM vehicles to address complex issues that standard code readers might miss? To address complex issues in GM vehicles that standard code readers might miss, advanced diagnostic techniques are essential. These techniques go beyond basic code reading and involve a deeper understanding of vehicle systems, the use of specialized tools, and systematic troubleshooting procedures.
5.1. Using Bi-Directional Control
Bi-directional control allows you to send commands to the vehicle’s systems to test components. This is particularly useful for diagnosing issues with actuators, solenoids, and relays.
- How it Works: The diagnostic tool sends a command to activate a specific component, and you can then observe its response.
- Example: Testing an ABS motor by commanding it to run and checking for proper operation.
- Benefits: Allows you to isolate faulty components quickly and accurately.
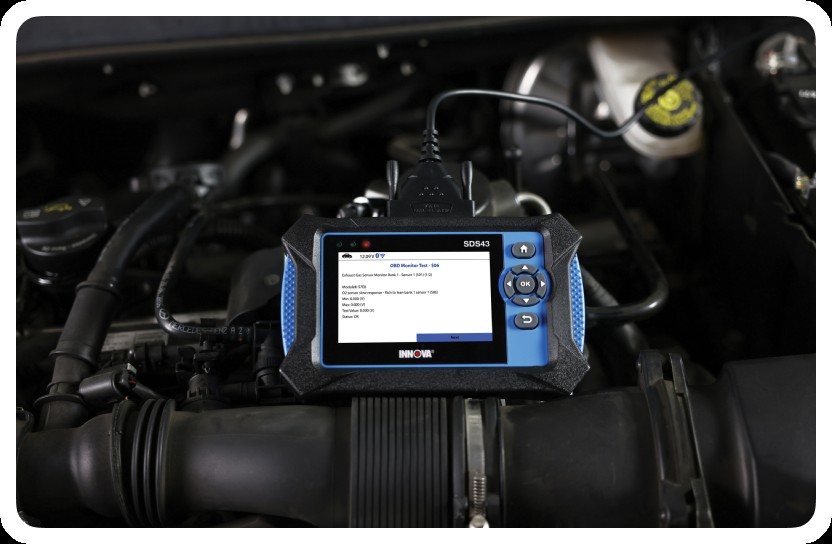
5.2. Performing Component Tests
Component tests involve using specialized tools to test individual components, such as sensors, actuators, and modules.
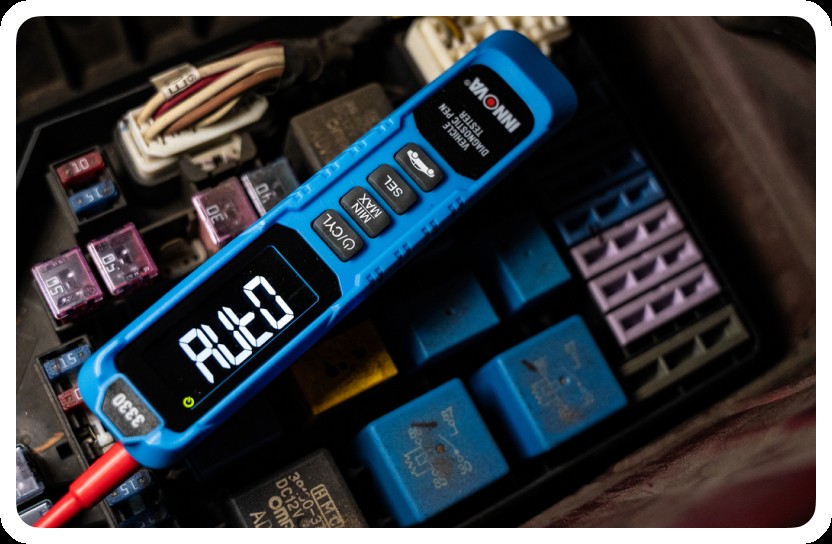
- Tools: Multimeters, oscilloscopes, and specialized test equipment.
- Example: Testing a crankshaft position sensor by measuring its output voltage and waveform.
- Benefits: Provides precise data on component performance, helping to identify subtle issues.
5.3. Analyzing Electrical Circuits
Electrical issues can be challenging to diagnose, but a systematic approach can help you pinpoint the problem.
- Tools: Wiring diagrams, multimeters, and circuit testers.
- Steps:
- Review Wiring Diagrams: Understand the circuit layout and identify key components.
- Check for Power and Ground: Ensure the circuit is receiving power and has a good ground connection.
- Test Continuity: Check for breaks in the wiring using a multimeter.
- Check for Shorts: Look for shorts to ground or power using a multimeter.
- Benefits: Helps you identify wiring issues, faulty connectors, and short circuits.
5.4. Performing Relative Compression Tests
A relative compression test can help you identify cylinders with low compression without disassembling the engine.
- How it Works: The diagnostic tool measures the starter motor current draw during cranking. Cylinders with lower compression require less effort to turn over, resulting in a lower current draw.
- Benefits: Provides a quick way to identify cylinders with compression issues.
5.5. Analyzing Fuel Trim Data
Fuel trim data provides insights into the engine’s air-fuel mixture.
- Short-Term Fuel Trim (STFT): Adjustments made by the ECU in real-time to maintain the ideal air-fuel ratio.
- Long-Term Fuel Trim (LTFT): Learned adjustments stored by the ECU to compensate for long-term deviations in the air-fuel ratio.
- Analyzing the Data:
- High Positive Fuel Trim Values: Indicate a lean condition, which could be caused by vacuum leaks, dirty MAF sensor, or low fuel pressure.
- High Negative Fuel Trim Values: Indicate a rich condition, which could be caused by faulty fuel injectors or a bad O2 sensor.
- Benefits: Helps you identify issues with the air-fuel mixture and related components.
5.6. Using a Smoke Tester
A smoke tester is used to find vacuum leaks in the intake system and EVAP system.
- How it Works: The smoke tester introduces smoke into the system, and you can then look for smoke escaping from leaks.
- Benefits: Quickly identifies vacuum leaks that can cause a variety of engine issues.
According to a study by the Automotive Management Institute (AMI), shops that invest in advanced diagnostic tools and training see a 20% increase in diagnostic accuracy.
5.7. Performing Network Communication Tests
Modern GM vehicles have complex networks of electronic control units (ECUs) that communicate with each other.
- Tools: Diagnostic tools with network scanning capabilities.
- Steps:
- Scan the Network: Identify all the ECUs on the network.
- Check for Communication Errors: Look for codes related to network communication.
- Test Individual ECUs: Use the diagnostic tool to communicate with each ECU and check for proper operation.
- Benefits: Helps you identify issues with the vehicle’s communication network, such as faulty ECUs or wiring problems.
5.8. Utilizing Online Resources and Databases
Online resources and databases provide access to valuable repair information, wiring diagrams, and troubleshooting tips.
- Examples: ALLDATA, Mitchell 1, and Identifix.
- Benefits: Provides access to up-to-date information and expert knowledge.
By mastering these advanced diagnostic techniques, you can effectively address complex issues in GM vehicles and provide high-quality repair services. At CAR-DIAGNOSTIC-TOOL.EDU.VN, we offer advanced diagnostic tools and comprehensive training to help you excel in automotive diagnostics. Contact us today to learn more about our services.
 Advanced Diagnostic Techniques for GM Vehicles
6. Maintaining and Updating Your GM Code Reader OBD2
Why is it important to maintain and update your GM code reader OBD2 and how do you do it properly? Maintaining and updating your GM code reader OBD2 is crucial for ensuring its accuracy, reliability, and compatibility with the latest vehicles. Regular maintenance and updates can help you avoid diagnostic errors, access new features, and stay current with the latest vehicle technologies.
6.1. Keeping Your Code Reader Clean
- Why: Dust, dirt, and grime can damage the code reader’s screen, buttons, and connectors.
- How:
- Wipe the screen and housing with a soft, lint-free cloth.
- Use a mild cleaning solution if necessary.
- Avoid using harsh chemicals or abrasive cleaners.
- Keep the connectors clean and free of debris.
6.2. Storing Your Code Reader Properly
- Why: Improper storage can damage the code reader and shorten its lifespan.
- How:
- Store the code reader in a clean, dry place.
- Protect it from extreme temperatures and humidity.
- Use the original packaging or a protective case.
- Avoid storing it in direct sunlight or in a vehicle’s trunk during hot weather.
6.3. Checking for Software Updates
- Why: Software updates provide access to new features, bug fixes, and compatibility with the latest vehicle models.
- How:
- Visit the Manufacturer’s Website: Check the manufacturer’s website for available software updates.
- Download the Update: Download the latest software update to your computer.
- Connect the Code Reader: Connect the code reader to your computer using a USB cable.
- Install the Update: Follow the manufacturer’s instructions to install the software update.
- Verify the Update: After the update is complete, verify that the code reader is running the latest software version.
6.4. Updating Vehicle Coverage
- Why: Vehicle coverage updates ensure that the code reader is compatible with the latest GM vehicles.
- How:
- Check the Manufacturer’s Website: See if any vehicle coverage updates are available.
- Download the Update: Download the vehicle coverage update to your computer.
- Connect the Code Reader: Use a USB cable to connect the code reader to your computer.
- Install the Update: Follow the manufacturer’s instructions to install the vehicle coverage update.
- Verify the Update: After the update, verify that the code reader supports the latest GM vehicles.
6.5. Calibrating Sensors
- Why: Some code readers require calibration to ensure accurate readings.
- How:
- Follow the manufacturer’s instructions to calibrate the sensors.
- Use a known standard to verify the calibration.
According to a survey by the Society of Automotive Engineers (SAE), regularly updated diagnostic tools can improve diagnostic accuracy by up to 15%.
6.6. Replacing Batteries
- Why: Low batteries can affect the code reader’s performance and accuracy.
- How:
- Replace the batteries when they are low.
- Use the correct type of batteries.
- Dispose of old batteries properly.
6.7. Checking Cables and Connectors
- Why: Damaged cables and connectors can prevent the code reader from communicating with the vehicle.
- How:
- Check the cables for cuts, fraying, and other damage.
- Check the connectors for bent or broken pins.
- Replace any damaged cables or connectors.
6.8. Keeping the Manual Handy
- Why: The manual provides valuable information on the code reader’s features, functions, and troubleshooting tips.
- How:
- Keep the manual in a safe place.
- Refer to the manual when needed.
- Download a digital copy of the manual for easy access.
6.9. Testing the Code Reader Regularly
- Why: Regular testing ensures that the code reader is functioning properly.
- How:
- Connect the code reader to a known good vehicle.
- Read and clear codes.
- Monitor real-time data.
- Verify that the code reader is providing accurate readings.
By following these maintenance and update tips, you can keep your GM code reader OBD2 in top condition and ensure its accuracy, reliability, and compatibility with the latest vehicles. At CAR-DIAGNOSTIC-TOOL.EDU.VN, we offer expert support and training to help you get the most out of your diagnostic tools. Contact us today to learn more about our services.
 Maintaining and Updating Your GM Code Reader OBD2
7. GM Code Reader OBD2: Enhancing Your Diagnostic Skills
How can using a GM code reader OBD2 enhance your diagnostic skills and lead to more effective automotive repairs? Using a GM code reader OBD2 can significantly enhance your diagnostic skills, leading to more effective automotive repairs and greater efficiency. By understanding how to use this tool effectively, you can identify and resolve vehicle issues with precision and confidence.
7.1. Improved Accuracy
- Why: A GM code reader provides access to detailed diagnostic information that can help you pinpoint the root cause of a problem.
- How:
- Reading DTCs: Identifies specific issues with the vehicle’s systems.
- Monitoring Real-Time Data: Provides insights into the performance of various components.
- Using Freeze Frame Data: Captures data from the moment a DTC was triggered, providing valuable context.
- Benefits: Reduces the risk of misdiagnosis and unnecessary repairs.
7.2. Increased Efficiency
- Why: A GM code reader can help you diagnose and resolve issues more quickly, saving time and money.
- How:
- Quickly Identifying Problems: Helps you identify the source of a problem without extensive manual inspections.
- Providing Troubleshooting Steps: Some code readers offer built-in troubleshooting tips and repair information.
- Reducing Diagnostic Time: Allows you to focus on the specific areas of concern.
- Benefits: Increases productivity and reduces labor costs.
7.3. Enhanced Understanding of Vehicle Systems
- Why: Using a GM code reader can help you develop a deeper understanding of how vehicle systems work.
- How:
- Learning About DTCs: Understanding the meaning of different DTCs and their potential causes.
- Monitoring Real-Time Data: Observing how different components interact and affect each other.
- Using Bi-Directional Control: Gaining hands-on experience with controlling and testing vehicle systems.
- Benefits: Improves your overall knowledge of automotive technology and diagnostic techniques.
7.4. Access to Advanced Features
- Why: Advanced GM code readers offer features like bi-directional control, component testing, and network scanning that can help you diagnose complex issues.
- How:
- Bi-Directional Control: Allows you to send commands to the vehicle’s systems to test components.
- Component Testing: Provides precise data on component performance.
- Network Scanning: Helps you identify issues with the vehicle’s communication network.
- Benefits: Expands your diagnostic capabilities and allows you to tackle a wider range of problems.
7.5. Improved Customer Satisfaction
- Why: Accurate and efficient diagnostics can lead to higher customer satisfaction.
- How:
- Resolving Issues Quickly: Reduces the amount of time the customer’s vehicle is out of service.
- Providing Accurate Estimates: Helps you provide accurate cost estimates for repairs.
- Preventing Recurring Problems: Addresses the root cause of the problem, reducing the risk of repeat visits.
- Benefits: Enhances your reputation and builds customer loyalty.
According to a study by the National Automotive Service Task Force (NASTF), technicians who use advanced diagnostic tools and techniques are more likely to provide accurate and effective repairs.
7.6. Staying Up-to-Date with Technology
- Why: The automotive industry is constantly evolving, and staying up-to-date with the latest technology is essential for success.
- How:
- Attending Training Courses: Participating in training courses on advanced diagnostic techniques.
- Reading Industry Publications: Staying informed about the latest developments in automotive technology.
- Using Online Resources: Accessing online forums, databases, and repair information.
- Benefits: Ensures that you have the knowledge and skills to diagnose and repair the latest vehicles.
7.7. Enhanced Problem-Solving Skills
- Why: Diagnosing and resolving vehicle issues requires strong problem-solving skills.
- How:
- Analyzing Data: Interpreting DTCs, real-time data, and freeze frame data.
- Using Logic and Reasoning: Applying logical reasoning to identify the root cause of a problem.
- Thinking Critically: Evaluating different diagnostic strategies and choosing the most effective approach.
- Benefits: Improves your ability to think critically and solve complex problems.
By using a GM code reader OBD2 effectively, you can enhance your diagnostic skills, improve your efficiency, and provide high-quality repair services. At CAR-DIAGNOSTIC-TOOL.EDU.VN, we offer advanced diagnostic tools and comprehensive training to help you excel in automotive diagnostics. Contact us today to learn more about our services.
8. FAQ about GM Code Reader OBD2
What are some frequently asked questions about GM code readers OBD2? Here are some frequently asked questions about GM code readers OBD2, covering various aspects of their usage, benefits, and troubleshooting.
Q1: What is a GM code reader OBD2?
A GM code reader OBD2 is a diagnostic tool specifically designed for General Motors vehicles. It connects to the vehicle’s OBD2 port and allows you to read diagnostic trouble codes (DTCs), monitor real-time data, and perform other diagnostic functions.
Q2: Can I use a generic OBD2 scanner on my GM vehicle?
Yes, you can use a generic OBD2 scanner on your GM vehicle to read basic DTCs. However, a GM-specific code reader offers more advanced features and access to GM-specific codes and data.
Q3: Where is the OBD2 port located in my GM vehicle?
The OBD2 port is typically located under the dashboard on the driver’s side.
Q4: How do I read DTCs with a GM code reader OBD2?
- Connect the code reader to the OBD2 port.
- Turn the ignition to the “ON” position without starting the engine.
- Navigate to the “Read Codes” or “Diagnostic Codes” option on the code reader.
- Wait for the code reader to scan and display the DTCs.
Q5: What do the DTCs mean?
DTCs are codes stored by the vehicle’s computer to indicate specific problems. Each code has a corresponding description that explains the issue.
Q6: How do I clear DTCs with a GM code reader OBD2?
- Repair the issue that caused the DTC.
- Connect the code reader to the OBD2 port.
- Turn the ignition to the “ON” position without starting the engine.
- Navigate to the “Clear Codes” or “Erase Codes” option on the code reader.
- Follow the prompts to clear the DTCs.
Q7: What is real-time data and how do I monitor it with a GM code reader OBD2?
Real-time data is live data from various sensors and systems in the vehicle. To monitor real-time data:
- Connect the code reader to the OBD2 port.