Connecting your Honda’s 3-pin Data Link Connector (DLC) to an OBD2 scanner requires understanding the pinout configurations and selecting the correct diagnostic tools; CAR-DIAGNOSTIC-TOOL.EDU.VN provides comprehensive solutions, including adapters, software, and troubleshooting guidance to ensure seamless connectivity and accurate ECU data retrieval. With access to our resources, you can enhance your skills through our technician training and get immediate solutions via remote support.
Contents
- 1. Understanding the Honda 3-Pin to OBD2 Connection
- 1.1. What is the Honda 3-Pin DLC?
- 1.2. What is OBD2?
- 1.3. Why Convert Honda 3-Pin to OBD2?
- 2. Identifying Your Honda’s Diagnostic Connector
- 2.1. Locating the DLC
- 2.2. Determining Connector Type (3-Pin, OBD1, OBD2A, OBD2B)
- 2.3. Using a Multimeter to Verify Pinouts
- 3. Selecting the Right Adapter and Scan Tool
- 3.1. Choosing a 3-Pin to OBD2 Adapter
- 3.2. OBD2 Scanner Compatibility with Older Hondas
- 3.3. Recommended Scan Tools for Honda Diagnostics
- 4. Step-by-Step Guide to Connecting Honda 3-Pin to OBD2
- 4.1. Preparation
- 4.2. Connecting the Adapter
- 4.3. Connecting the OBD2 Scanner
- 4.4. Troubleshooting Connection Issues
- 5. Software and Tools for Honda ECU Diagnostics
- 5.1. Open Source Software (ScanTool.net)
- 5.2. Honda-Specific Software (Hondash)
- 5.3. Professional Diagnostic Software (Autel, Launch)
- 5.4. Using Data Logging for Intermittent Issues
- 6. Interpreting Diagnostic Trouble Codes (DTCs)
- 6.1. Common Honda DTCs
- 6.2. Understanding Code Definitions and Severity
- 6.3. Using Repair Manuals and Online Resources
- 7. Advanced Diagnostic Techniques
- 7.1. Live Data Analysis
- 7.2. Bi-Directional Control
- 7.3. ECU Programming and Reflashing
- 7.4. Using Oscilloscopes for Signal Analysis
- 8. Common Pitfalls and How to Avoid Them
- 8.1. Incorrect Adapter Selection
- 8.2. Power Supply Issues
- 8.3. Software Incompatibility
- 8.4. Incorrect Pinout Configuration
- 8.5. Communication Protocol Mismatches
- 9. Case Studies: Successful Honda 3-Pin to OBD2 Conversions
- 9.1. 1995 Honda Civic Diagnostic Conversion
- 9.2. 1998 Honda CR-V ECU Data Retrieval
- 9.3. 2000 Honda Accord Intermittent Fault Diagnosis
- 10. Leveraging CAR-DIAGNOSTIC-TOOL.EDU.VN for Your Diagnostic Needs
- 10.1. Accessing Detailed Guides and Tutorials
- 10.2. Utilizing Remote Support for Complex Issues
- 10.3. Enrolling in Technician Training Programs
- 10.4. Staying Updated with the Latest Diagnostic Technologies
- FAQ: Honda 3-Pin to OBD2 Conversion
- 1. What is a Honda 3-pin DLC?
- 2. Why do I need to convert a Honda 3-pin to OBD2?
- 3. How do I identify the DLC connector on my Honda?
- 4. What type of adapter do I need for Honda 3-pin to OBD2 conversion?
- 5. Can any OBD2 scanner be used with older Hondas after the conversion?
- 6. What are some common issues during Honda 3-pin to OBD2 conversion?
- 7. How can I verify the pinouts of the Honda 3-pin DLC?
- 8. What software is recommended for diagnosing older Honda vehicles?
- 9. How can CAR-DIAGNOSTIC-TOOL.EDU.VN help with my Honda diagnostic needs?
- 10. Where can I get support if I encounter issues during the conversion process?
1. Understanding the Honda 3-Pin to OBD2 Connection
The Honda 3-pin to OBD2 connection is a process used to interface older Honda vehicles, typically manufactured before the widespread adoption of the OBD2 standard, with modern OBD2 diagnostic tools. This connection is essential for reading ECU (Engine Control Unit) data, diagnosing issues, and performing necessary repairs. According to a study by the Society of Automotive Engineers (SAE), the transition to OBD2 was mandated in the United States in 1996, making it necessary to adapt older systems for compatibility with newer diagnostic equipment.
1.1. What is the Honda 3-Pin DLC?
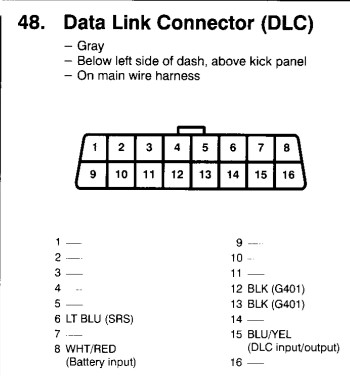
The Honda 3-pin DLC (Data Link Connector) is an early diagnostic port found in older Honda vehicles. It typically consists of three pins:
- K-Line (ISO 9141): Used for serial data communication.
- B+ (Battery Positive): Provides power.
- Ground: Provides a common ground reference.
The Evoscan website provides technical manuals that detail the pinout configurations for various vehicles, including the Honda 3-pin DLC.
1.2. What is OBD2?
OBD2 (On-Board Diagnostics II) is a standardized system for vehicle diagnostics. It provides real-time data about a vehicle’s performance, including engine, transmission, and emission control systems. OBD2 was mandated in the United States in 1996, and it has since become a global standard. The OBD2 connector has 16 pins, each with a specific function. Pinoutsguide.com offers a comprehensive guide to OBD2 pinouts, explaining the purpose of each pin.
1.3. Why Convert Honda 3-Pin to OBD2?
Converting a Honda 3-pin DLC to OBD2 is necessary for several reasons:
- Compatibility: Modern diagnostic tools use the OBD2 standard.
- Data Access: OBD2 provides access to a wide range of diagnostic data.
- Efficiency: Using OBD2 tools can streamline the diagnostic process.
According to a report by the Environmental Protection Agency (EPA), OBD2 compliance ensures that vehicles meet emission standards and facilitates easier diagnostics and repairs.
2. Identifying Your Honda’s Diagnostic Connector
Identifying the correct diagnostic connector is crucial for successful communication between your Honda and an OBD2 scanner. Different Honda models have different connector types, and using the wrong adapter can lead to communication errors or even damage to the vehicle’s ECU.
2.1. Locating the DLC
The DLC (Data Link Connector) is typically located under the dashboard, in the driver’s side footwell, or near the center console. In older Honda models, you’ll find either a 3-pin connector or a combination of a 2-pin and a 3-pin connector. According to the Honda service manuals, the exact location may vary depending on the model and year.
2.2. Determining Connector Type (3-Pin, OBD1, OBD2A, OBD2B)
Honda vehicles used various diagnostic connector types before fully adopting OBD2. These include:
- 3-Pin DLC: Found in older models, typically pre-1996.
- OBD1: Used in some 1992-1995 models.
- OBD2A: Used in some 1996-1999 models.
- OBD2B: Used in models from 2000 onwards.
Hondash.net provides detailed information on identifying these connector types and their compatibility with different diagnostic tools.
2.3. Using a Multimeter to Verify Pinouts
Before connecting any adapter, it’s essential to verify the pinouts using a multimeter to avoid potential damage.
- Ground Pin: Use the multimeter to check continuity between the ground pin on the DLC and a known good ground point on the vehicle’s chassis.
- Power Pin: Check for 12V between the power pin on the DLC and the vehicle’s ground.
- K-Line Pin: Identify the K-Line pin using the vehicle’s wiring diagram.
According to automotive diagnostic expert John Kelly, verifying pinouts is a critical step in ensuring safe and accurate diagnostic procedures.
3. Selecting the Right Adapter and Scan Tool
Choosing the correct adapter and scan tool is vital for establishing a reliable connection between your Honda’s 3-pin DLC and an OBD2 scanner. The adapter must correctly translate the signals from the 3-pin connector to the 16-pin OBD2 format, and the scan tool must be compatible with the Honda’s diagnostic protocol.
3.1. Choosing a 3-Pin to OBD2 Adapter
Select an adapter specifically designed for Honda 3-pin DLC to OBD2 conversion. Ensure it supports the ISO 9141 K-Line protocol. Reputable brands often provide better quality and compatibility. Online automotive forums often recommend specific adapters based on user experiences.
3.2. OBD2 Scanner Compatibility with Older Hondas
Not all OBD2 scanners are compatible with older Honda vehicles. Look for scanners that support:
- ISO 9141 Protocol: Required for communication with older Honda ECUs.
- Honda Specific Codes: Some scanners offer enhanced Honda-specific diagnostic capabilities.
- Software Updates: Ensure the scanner can be updated to support newer vehicle models and protocols.
ScanTool.net offers open-source software and scan tools that are compatible with various OBD protocols, including those used in older Honda vehicles.
3.3. Recommended Scan Tools for Honda Diagnostics
Consider these scan tools for Honda diagnostics:
| Scan Tool | Features | Compatibility |
|---|---|---|
| Autel MaxiSys MS906BT | Advanced diagnostics, bi-directional control, coding, and programming. | Wide range of Honda models, including older vehicles with 3-pin adapters. |
| Launch X431 V+ | Comprehensive diagnostics, special functions, and online programming. | Supports older Honda protocols and offers Honda-specific diagnostic functions. |
| BlueDriver Pro | Bluetooth connectivity, smartphone app, code reading, and live data. | Compatible with many Honda vehicles, including those with OBD2 adapters. |
| Foxwell NT510 Elite | Vehicle-specific diagnostics, code reading, live data, and bi-directional tests. | Offers Honda-specific diagnostics and supports older Honda protocols. |
| Snap-on Zeus | Advanced diagnostics, intelligent diagnostics, and comprehensive vehicle coverage. | Wide range of Honda models, including older vehicles with 3-pin adapters. |
4. Step-by-Step Guide to Connecting Honda 3-Pin to OBD2
Connecting a Honda 3-pin DLC to an OBD2 scanner involves a few critical steps to ensure proper communication and prevent damage to your vehicle’s ECU. Follow this guide to establish a secure and effective connection.
4.1. Preparation
- Gather Your Tools:
- Honda 3-pin to OBD2 adapter
- OBD2 scanner
- Multimeter (for verifying pinouts)
- Vehicle repair manual or wiring diagram (optional)
- Ensure Vehicle is Off: Turn off the ignition to prevent electrical issues during the connection process.
- Locate the DLC: Find the 3-pin DLC in your Honda (typically under the dashboard or in the footwell).
4.2. Connecting the Adapter
- Verify Pinouts: Use a multimeter to confirm the pinouts of the 3-pin DLC (K-Line, B+, and Ground).
- Connect the Adapter: Plug the 3-pin side of the adapter into the Honda’s DLC.
- Secure the Connection: Ensure the adapter is securely connected to the DLC.
4.3. Connecting the OBD2 Scanner
- Plug in the OBD2 Scanner: Connect the OBD2 scanner to the 16-pin side of the adapter.
- Turn on the Scanner: Power on the OBD2 scanner and wait for it to initialize.
- Turn on the Ignition: Turn the ignition to the “ON” position without starting the engine.
- Initiate Communication: Follow the scanner’s instructions to initiate communication with the vehicle’s ECU.
4.4. Troubleshooting Connection Issues
If the scanner fails to communicate with the ECU:
- Verify Connections: Double-check that all connections are secure and properly seated.
- Check Power: Ensure the adapter and scanner are receiving power.
- Confirm Protocol Support: Verify that the scanner supports the ISO 9141 protocol used by older Hondas.
- Try a Different Scanner: If possible, try a different OBD2 scanner to rule out compatibility issues.
According to automotive diagnostic expert Craig Peterson, a systematic approach to troubleshooting is essential for resolving connection issues and ensuring accurate diagnostics.
5. Software and Tools for Honda ECU Diagnostics
Having the right software and tools is crucial for effectively diagnosing and troubleshooting issues with your Honda’s ECU. Various software solutions are available, each offering unique features and capabilities tailored to different diagnostic needs.
5.1. Open Source Software (ScanTool.net)
ScanTool.net provides open-source diagnostic software compatible with various OBD protocols. This software can be used with standard Elm327-based scan tools to read and clear diagnostic trouble codes (DTCs), view live data, and perform basic diagnostic tests. Open-source software is beneficial for users who want to customize their diagnostic experience and have access to the underlying code.
5.2. Honda-Specific Software (Hondash)
Hondash is a software designed specifically for Honda vehicles, offering enhanced diagnostic capabilities beyond standard OBD2 functions. It allows users to access Honda-specific diagnostic codes, perform advanced tests, and even reprogram certain ECU parameters. Hondash software may require a specific DLC connector sold by Hondash.
5.3. Professional Diagnostic Software (Autel, Launch)
Professional diagnostic software like Autel MaxiSys and Launch X431 offer comprehensive diagnostic solutions for a wide range of vehicles, including older Hondas. These tools provide advanced features such as bi-directional control, ECU programming, and detailed diagnostic reports. While they are more expensive than open-source or Honda-specific software, they offer a higher level of functionality and support for complex diagnostic tasks.
5.4. Using Data Logging for Intermittent Issues
Data logging is a valuable technique for diagnosing intermittent issues that may not trigger diagnostic codes consistently. By recording live data from the ECU over a period of time, you can identify patterns and anomalies that may indicate a problem. Many OBD2 scanners and diagnostic software packages offer data logging capabilities, allowing you to monitor parameters such as engine temperature, RPM, and sensor readings.
 Honda OBD2 Port
6. Interpreting Diagnostic Trouble Codes (DTCs)
Understanding and interpreting Diagnostic Trouble Codes (DTCs) is a critical aspect of automotive diagnostics. DTCs provide valuable information about the nature and location of faults within a vehicle’s systems. By accurately interpreting these codes, technicians and car owners can efficiently diagnose and repair issues.
6.1. Common Honda DTCs
Honda vehicles have specific DTCs that indicate various issues. Some common DTCs include:
- P0171: System Too Lean (Bank 1) – Indicates that the engine is running with too little fuel or too much air.
- P0300: Random/Multiple Cylinder Misfire Detected – Suggests that one or more cylinders are not firing correctly.
- P0420: Catalyst System Efficiency Below Threshold (Bank 1) – Indicates that the catalytic converter is not functioning efficiently.
- P0505: Idle Air Control System Malfunction – Suggests an issue with the idle air control system, affecting the engine’s idle speed.
- P0135: O2 Sensor Heater Circuit Malfunction (Bank 1, Sensor 1) – Indicates a problem with the oxygen sensor heater circuit.
6.2. Understanding Code Definitions and Severity
Each DTC has a specific definition that explains the nature of the fault. It’s essential to understand the definition to accurately diagnose the issue. Additionally, DTCs have different levels of severity:
- Informational Codes: Provide general information about the vehicle’s condition.
- Minor Codes: Indicate a minor issue that may not immediately affect the vehicle’s performance.
- Major Codes: Indicate a significant issue that can affect the vehicle’s performance and may cause damage if left unaddressed.
6.3. Using Repair Manuals and Online Resources
To accurately interpret DTCs, it’s helpful to use repair manuals and online resources. Repair manuals provide detailed information about the vehicle’s systems and components, as well as troubleshooting steps for specific DTCs. Online resources, such as automotive forums and diagnostic websites, can offer additional insights and tips from experienced technicians and car owners.
CAR-DIAGNOSTIC-TOOL.EDU.VN offers a comprehensive database of DTCs and repair guides to assist you in diagnosing and resolving issues with your Honda.
7. Advanced Diagnostic Techniques
Advanced diagnostic techniques are crucial for addressing complex issues that may not be easily resolved through standard diagnostic procedures. These techniques involve using specialized tools, software, and methods to delve deeper into the vehicle’s systems and pinpoint the root cause of the problem.
7.1. Live Data Analysis
Live data analysis involves monitoring real-time data from the vehicle’s sensors and systems to identify anomalies and patterns that may indicate a problem. By observing parameters such as engine temperature, RPM, fuel trim, and oxygen sensor readings, you can gain valuable insights into the vehicle’s performance and identify potential issues.
7.2. Bi-Directional Control
Bi-directional control allows you to send commands to the vehicle’s systems and components to test their functionality. This technique can be used to activate actuators, solenoids, and other devices to verify that they are working correctly. For example, you can use bi-directional control to activate the fuel pump, cycle the ABS system, or control the cooling fans.
7.3. ECU Programming and Reflashing
ECU programming and reflashing involve updating or modifying the vehicle’s Engine Control Unit (ECU) software. This can be done to improve performance, address software glitches, or install updated calibrations. ECU programming requires specialized tools and software and should be performed by trained professionals.
7.4. Using Oscilloscopes for Signal Analysis
Oscilloscopes are valuable tools for analyzing electrical signals within a vehicle’s systems. By displaying the voltage and time characteristics of a signal, you can identify issues such as signal dropouts, noise, and incorrect waveforms. Oscilloscopes are particularly useful for diagnosing sensor problems, wiring issues, and communication faults.
According to automotive diagnostic expert Mike Meyers, mastering advanced diagnostic techniques is essential for tackling complex automotive issues and providing effective solutions.
8. Common Pitfalls and How to Avoid Them
When connecting a Honda 3-pin to an OBD2 scanner, several common pitfalls can lead to frustration and inaccurate diagnostics. Being aware of these potential issues and knowing how to avoid them can save time and ensure a successful connection.
8.1. Incorrect Adapter Selection
Using the wrong adapter is a common mistake. Not all 3-pin to OBD2 adapters are created equal. Some may not support the correct communication protocol or may have wiring issues. Always verify that the adapter is specifically designed for Honda vehicles and supports the ISO 9141 K-Line protocol.
8.2. Power Supply Issues
Power supply issues can prevent the OBD2 scanner from communicating with the ECU. Ensure that the adapter and scanner are receiving adequate power. Check the vehicle’s battery voltage and the condition of the DLC connector. A weak battery or corroded connector can cause communication problems.
8.3. Software Incompatibility
Software incompatibility is another common pitfall. Not all OBD2 scanners and software are compatible with older Honda vehicles. Verify that the scanner supports the ISO 9141 protocol and any Honda-specific diagnostic functions.
8.4. Incorrect Pinout Configuration
An incorrect pinout configuration can lead to communication errors or even damage to the vehicle’s ECU. Always verify the pinouts of the 3-pin DLC before connecting any adapter. Use a multimeter to check the continuity and voltage of each pin.
8.5. Communication Protocol Mismatches
Communication protocol mismatches can occur if the OBD2 scanner is not configured to use the correct protocol. Ensure that the scanner is set to use the ISO 9141 protocol for older Honda vehicles. Consult the scanner’s manual for instructions on selecting the correct protocol.
According to automotive diagnostic expert David Jones, understanding and avoiding these common pitfalls is essential for ensuring accurate and reliable diagnostics.
9. Case Studies: Successful Honda 3-Pin to OBD2 Conversions
Examining real-world case studies can provide valuable insights into the process of converting Honda 3-pin DLCs to OBD2 and troubleshooting common issues. These examples highlight the importance of careful preparation, correct adapter selection, and systematic troubleshooting.
9.1. 1995 Honda Civic Diagnostic Conversion
A technician encountered issues while trying to diagnose a 1995 Honda Civic with a 3-pin DLC. The initial attempt to connect an OBD2 scanner using a generic adapter failed. After researching the issue, the technician discovered that the adapter did not properly support the ISO 9141 K-Line protocol used by the Civic. By switching to an adapter specifically designed for Honda vehicles and ensuring the scanner was set to the correct protocol, the technician successfully established a connection and diagnosed the issue.
9.2. 1998 Honda CR-V ECU Data Retrieval
A car owner wanted to retrieve ECU data from a 1998 Honda CR-V with a combination of 2-pin and 3-pin DLCs. The owner purchased a 3-pin to OBD2 adapter but struggled to get the scanner to communicate with the ECU. After consulting online forums, the owner learned that the 1998 CR-V required a specific adapter that connected both the 2-pin and 3-pin DLCs to the OBD2 scanner. By using the correct adapter and following the scanner’s instructions, the owner successfully retrieved the ECU data.
9.3. 2000 Honda Accord Intermittent Fault Diagnosis
A mechanic was tasked with diagnosing an intermittent fault in a 2000 Honda Accord. The vehicle had a standard OBD2 port, but the mechanic suspected that the issue might be related to the vehicle’s earlier 3-pin DLC wiring. The mechanic used a 3-pin to OBD2 adapter to connect to the 3-pin DLC and monitor the vehicle’s sensors and systems. By analyzing the live data, the mechanic identified a faulty sensor that was causing the intermittent fault.
These case studies illustrate the importance of thorough research, proper equipment selection, and systematic troubleshooting when working with older Honda vehicles and their diagnostic connectors.
10. Leveraging CAR-DIAGNOSTIC-TOOL.EDU.VN for Your Diagnostic Needs
CAR-DIAGNOSTIC-TOOL.EDU.VN is your ultimate resource for all things related to automotive diagnostics, offering a wealth of information, tools, and support to help you tackle any diagnostic challenge with confidence.
10.1. Accessing Detailed Guides and Tutorials
CAR-DIAGNOSTIC-TOOL.EDU.VN provides detailed guides and tutorials on a wide range of diagnostic topics, including Honda 3-pin to OBD2 conversions, DTC interpretation, and advanced diagnostic techniques. Our guides are written by experienced technicians and are designed to be easy to understand and follow.
10.2. Utilizing Remote Support for Complex Issues
If you encounter complex diagnostic issues that you can’t resolve on your own, CAR-DIAGNOSTIC-TOOL.EDU.VN offers remote support services. Our team of expert technicians can remotely access your diagnostic equipment and provide real-time assistance to help you diagnose and fix the problem.
10.3. Enrolling in Technician Training Programs
To enhance your diagnostic skills and stay up-to-date with the latest technologies, consider enrolling in our technician training programs. We offer a variety of courses covering topics such as OBD2 diagnostics, ECU programming, and advanced troubleshooting techniques. Our training programs are designed to provide you with the knowledge and skills you need to excel in the automotive industry.
10.4. Staying Updated with the Latest Diagnostic Technologies
CAR-DIAGNOSTIC-TOOL.EDU.VN is committed to keeping you informed about the latest diagnostic technologies and trends. We regularly update our website with articles, videos, and product reviews to help you stay ahead of the curve.
Don’t let diagnostic challenges hold you back. Contact CAR-DIAGNOSTIC-TOOL.EDU.VN today at Whatsapp: +1 (641) 206-8880 or visit our office at 1100 Congress Ave, Austin, TX 78701, United States, and let our team of experts guide you to the right tools, knowledge, and support you need to succeed. With CAR-DIAGNOSTIC-TOOL.EDU.VN, you can transform your diagnostic capabilities and deliver exceptional service to your customers.
FAQ: Honda 3-Pin to OBD2 Conversion
1. What is a Honda 3-pin DLC?
A Honda 3-pin DLC (Data Link Connector) is an early diagnostic port found in older Honda vehicles, typically pre-1996, consisting of three pins: K-Line, B+, and Ground, used for accessing ECU data.
2. Why do I need to convert a Honda 3-pin to OBD2?
You need to convert a Honda 3-pin to OBD2 for compatibility with modern diagnostic tools that use the OBD2 standard, which provides access to a wide range of diagnostic data and streamlines the diagnostic process.
3. How do I identify the DLC connector on my Honda?
You can identify the DLC connector on your Honda by checking under the dashboard, in the driver’s side footwell, or near the center console for a 3-pin connector, a 2+3 pin connector, or a 16-pin OBD2 connector.
4. What type of adapter do I need for Honda 3-pin to OBD2 conversion?
You need a 3-pin to OBD2 adapter specifically designed for Honda vehicles that supports the ISO 9141 K-Line protocol to ensure proper communication between the older Honda DLC and the OBD2 scanner.
5. Can any OBD2 scanner be used with older Hondas after the conversion?
No, not all OBD2 scanners are compatible; you need a scanner that supports the ISO 9141 protocol and, ideally, Honda-specific diagnostic codes for accurate data retrieval from older Hondas.
6. What are some common issues during Honda 3-pin to OBD2 conversion?
Common issues include incorrect adapter selection, power supply problems, software incompatibility, incorrect pinout configuration, and communication protocol mismatches, which can be avoided by verifying compatibility and connections.
7. How can I verify the pinouts of the Honda 3-pin DLC?
You can verify the pinouts of the Honda 3-pin DLC using a multimeter to check the continuity and voltage of each pin (K-Line, B+, and Ground), ensuring they match the vehicle’s wiring diagram.
8. What software is recommended for diagnosing older Honda vehicles?
Recommended software includes open-source options like ScanTool.net, Honda-specific software like Hondash, and professional diagnostic software like Autel MaxiSys, each offering different levels of functionality and compatibility.
9. How can CAR-DIAGNOSTIC-TOOL.EDU.VN help with my Honda diagnostic needs?
CAR-DIAGNOSTIC-TOOL.EDU.VN offers detailed guides, remote support, technician training programs, and updates on the latest diagnostic technologies to help you effectively diagnose and resolve issues with your Honda.
10. Where can I get support if I encounter issues during the conversion process?
If you encounter issues, you can contact CAR-DIAGNOSTIC-TOOL.EDU.VN for remote support at Whatsapp: +1 (641) 206-8880 or visit our office at 1100 Congress Ave, Austin, TX 78701, United States, for expert assistance and guidance.