Want to know How To Test Obd2 Alternator? CAR-DIAGNOSTIC-TOOL.EDU.VN provides you with the ultimate guide on using OBD2 scanners and diagnostic tools to check your car’s alternator and electrical system. We’ll cover everything from interpreting error codes to live data analysis, ensuring you have the knowledge to diagnose issues accurately, with our detailed repair guides and remote support. Enhance your skills with our technician training programs, ensuring you’re always at the cutting edge of automotive technology, and we offer remote support to assist you every step of the way.
Contents
- 1. Understanding the Alternator’s Role in Your Vehicle
- 1.1 Why is the Alternator Important?
- 1.2 Common Symptoms of a Failing Alternator
- 1.3 The Impact of a Faulty Alternator
- 2. Can an OBD2 Scanner Diagnose Alternator Issues?
- 2.1 How OBD2 Scanners Work
- 2.2 Limitations of Using OBD2 Scanners for Alternator Diagnosis
- 2.3 Key Error Codes to Look For
- 3. Steps to Use an OBD2 Scanner to Check for Alternator Problems
- 3.1 Step 1: Prepare Your Vehicle and Scanner
- 3.2 Step 2: Connect the Foxwell NT1009 Scanner
- 3.3 Step 3: Navigating the Diagnostic Menu
- 3.4 Step 4: Check Error Codes
- 3.5 Step 5: Check Live Data for Voltage Output
- 3.6 Step 6: Perform Load Testing
- 3.7 Step 7: Utilize Special Testing Functions
- 3.8 Step 8: Analyze and Respond
- 3.9 Step 9: Unplug and Store the Scanner
- 4. Alternative Methods to Test Your Vehicle’s Alternator
- 4.1 Using a Multimeter
- 4.2 Performing a Load Test
- 4.3 Visual Inspection
- 5. Choosing the Right OBD2 Scanner for Alternator Testing
- 5.1 Key Features to Look For
- 5.2 Recommended OBD2 Scanners
- 5.3 Cost vs. Benefit
- 6. Common Mistakes to Avoid When Testing an Alternator
- 6.1 Incorrectly Interpreting Error Codes
- 6.2 Neglecting Visual Inspection
- 6.3 Failing to Perform Load Testing
- 6.4 Ignoring Battery Condition
- 6.5 Skipping Safety Precautions
- 7. Advanced Diagnostic Techniques for Alternator Issues
- 7.1 Oscilloscope Testing
- 7.2 Circuit Testing
- 7.3 Using a Scan Tool with Advanced Features
- 8. When to Seek Professional Help
- 8.1 Complex Electrical Issues
- 8.2 Lack of Experience
- 8.3 Specialized Equipment Needed
- 9. Maintaining Your Vehicle’s Electrical System
- 9.1 Regular Battery Testing
- 9.2 Checking and Cleaning Connections
- 9.3 Inspecting Belts and Hoses
- 9.4 Avoiding Excessive Electrical Load
- 10. FAQs About Testing an Alternator with an OBD2 Scanner
- 10.1 Can you test an alternator with an OBD2 scanner?
- 10.2 Will a bad alternator show up on a scan?
- 10.3 Is there an OBD code for alternator?
- 10.4 How accurate is an OBD2 scanner for diagnosing alternator problems?
- 10.5 What voltage should I see on my OBD2 scanner when testing the alternator?
- 10.6 Can I clear alternator-related codes with an OBD2 scanner?
- 10.7 What other tools do I need besides an OBD2 scanner to test an alternator?
- 10.8 How often should I test my alternator?
- 10.9 Can an OBD2 scanner detect intermittent alternator problems?
- 10.10 Is it safe to drive with a failing alternator?
1. Understanding the Alternator’s Role in Your Vehicle
The alternator is a critical component of your car’s electrical system, responsible for charging the battery and powering various electrical components while the engine is running. Think of it as the heart of your car’s electrical system, ensuring everything gets the power it needs.
1.1 Why is the Alternator Important?
The alternator’s primary functions include:
- Charging the battery: Replenishes the battery’s charge after starting the engine.
- Powering electrical components: Supplies electricity to lights, radio, air conditioning, and other accessories.
According to a study by the National Renewable Energy Laboratory, a properly functioning alternator is essential for maintaining the overall health and performance of a vehicle’s electrical system.
1.2 Common Symptoms of a Failing Alternator
Recognizing the symptoms of a failing alternator can save you from unexpected breakdowns and costly repairs. Common signs include:
- Dimming headlights: Indicates that the alternator is not providing enough power to the electrical system.
- Slow engine start-up: A weak alternator may not adequately charge the battery, leading to difficulty starting the engine.
- Dead battery: If the alternator fails, the battery will not be charged, resulting in a dead battery.
- Unusual noises: Whining or grinding sounds from the alternator may indicate worn bearings or other internal issues.
- Warning lights: The battery or alternator warning light on the dashboard may illuminate.
1.3 The Impact of a Faulty Alternator
A faulty alternator can lead to several problems, including:
- Vehicle stalling: Insufficient power supply can cause the engine to stall.
- Electrical system failure: Components like lights, radio, and air conditioning may stop working.
- Battery damage: A failing alternator can overcharge or undercharge the battery, leading to reduced lifespan.
2. Can an OBD2 Scanner Diagnose Alternator Issues?
Yes, an OBD2 scanner can be used to diagnose alternator issues, but it has limitations. It can provide valuable information by reading trouble codes and monitoring live data, helping you identify potential problems.
2.1 How OBD2 Scanners Work
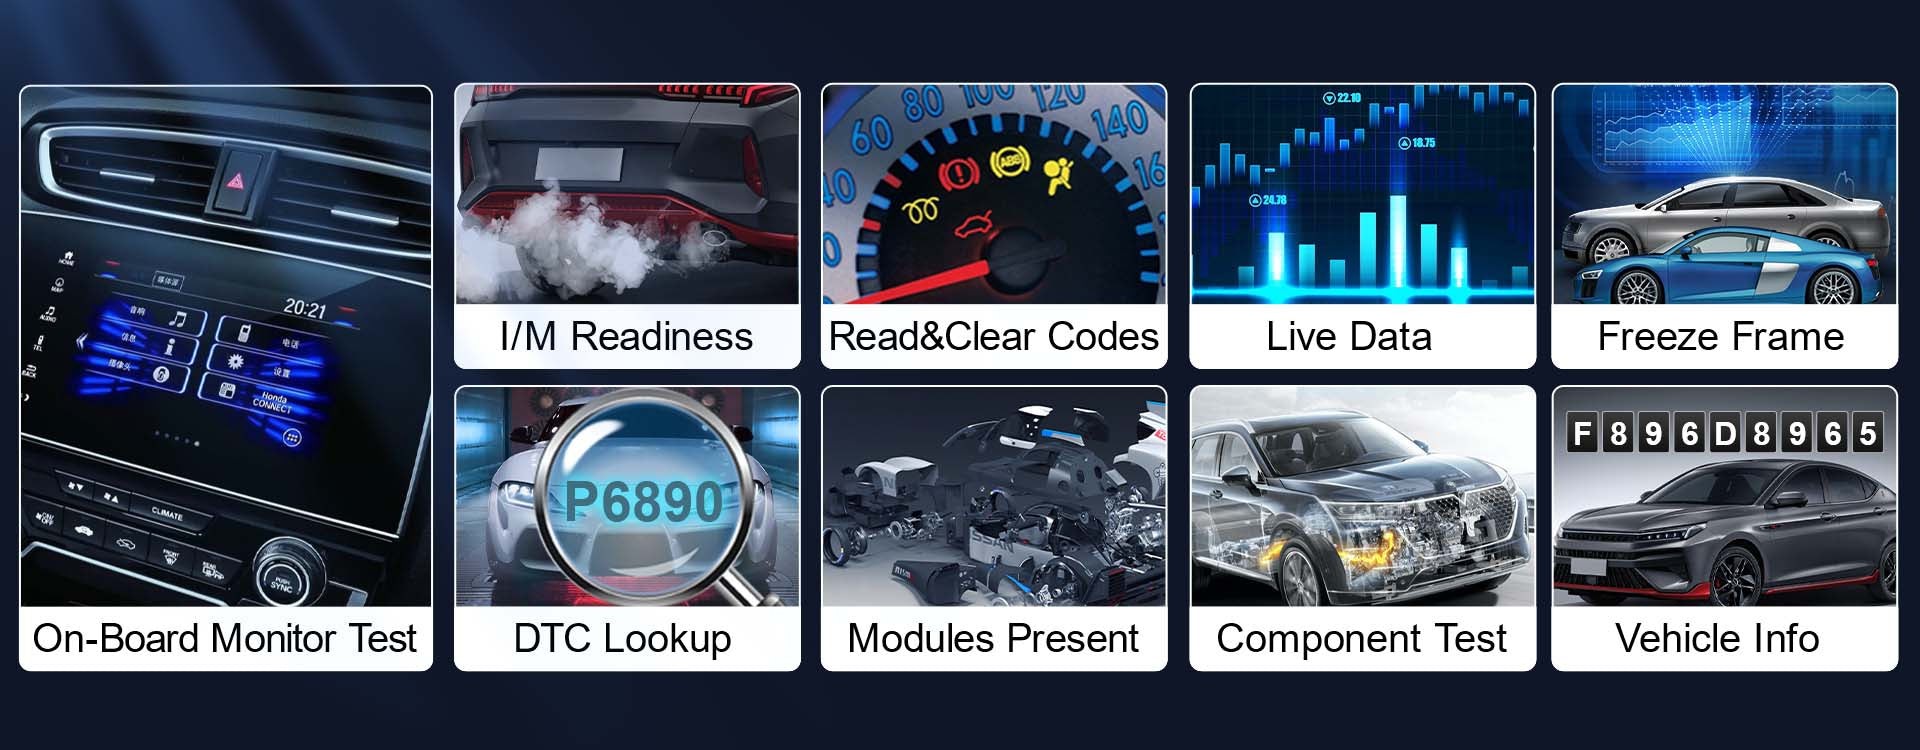
OBD2 scanners connect to your vehicle’s onboard computer system, accessing diagnostic information related to various components, including the electrical system. They work by:
- Reading trouble codes: Identifying stored codes that indicate electrical issues.
- Monitoring live data: Providing real-time information on voltage, current, and other parameters.
2.2 Limitations of Using OBD2 Scanners for Alternator Diagnosis
While OBD2 scanners are helpful, they may not directly identify a faulty alternator. Instead, they provide clues that guide you toward a diagnosis. Limitations include:
- Indirect diagnosis: OBD2 scanners often detect related electrical issues rather than pinpointing the alternator itself.
- Need for interpretation: Error codes and live data require interpretation to determine if the alternator is the root cause.
- Additional testing: Additional tests, such as multimeter testing or load testing, may be necessary for a definitive diagnosis.
2.3 Key Error Codes to Look For
When using an OBD2 scanner, be on the lookout for these key error codes that may indicate alternator issues:
- P0562 (System Voltage Low): Indicates that the system voltage is below the specified range.
- P0622 (Alternator Field Control Circuit Malfunction): Suggests a problem with the alternator’s control circuit.
- P0625 (Alternator Field Terminal Low): Indicates a low voltage reading at the alternator field terminal.
- P0626 (Alternator Field Terminal High): Indicates a high voltage reading at the alternator field terminal.
According to a report by the Automotive Research Association, understanding these codes can significantly aid in diagnosing alternator-related issues.
3. Steps to Use an OBD2 Scanner to Check for Alternator Problems
Using an OBD2 scanner to check for alternator problems involves several steps, from preparing your vehicle to analyzing the data. Here’s a detailed guide:
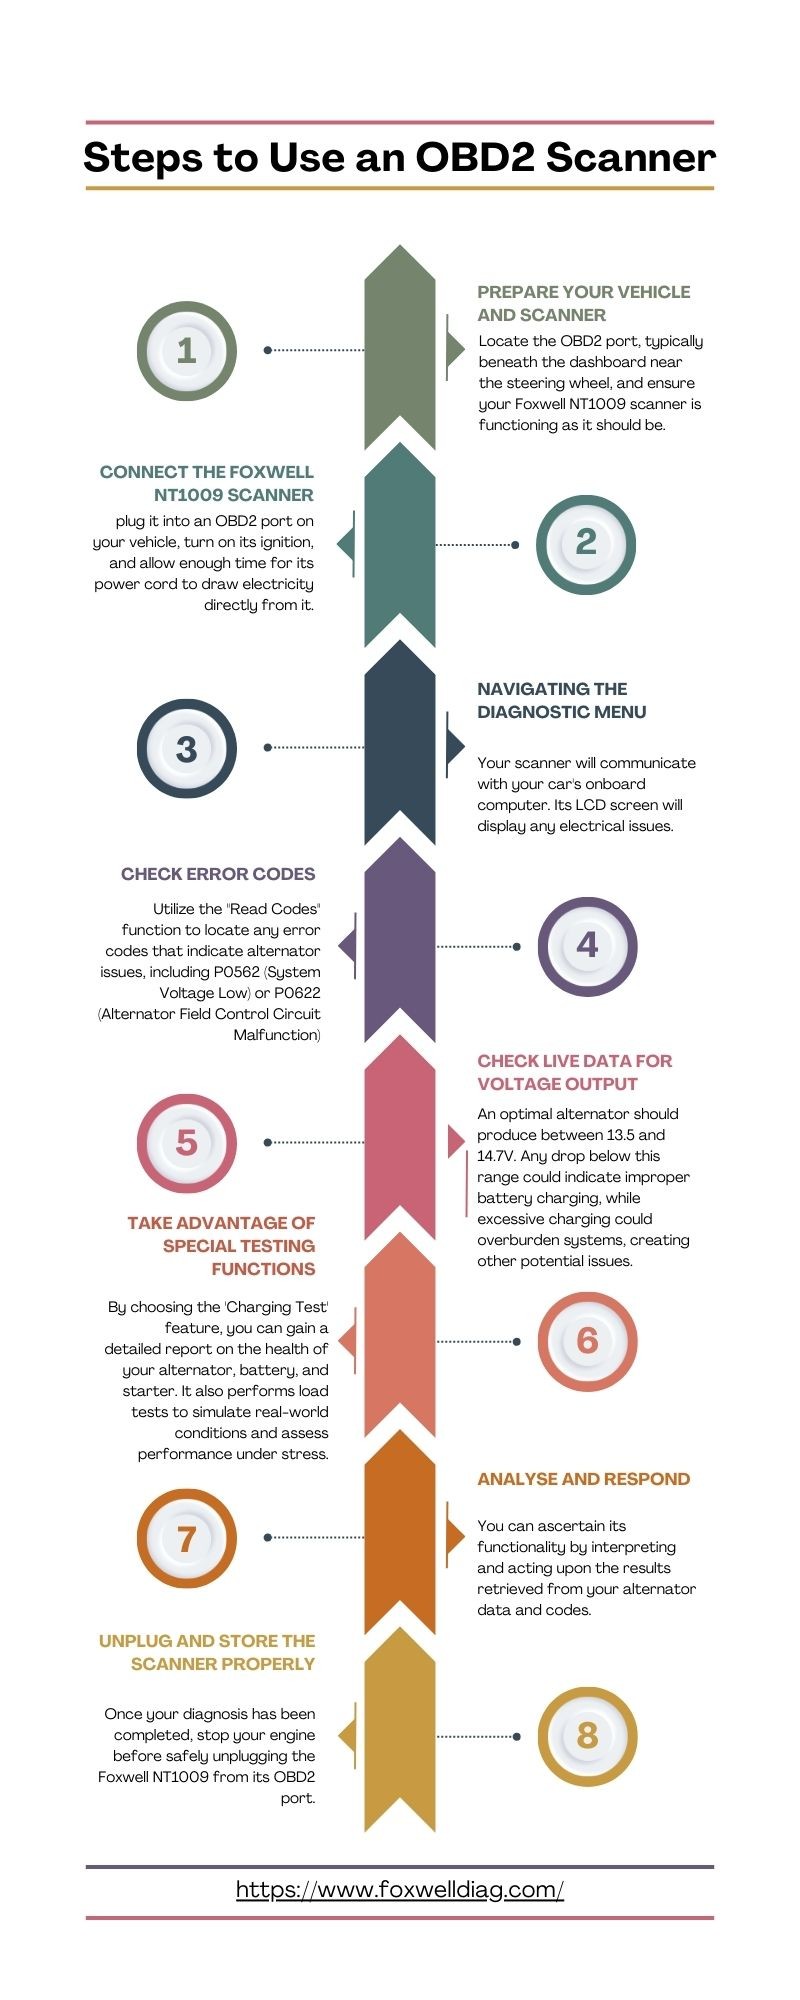
3.1 Step 1: Prepare Your Vehicle and Scanner
- Turn off all electrical accessories: Switch off headlights, radio, air conditioning, and other accessories to reduce electrical load.
- Locate the OBD2 port: Typically found under the dashboard near the steering wheel.
- Ensure your scanner is functioning: Check that your Foxwell NT1009 scanner is in good working condition.
3.2 Step 2: Connect the Foxwell NT1009 Scanner
- Plug in the scanner: Connect the Foxwell NT1009 scanner to the OBD2 port.
- Turn on the ignition: Turn the ignition to the “on” position without starting the engine.
- Allow initialization: Give the scanner time to initialize and establish communication with your vehicle’s computer system.
 Connecting Foxwell NT1009 Scanner to OBD2 Port for System Check
3.3 Step 3: Navigating the Diagnostic Menu
- Access the diagnostic section: Navigate the scanner’s menu to find the “Diagnostic” section.
- Enter vehicle information: Input your vehicle’s make, model, and year for accurate data retrieval.
- Initiate communication: Allow the scanner to communicate with your car’s onboard computer.
3.4 Step 4: Check Error Codes
- Select “Read Codes”: Use the “Read Codes” function to identify any stored error codes.
- Note relevant codes: Look for codes such as P0562 or P0622, which indicate potential alternator issues.
- Record the codes: Write down all relevant error codes for further analysis.
3.5 Step 5: Check Live Data for Voltage Output
- Start the engine: Start your vehicle’s engine.
- Access live data: Navigate to the live data or real-time data section of the scanner.
- Monitor voltage readings: Watch the voltage readings as they appear on the screen.
- Observe voltage range: An optimal alternator should produce between 13.5 and 14.7V.
3.6 Step 6: Perform Load Testing
- Engage electrical accessories: Turn on headlights, air conditioning, and other electrical accessories.
- Monitor voltage drop: Observe the voltage readings while the accessories are running.
- Assess alternator performance: A significant voltage drop under load may indicate an ineffective alternator.
3.7 Step 7: Utilize Special Testing Functions
- Access charging test feature: Choose the “Charging Test” option on the Foxwell NT1009.
- Run the test: Follow the on-screen prompts to perform a detailed charging system test.
- Review the report: Analyze the report to assess the health of the alternator, battery, and starter.
- Evaluate load performance: Evaluate how the alternator performs under simulated real-world conditions.
3.8 Step 8: Analyze and Respond
- Interpret the results: Determine the functionality of the alternator based on the data and codes retrieved.
- Assess voltage ranges: If readings fall within normal ranges, the alternator is likely functioning correctly.
- Identify issues: Consistently low or high voltage readings indicate the need for repair or replacement.
- Clear error codes: Use the scanner to clear any remaining error codes after making repairs.
3.9 Step 9: Unplug and Store the Scanner
- Stop the engine: Turn off your vehicle’s engine.
- Unplug the scanner: Safely disconnect the Foxwell NT1009 from the OBD2 port.
- Store properly: Store the scanner in a safe place for future use.
By following these steps, you can effectively use an OBD2 scanner to check for alternator problems and gain valuable insights into your vehicle’s electrical system.
4. Alternative Methods to Test Your Vehicle’s Alternator
If an OBD2 scanner doesn’t provide definitive answers, alternative methods can help you test your alternator, ensuring a comprehensive diagnosis.
4.1 Using a Multimeter
A multimeter is a straightforward tool for testing an alternator. Here’s how to use it:
- Prepare the multimeter: Set the multimeter to read DC voltage.
- Connect the leads: Connect the red (positive) lead to the positive terminal of the battery and the black (negative) lead to the negative terminal.
- Start the engine: Start your vehicle’s engine.
- Read the voltage: Observe the voltage reading on the multimeter. A reading between 13.5 and 14.7V indicates proper alternator functioning.
- Check under load: Turn on electrical accessories (headlights, AC) and check if the voltage remains within the specified range.
 Testing Alternator with Multimeter
4.2 Performing a Load Test
A load test provides a more in-depth examination of the alternator’s performance under increased electrical load. This test can be performed using a specific load testing tool or by a professional mechanic.
- Connect the load tester: Connect the load tester to the battery terminals.
- Start the engine: Start your vehicle’s engine.
- Apply load: Use the load tester to gradually increase the electrical load on the alternator.
- Monitor voltage: Observe the voltage readings as the load increases. The voltage should remain within the specified range (13.5-14.7V).
- Analyze results: If the voltage drops significantly under load, it indicates that the alternator is not performing optimally and may need to be replaced.
4.3 Visual Inspection
A visual inspection can sometimes reveal obvious issues with the alternator. Look for the following:
- Physical damage: Check for cracks, dents, or other visible damage to the alternator housing.
- Loose connections: Ensure that all electrical connections are secure and free from corrosion.
- Worn belts: Inspect the alternator belt for wear, cracks, or looseness. A worn belt can cause the alternator to function improperly.
5. Choosing the Right OBD2 Scanner for Alternator Testing
Selecting the right OBD2 scanner is essential for accurate and effective alternator testing. Consider the following factors when choosing a scanner:
5.1 Key Features to Look For
- Live data streaming: Ability to monitor real-time voltage, current, and other parameters.
- Error code reading and clearing: Capability to read and clear diagnostic trouble codes (DTCs).
- Special testing functions: Specific tests for the charging system, such as alternator and battery tests.
- User-friendly interface: An intuitive interface that makes it easy to navigate and interpret data.
- Compatibility: Compatibility with a wide range of vehicle makes and models.
5.2 Recommended OBD2 Scanners
- Foxwell NT1009: A reliable scanner with live data streaming and special testing functions.
- Innova 3100rs: Offers comprehensive diagnostic capabilities and user-friendly interface.
- Autel AL519: Provides detailed diagnostic information and supports a wide range of vehicles.
CAR-DIAGNOSTIC-TOOL.EDU.VN offers detailed reviews and comparisons of various OBD2 scanners, helping you make an informed decision based on your specific needs.
5.3 Cost vs. Benefit
Consider the cost of the OBD2 scanner in relation to the benefits it provides. A higher-priced scanner may offer more advanced features and capabilities, but a more affordable option may be sufficient for basic alternator testing.
According to a study by the American Automobile Association (AAA), investing in a quality OBD2 scanner can save you money in the long run by enabling you to diagnose and address issues early on, preventing costly repairs.
6. Common Mistakes to Avoid When Testing an Alternator
Avoiding common mistakes during alternator testing can ensure accurate results and prevent potential damage to your vehicle’s electrical system.
6.1 Incorrectly Interpreting Error Codes
- Understand the codes: Always refer to the vehicle’s service manual or a reliable online resource to understand the meaning of each error code.
- Consider related issues: Keep in mind that error codes can sometimes be triggered by related issues rather than the alternator itself.
- Verify the codes: Double-check the codes using a different scanner or testing method to ensure accuracy.
6.2 Neglecting Visual Inspection
- Check for damage: Always perform a thorough visual inspection of the alternator, looking for physical damage, loose connections, and worn belts.
- Address issues: Address any visible issues before proceeding with further testing.
6.3 Failing to Perform Load Testing
- Simulate real-world conditions: Load testing is essential for assessing the alternator’s performance under increased electrical load.
- Use appropriate tools: Use a load tester or engage electrical accessories to simulate real-world conditions.
- Monitor voltage: Monitor the voltage readings closely to identify any significant voltage drops.
6.4 Ignoring Battery Condition
- Check the battery: A weak or faulty battery can affect the alternator’s performance.
- Test the battery: Test the battery’s voltage and load capacity before testing the alternator.
- Replace if necessary: Replace the battery if it is not functioning properly.
6.5 Skipping Safety Precautions
- Disconnect the battery: Disconnect the negative battery terminal before working on the electrical system to prevent electrical shocks.
- Wear safety glasses: Wear safety glasses to protect your eyes from debris and electrical sparks.
- Use insulated tools: Use insulated tools to prevent electrical shocks.
7. Advanced Diagnostic Techniques for Alternator Issues
For complex alternator issues, advanced diagnostic techniques can provide more detailed insights and help pinpoint the root cause of the problem.
7.1 Oscilloscope Testing
An oscilloscope can be used to analyze the alternator’s voltage waveform, providing information about its performance and identifying potential issues.
- Connect the oscilloscope: Connect the oscilloscope to the alternator’s output terminal.
- Start the engine: Start your vehicle’s engine.
- Analyze the waveform: Observe the voltage waveform on the oscilloscope. A healthy alternator should produce a smooth, consistent waveform.
- Identify issues: Irregularities in the waveform can indicate issues such as diode failure or regulator problems.
7.2 Circuit Testing
Circuit testing involves checking the continuity and voltage of the alternator’s wiring harness and connections to identify any shorts, opens, or high resistance.
- Check continuity: Use a multimeter to check the continuity of the wiring harness.
- Measure voltage: Measure the voltage at various points in the circuit to identify any voltage drops.
- Repair or replace: Repair or replace any damaged wiring or connections.
7.3 Using a Scan Tool with Advanced Features
Some advanced scan tools offer specialized features for diagnosing alternator issues, such as:
- Component testing: Ability to activate and test individual components of the alternator.
- Guided diagnostics: Step-by-step instructions for diagnosing specific alternator issues.
- Data logging: Ability to record and analyze data over time.
8. When to Seek Professional Help
While you can perform basic alternator testing using an OBD2 scanner and other methods, there are times when it’s best to seek professional help.
8.1 Complex Electrical Issues
If you encounter complex electrical issues that you’re unable to diagnose or resolve on your own, it’s best to consult a qualified mechanic.
- Difficult to diagnose: Issues that are difficult to diagnose or require specialized knowledge and equipment.
- Safety concerns: Electrical issues that pose a safety risk.
- Time constraints: Lack of time or resources to perform the necessary repairs.
8.2 Lack of Experience
If you lack experience working on automotive electrical systems, it’s best to leave alternator testing and repairs to a professional.
- Potential for damage: Improper testing or repairs can damage your vehicle’s electrical system.
- Safety risks: Working with electrical systems can be dangerous if you’re not properly trained.
- Warranty concerns: Repairs performed by non-professionals may void your vehicle’s warranty.
8.3 Specialized Equipment Needed
Some alternator issues require specialized equipment to diagnose and repair, such as oscilloscopes, load testers, and advanced scan tools.
- Access to equipment: Professional mechanics have access to the necessary equipment.
- Expertise: They have the expertise to use the equipment effectively.
- Accurate diagnosis: They can provide an accurate diagnosis and recommend the appropriate repairs.
9. Maintaining Your Vehicle’s Electrical System
Proper maintenance of your vehicle’s electrical system can help prevent alternator issues and extend the life of your battery.
9.1 Regular Battery Testing
- Test the battery: Test the battery’s voltage and load capacity at least twice a year.
- Replace if necessary: Replace the battery if it’s not functioning properly.
9.2 Checking and Cleaning Connections
- Inspect connections: Inspect the battery terminals and electrical connections for corrosion.
- Clean connections: Clean any corroded connections with a wire brush and battery terminal cleaner.
- Apply protectant: Apply a battery terminal protectant to prevent future corrosion.
9.3 Inspecting Belts and Hoses
- Check belts: Inspect the alternator belt for wear, cracks, or looseness.
- Replace belts: Replace worn or damaged belts promptly.
- Check hoses: Check the coolant hoses for leaks or damage.
- Replace hoses: Replace any leaking or damaged hoses.
9.4 Avoiding Excessive Electrical Load
- Limit accessory use: Avoid using excessive electrical accessories, especially when the engine is idling.
- Turn off lights: Turn off headlights and other lights when they’re not needed.
- Unplug devices: Unplug electronic devices when they’re not in use.
10. FAQs About Testing an Alternator with an OBD2 Scanner
10.1 Can you test an alternator with an OBD2 scanner?
Yes, an OBD2 scanner can help you test an alternator by reading trouble codes and monitoring live voltage data. However, it may not give a direct diagnosis, so you might need to combine it with other testing methods for a complete assessment.
10.2 Will a bad alternator show up on a scan?
A bad alternator can trigger related trouble codes on a scan, such as low system voltage or issues with the alternator’s circuit. While it won’t specifically say “bad alternator,” the codes can indicate a problem that requires further investigation.
10.3 Is there an OBD code for alternator?
Yes, there are OBD codes that relate to alternator issues. Common ones include P0562 (System Voltage Low) and P0622 (Alternator Field Control Circuit Malfunction), which can signal that your alternator isn’t working properly.
10.4 How accurate is an OBD2 scanner for diagnosing alternator problems?
An OBD2 scanner is a valuable tool, but its accuracy depends on how the data is interpreted. It provides indirect clues, so combining it with other testing methods like a multimeter or load test ensures a more accurate diagnosis.
10.5 What voltage should I see on my OBD2 scanner when testing the alternator?
When testing the alternator, you should see a voltage range between 13.5 and 14.7 volts on your OBD2 scanner. This indicates that the alternator is charging the battery properly.
10.6 Can I clear alternator-related codes with an OBD2 scanner?
Yes, you can clear alternator-related codes with an OBD2 scanner after you have addressed the underlying issue. However, if the problem persists, the codes will reappear.
10.7 What other tools do I need besides an OBD2 scanner to test an alternator?
Besides an OBD2 scanner, you may need a multimeter to check voltage and continuity, a load tester to assess alternator performance under load, and basic hand tools for visual inspection and disassembly.
10.8 How often should I test my alternator?
You should test your alternator if you notice any signs of electrical issues, such as dimming lights or a slow-starting engine. Regular testing, such as during routine maintenance, can also help catch problems early.
10.9 Can an OBD2 scanner detect intermittent alternator problems?
An OBD2 scanner can sometimes detect intermittent alternator problems by capturing stored codes or by monitoring live data during the occurrence of the issue. However, intermittent issues can be more challenging to diagnose.
10.10 Is it safe to drive with a failing alternator?
It is not recommended to drive with a failing alternator, as it can lead to a complete electrical system failure and leave you stranded. Additionally, it can damage other components, such as the battery.
By understanding these FAQs, you can better utilize your OBD2 scanner and other tools to diagnose and address alternator issues effectively.
Want to learn more and get expert advice? Contact CAR-DIAGNOSTIC-TOOL.EDU.VN today for personalized guidance and solutions for all your automotive diagnostic needs. Our team is ready to assist you with top-notch tools, detailed repair guides, and remote support. Reach out via WhatsApp at +1 (641) 206-8880, visit our website CAR-DIAGNOSTIC-TOOL.EDU.VN, or stop by our office at 1100 Congress Ave, Austin, TX 78701, United States. Let us help you keep your vehicle running smoothly and efficiently!